Pages

Pages

Pages

Wednesday, May 25, 2022

Tiny Rose Embroidery, Stem stitch rose

 Hi all 

Hope all are doing well and good.  Today I am happy to share with you the tutorial to embroider a tiny rose using stem stitch.  Hope all of you will like it. 

I am taking 6 strands of thread and two colours of thread.  The centre of the flower is done using a small knot.  Let's move on to the tutorial.

Video Tutorial Here

1)  Start with a small square.

2)  Bring the thread up at 1, In at 2 and again up at 3

3)  Pull through the thread.  You will get a straight stitch like the one below. 

4)  Pass the needle under the straight stitch with the tip of the needle pointing upwards and working thread below

5)  Pull through the thread and put the needle in at the 4th corner.

6)  Pull through the thread and you will get a small 'x' like structure with a knot in the centre and four legs.

7)  Bring the needle up between any two legs

8)  Pass the thread under the any one tail and pull through.

9)  Like wise pass the needle under the other three tails also with the thread under the needle.


10)  After passing the thread through the fourth tail pass the needle through the fabric and pick up a small stitch and pull through the thread with the thread under the needle. 

11)  Anchor the first color above the last stitch

12)  A tiny knotted centre is formed.  

13)  Bring the thread up with the second colour at any one point around the tiny knot.

14)  Start doing the stem stitches around the tiny knot till you get the desired size of the rose. 


15)  Anchor the thread.

After 5 rounds of stem stitches my rose looks like this.

Add some leaves and your tiny rose is ready.  I have added lazy daisy leaves.

You can use this tiny motif as an all over design in your dresses.  Or you can add 3 or 4 roses next to each other as a bunch.  You can also add a bead or pearl in the centre as an embellishment. 

Hope all of you like this.  Try this rose in your dresses.  If you want to see the video tutorial for this rose click here

I will be back with another interesting tutorial soon.  Till then have a nice day.

Friday, May 20, 2022

Floral Embroidery Heart finish - Part 2

 Hi all

Hope all are doing well and good.  On Monday I have posted the part 1 of a floral embroidery heart design. Today I have completed it and happy to share with you all.  Have a look at it.


Leaves - Satin stitch
End of stems - Satin stitch outlined with back stitch
The circles that takes the heart shape - Satin shape.

The direction of the satin stitch circles takes the shape of the design.  All the stitches are done using 3 strands. 

Video tutorial


Part 1 of the design can be found here.  Pattern can also be found there.    Hope all of you like this design.  I will be back with a mirror work in my next post.  Till then have a nice day.  

Tuesday, May 17, 2022

Checkered Chain Band - Embroidery Stitch Tutorial

 Hi all

Hope all are doing well and good.  Today I am happy to share with you the embroidery stitch tutorial for checkered chain band.  It looks a bit complicated with two set of threads.  This tutorial will give you clear and crisp instructions for doing the checkered chain band stitch.  It looks like magic chain stitch over straight lines.  

Let's move on to the tutorial.  In this tutorial I have used three different colour threads.  For the base blue colour is used.  2 more contrasting colour threads are threaded in two needles with the threads doubled.  I use 6 strands of thread.  

1)This stitch is done between two vertical lines that are spaced 1/4".  Now make horizontal stitches as shown with equal spacing.


2)  2 contrast colour threads threaded in the needle.  Threads should be doubled.

3)Bring the first thread up below the first straight stitch.  It should come up in the middle of the straight stitch.

4)Pass the first thread under the second straight stitch without picking up the fabric. Pull through the thread.

5)  Split the thread as shown above.

6)Bring the second colour thread up  in between the splited thread and below the second straight stitch and pull through.

7)  Now Split the second colour (Green) thread.

8)Bring the first colour thread(Pink) to the front(This is coming from inside the second colour).

9)  Pass the second colour thread under the next(third) straight stitch and pull through.

10)  Now split the first colour and bring the second colour to the front.

11)  Pass the first colour(Pink) under the next straight stitch and pull through.

12)  Split the second colour and bring the first colour to the front and pass the second colour under the next straight stitch.

Repeat the above step with the first and second colour alternatively till the end of the stitch line.

Bring the last colour that passes under the straight stitch to the front by splitting the other colour and anchor the thread that is splitted. In my case it is pink colour. 

Now anchor the other colour outside the pink loop.

A line of checkered Chain Band stitch is formed.  


Hope all of you find this tutorial useful.  I will be back soon with the finish of the embroidery floral heart in my next post.  Till then, happy embroidering and have a nice day. 

Monday, May 16, 2022

Floral Embroidery Heart Design - part 1

 Hi all

Hope all are doing well and good.  Today I am happy to share with you a floral embroidery design. This design is so simple with two flowers and circles.  The flowers as well as the circles takes the shape of a heart.  

I have completed a portion of the design and the video tutorial.  Let me show the design and the completed portion today.  


The flowers are worked using back stitch and then button hole stitches are worked by passing the thread through the back stitches.  Some straight stitches are added inside each petal.  Then the centre of the flower is filled using satin stitches.  

Anchor thread numbers
----------------------------------
Dark blue - 155
Light Blue - 154
Cream - 361
Green - 211

No of strands used
------------------------------
Back stitch  - 3 strands
Buttonhole stitch - 6 strands
Straight stitch - 6 strands
Satin stitch - 4 strands

Tomorrow we will see the working of the completed design.  till then have a nice day.

Tuesday, May 10, 2022

Embroidery Neck Design using Holbein Stitch

 Hi all

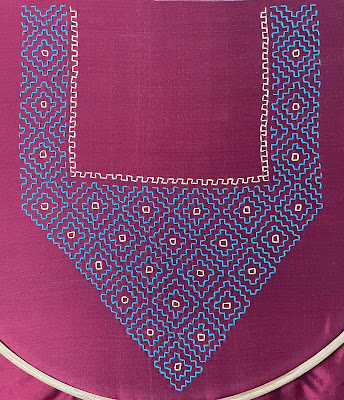
Hope all are doing well and good.  Today I am happy to share with you a neck design that I have designed for my kurti.  This is a very simple but elegant design that uses holbein stitch to embroider it. If you are new to embroidery and if you like geometrical designs you will surely love this design. 

The fabric I have used is silk cotton fabric.  I have used anchor embroidery thread numbers 1089 & 293.  I have used three strands of thread throughout the design. 

Let me show the neck design.  


Sleeves

Closeup of the design

Pattern for the design


You can print these pattern in an A4 paper.  No scaling is necessary.  Keep it under a tracing paper and draw the complete neck and then transfer it to the fabric.   I am providing this pattern for free.  Use it for your personal use.  If you want to share it please provide a link to this page.

You can see a similar pattern here.

If you want to see how this design is worked you can view the video in the link below.

Do check my other videos in the my youtube channel,

If you like my videos kindly subscribe and share it with your friends.   If any of you have tried this pattern send your embroidery to shamiimmanuel@gmail.com.  I will be happy to see them.