Showing posts with label Kasuti embroidery borders. Show all posts

Friday, August 19, 2022

Kasuti Embroidery Border Design 2

 Hi all

Hope all are doing well and good.  The simple 2nd border in kasuti embroidery with it's video tutorial.

Video Tutorial

Click below to see the other borders

Border 1

See you with the next border.  Till then have a nice day.

Saturday, April 2, 2022

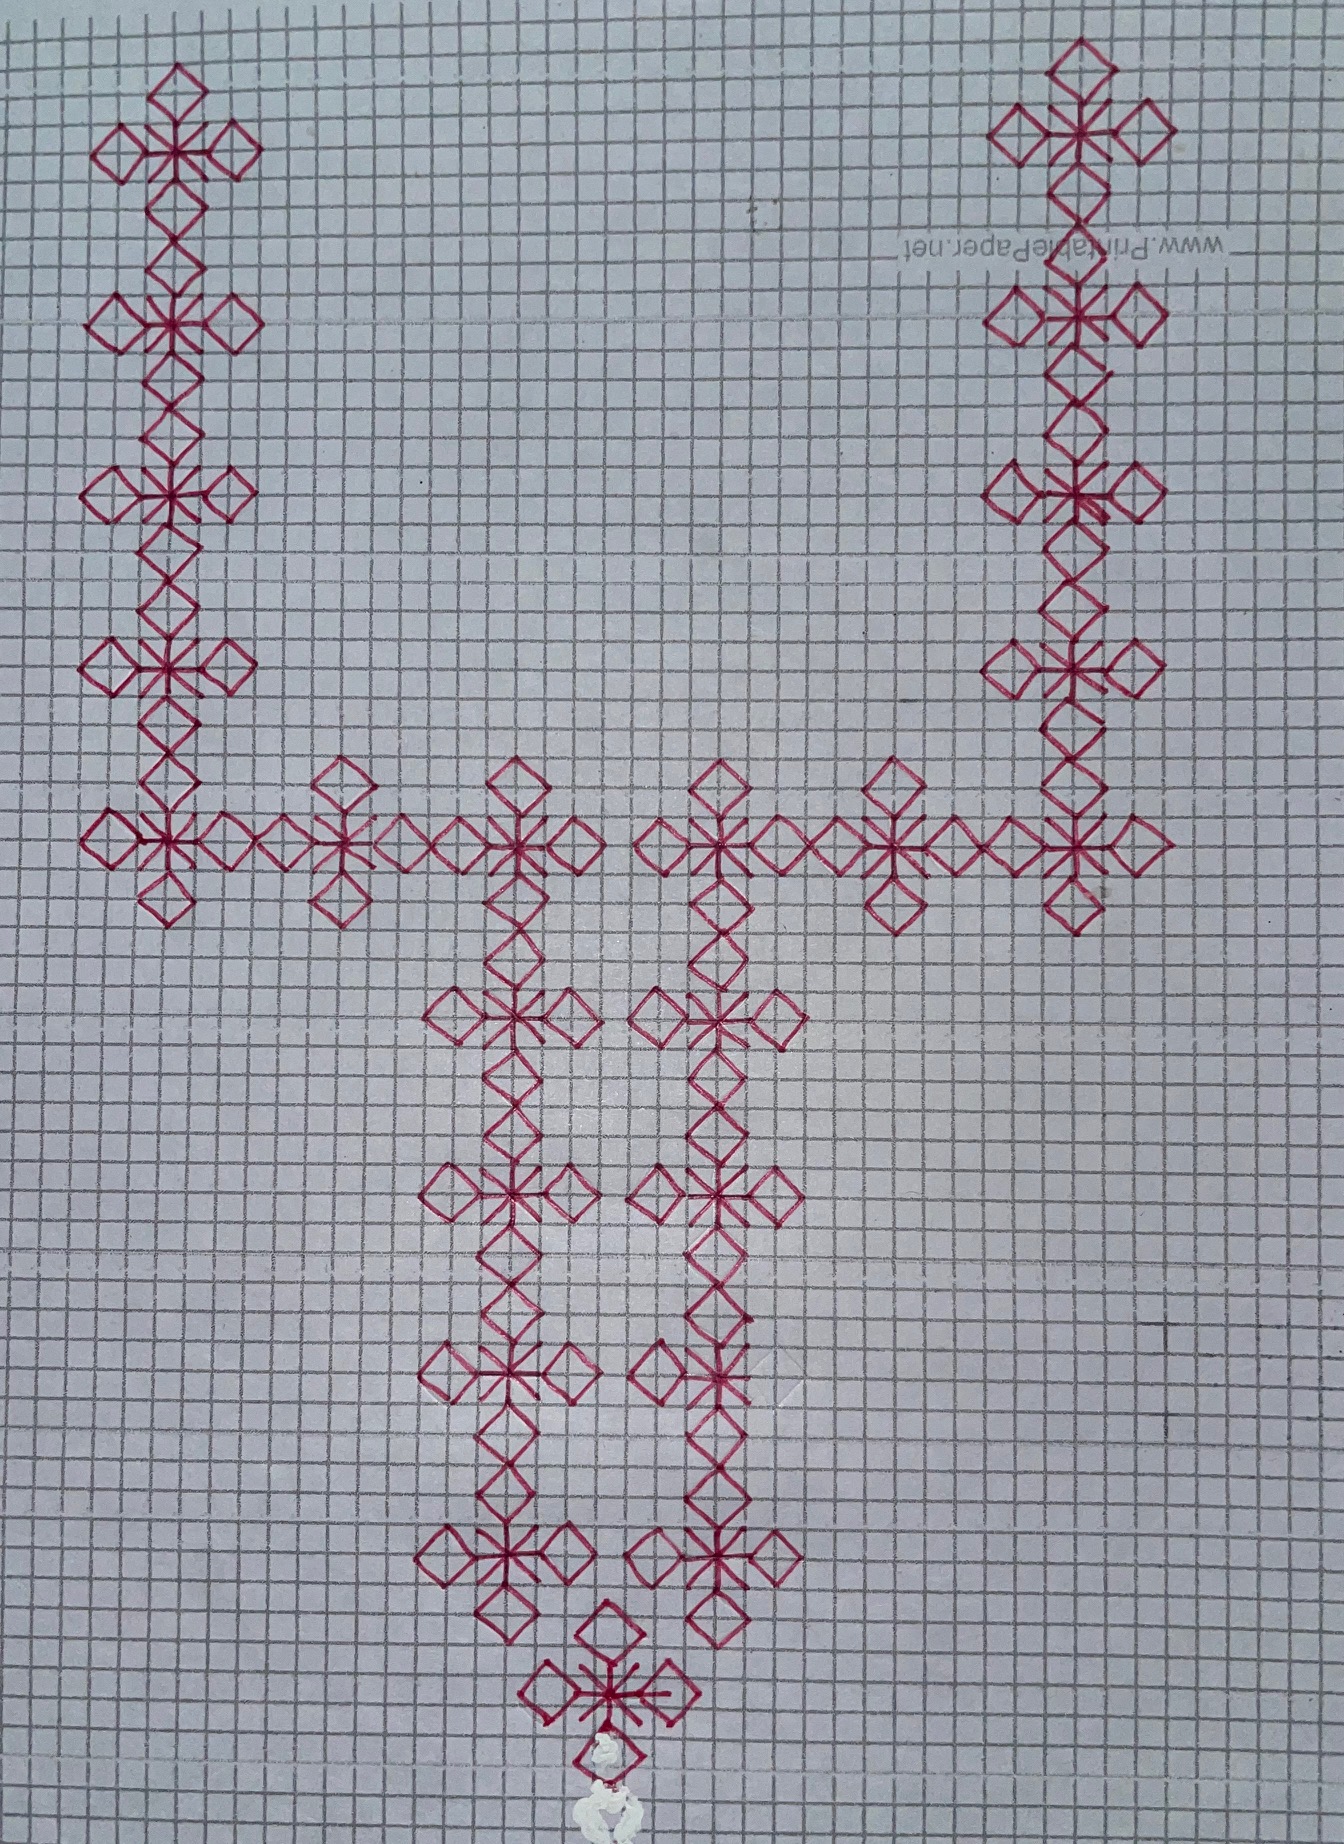
Simple Kasuti embroidery Neckdesign

 Hi all

Hope all are doing well and good.  Though I love to do all sorts of embroideries, kasuti and kutch embroidery is my favourite.  I try to do kasuti embroidery that looks similar on the front and back side of embroidery.  Recently using a border design I have created a neck design.  This is a very simple design.  that has one single motif repeatedly.  

Click this link for video tutorial.  If you like my videos consider subscribing my channel.  

I have done a sample neck design.  The measurements are not proper.  It's just a model.  Have a look at it.


I have added golden stones along the edge of each motif.  

This is before adding the stones.

The beauty of kasuti is that we can create same pattern on front side and back side of fabric.  You can see it from the photograph below.

Front

Back

Pattern for the design.
-----------------------------

Here is the pathway of working a single motif

Take straight stitches in the following order
1-2,  3-17,  9-10
11-12,  9-12,  11-10
9-17,  21-17,  18-17
8-5,  6-7,  8-7
6-5,  8-17,  19-17
20-17,  14-15,  16-13
14-13,  16-15,  14-17
3-4,  1-4,  3-2

Do give a try.  Soon I will be posting the proper design for the neck of a standard kurti.  Till then have a nice day.  

Saturday, October 2, 2021

Kasuti Embroidery Trimmings and Motifs - Part 3

 Hi all

Hope all are staying safe and doing good.  In the beginning of April I have started to do a kasuti sampler in aida cloth.  You can see both the posts in the following links:

Kasuti Embroidery Trimmings and Motifs - Part 1

Kasuti Embroidery Trimmings and Motifs - Part 2

Today I have added 5 more trimmings and 4 motifs in that sampler.  All these trimmings are worked on  10 ct aida with 3 strands of anchor thread.  Come let us see the trimmings now.  


The first trimming has a diamond with three spokes and an inverted 'v' on the fourth side . The diamonds are connected with horizontal lines and another inverted 'v'.

The second trimming is a floral motif .  This also has an inverted 'v' element where the stalk of the flower rest.  All the motifs are connected to each other through horizontal lines.   I am planning to work this trimming as a border for a dress and the floral part separately as a butti all over the dress. 

The third trimming is a development of the first one.  On top of each diamond there are three spokes.  To fill the space between the diamonds another three spoke elements have been added.  I am working on a neck design using this trimming.  Next week I will be posting it.  

The fourth trimming is also like a simple flower with 2 creepers on both the sides of the stalk. 

The fifth trimming is a development of the zig zag one with 3 spokes up and down alternatively. This will be so beautiful for necklines. 

We will move on to the motifs now.  These are worked with 2 strands of anchor thread in 14 ct aida. 


So far the sampler looks like this


So far I have completed 20 trimmings and 9 motifs.  Will be back with another set soon.  

In my next post I will come up with a simple crochet project.  Till then have a nice day.

Wednesday, April 28, 2021

Kasuti Embroidery Trimmings and Motifs - Part 2

 Hi all

Hope all are doing well and all are staying safe.  In the beginning of this month I have posted a small introduction about kasuti embroidery and the basic trimmings or elements used.  I have posted a small motif also.  I started that sampler project in an idea posting the progress once in a week but that doesn't worked out.  I was able to complete the another five trimmings and four more small motif only yesterday so that I can make an update in that sampler.

You can view all my previous kasuti works here.

The second part of the trimmings have been worked in different colour.  These trimmings are worked in 10ct aida with 3 strands of anchor thread.


The first trimming in this part make a nice border.  I have used this trimming as a part of the border in an old kurti.  You can view it here.

The next one is a simple spoke with a diamond.  The third and fourth trimmings are the variations of second one with added spokes in the tip of the diamond. 

The last one is spokes with triangles.  This can also be worked in different variations.  Here I have worked in different heights.  You can work in same height and can leave space between two elements etc depending upon the design.

Now let use move on to the motifs I have worked.  I have used a second colour along with the maroon.  These motifs are worked in 14ct aida cloth with 2 strands of anchor thread.


All the five motifs so far.


Hope all of you had a nice time seeing these trimmings and motifs.  Tomorrow I will come up with a post on preparing a fabric to do embroidery. 

Stay healthy and stay safe.  

Thursday, April 1, 2021

Kasuti Embroidery Trimmings and Motifs - Part 1

Hi all

Hope all are doing well.  Today is the beginning of new month.  And I am here with a new start today.  I have done so many designs in kasuti embroidery. 

You can view my previous Kasuti Works here.

I have a whole lot of motifs and borders and trimmings used in kasuti embroidery in different books and have pinned it to my pinterest board online.  So thought of developing a sampler with the kasuti borders and motifs so I can see many designs in one piece.  Weekly once I will share the progress on it. 

Some basic information about kasuti
-----------------------------------------------
Kasuti embroidery is an Indian embroidery method that uses counted thread technique.  It has geometrical shape designs and it is symmetrical. It is like spanish black work but only double running stitch is used to work kasuti designs.   When kasuti embroidery is executed perfectly both the front and the rear side of the fabric looks identical. 

The straight line is the simplest element in kasuti embroidery.   With the help of the straight line different characteristic elements are formed and with the help of those elements trimming are formed.  Trimmings are thin and narrow horizontal/vertical stripes used as edgings/stripes on dresses.  Trimmings are combined to form borders. 

Today I am showing the first ten trimmings and a small motif.  I have selected 15 count aida for doing the trimmings and 14 count aida to do the motifs.  


  1. Starting from the top straight line- simple double running stitch.
  2. Zig zag line.
  3. 'u' and inverted 'u' trimming. 
  4. Next is a combination of horizontal line, a 'v' shape and two diagonal lines.
  5. Trimming with ascending and descending steps.
  6. Clover structure trimming.
  7. Modified version of the previous one clover structure and its reverse in a successive manner.
  8. Trimmings with spokes and zig zag line.
  9. Trimming with straight line, spokes and square open at one side.
  10. Trimming with cup shaped horse shoe structure.
I will show how the trimmings are combined to form borders later after completing some more trimmings.

Now we will see a simple motif.  This motif consists of the the characteristic element 'square' and diagonal  and horizontal lines.  Anchor thread number 20 and 3 strands are used to do the motif.

Motif - 1

In my next part I will show you the next 10 trimmings and more motifs.  If anyone interested in trying kasuti embroidery try practice in an even weave fabric like aida and then you can move on using the net.   Hope all of you like today's post.  Tomorrow is Good Friday.  To remember Jesus' sacrifice on the cross for myself I have handwritten a famous passage which I like along with a mandala design.  I will be posting it tomorrow morning itself.  So do watch my space and have a nice day. 

Thursday, January 12, 2017

Kasuti embroidered borders, Needlepoint start, WIP updates

Hi all

Hope all r  doing great with new plans, new dreams and new resolutions.  In my side, though I had a little problem with cough and cold last week, my crafty journey is going on smoothly.  Last year I decided to do some pillow covers before christmas since I had a red dotted fabric in my stash.  I thought of adding a little bit of hand embroidery in it and decided to do embroidery patches and attach to it.  I have done with kasuti embroidery borders in 10ct matty cloth with three strands of anchor embroidery threads.  But I keep on postponing the sewing part and by the time christmas and new year were over.   Till now I didn't feel like taking my sewing machine out of its cover.  So here I am showing only the embroidered borders or patches.  


This weekend I will be sewing this and another pillow cover with a touch of stenciling in it.  I will show it once I finish both.

As I have planned in the beginning of this year, I have started the needlepoint wall hanging kit which was with me for more than 3 years.  Seeing the chart I thought it will be a complicated one, since the chart contains only one fourth of the design.  But after starting it I got the hang of changing the direction of the working piece and continue with the chart which is new to me.  So far the stitching is going on well and I liked it a lot.  Here are the two pictures after the end of day1 and day2 of stitching.


I have some progress in my mega cross stitch project and granny stripe blanket which I have done during Nov and Dec.  
Before

After
One more page to finish the top blocks.  Will try to finish the next page within next month.  This project will again travel with me this year.

Before

After

I have completed one third of the blanket.  only 21 color stripes remaining. Means I have to do 42 rows.  I am strictly doing 2 rows a day and hopefully I will be finishing this project within Feb 10th along with a simple border. When I show this blanket next time mostly it will be a Ta.. da.. post.  

In my next post I will come up with a simple yoke pattern which I have designed with the basic embroidery stitches and the first block of the rainbow SAL 2017.    Till then, Have a happy time with needles , yarns and threads.

Thursday, November 17, 2016

Another Kasuti Finish

Hello dear friends

Thanks for your lovely comments in my previous post on two color granny squares.  I thought of finishing those crochet blocks into a cushions but when I add one more round with granny squares the width if the block exceeds the width of the cushion.  Wrong calculation on my part.  Now I don't want to unravel the joined squares and so I am going to finish it into a runner for my old computer table which is also my ironing table now.  So that work is in progress. 

Yesterday the sun was shining brightly and I managed to take some photographs of the kasuti kurti which I have finished two weeks back.  This one again is done on silk cotton fabric with three strands of anchor embroidery thread.


Lower border for the front.

Border for sleeves.  I reduced the height of the pattern for the sleeves.  Otherwise it is same as the front border.

I have completed all my custom orders.  And now I am doing some crochet sofa cover to be finished before christmas.   Also I am practicing long and short stitch, and doing small embroidery designs now and then.  Will be back with a small cross stitch finish in my next post.  Till then, Happy embroidering.

Saturday, October 8, 2016

Kasuti sampler update 2

Hello all,

Hope all of u r enjoying weekends. In India it's festival time (pooja and dussehra).  Though we don't celebrate these festivals, we enjoy our holidays.  This time it's a six days holidays for kids and they are enjoying a lot.  Festival wishes to those who celebrate these festivals especially my blogger friends.  

Some time back I have blogged about the start of a kasuti sampler.  I have added two more motifs and a border to it.  All the designs are from KARNATAKA KASUTHI DESIGN BOOK IN COLOR (VOL-1) from mridulas .  Have a look at these .  Each motif has been repeated 6 times.


This is a motif from the kasuti embroidery kurti which I am working now.  

Along with the embroidery kurti I am doing some crochet samples which I would like to take up into a project.  Some granny squares are also whipped up as a part of a big project.  Will come up with that in my next post.  Till then, happy embroidering.

Friday, May 6, 2016

A kasuti Sampler

Hello all,

Hope all r doing good.  Thanks for the comments in my previous post.  When I started doing cross stitch designs in black color background inspires me.  And once I have found a black color 10ct aida cloth in a shop and bought two meters.  But when I got 14ct aida in my hand I kept the 10ct unattended. 

 During the starting of this year I was cleaning my cupboard and found the old black aida.  I thought of using it for some purpose and when I measured it, it fits a small bed in my home.  So I started to do a kasuti sampler because I want to try all the designs of kasuti I am having in a book.  With an enthusiasm I started, but, after that I find it difficult to find the holes in that black color aida cloth.  So to solve that issue I wrapped  white color tape (the one used for dressing purpose in hospitals) around my index finger of the left hand and started stitching.  This time it is even more easier and the holes r visible easily.  I started with a simple border and so far I have completed 3 borders and 4 sets of motifs.  I have started doing it from the centre and the embroidery is growing towards one end. 

So lets have a look at the sampler .  Click on the image to get a closer view.


This border forms a nice and wide border for kurtis or sarees.


The sampler so far


I am using 3 strands of  anchor variegated threads.  It is going to be a long term project.  Currently I am working on two kurti's (kasuti and kutch) made on custom order. I ran out of thread and ordered some anchor threads.  All these are somewhat big projects.  Takes time to complete it.  So in order to get instant satisfaction I am doing crochet coasters now and then.  

Hope all of u like my sampler.   I am eagerly waiting for my parcel from pradhan embroidery stores.   In  my next post I will come up with a finished crochet coaster and some kits I own.  Till then, Happy embroidering. 
*/