Monday, January 20, 2020

Kutch Embroidery - Tutorial 2

Kutch work tutorials so far
--------------------------------
To learn the basic motif  - Kutch work tutorial1

Today we will learn how to work two continuous diamond motif in kutch work.  If you get the hang of working this motif you can get a good idea of stitching other motifs.  


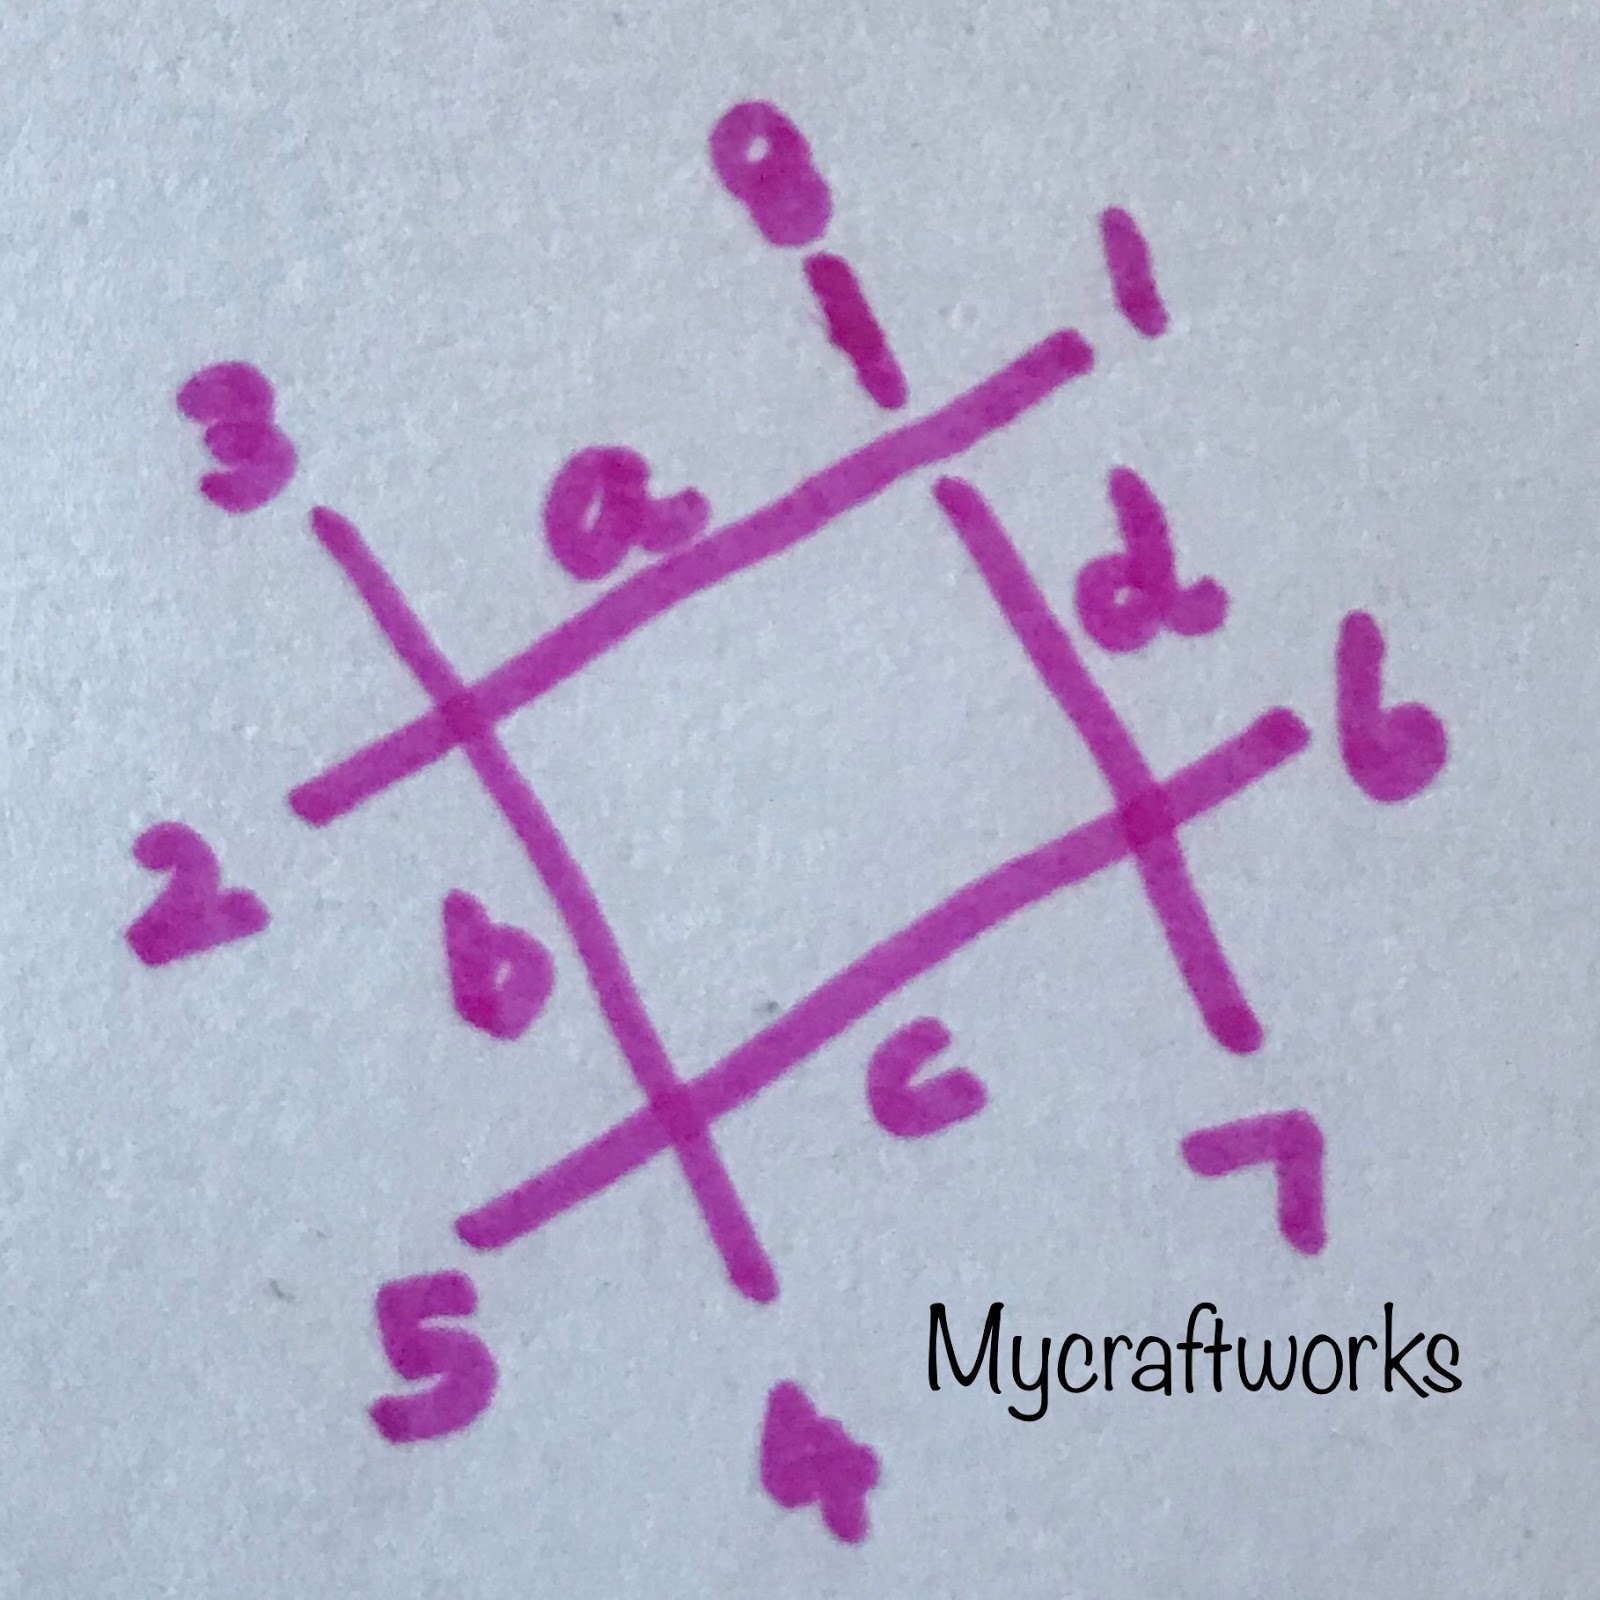
Imagine the corners of the diamonds extends like this.  Start stitching from 1.


Start at 1(Bring the needle from under the fabric - out at 1)
In at 2
Line a is formed.


Out at 3
In at 4
Note that the running thread should pass over the line 'a' when coming from 3 to 4.
Line 'b' is formed.


Out at 5
In at 6
The running thread should pass over the line 'b' from 5 to 6.


Out at 7
In at 8
The running thread should pass under the line 'c' from 7 to 8.


Out at 9
In at 10
The running thread should pass under line 'd'.
Line 'e' is formed.

 
Out at 11.
In at 12.
The running thread should pass under 'e' over 'f' and then under 'a'.
Line 'f' is formed.

The foundation is now complete.
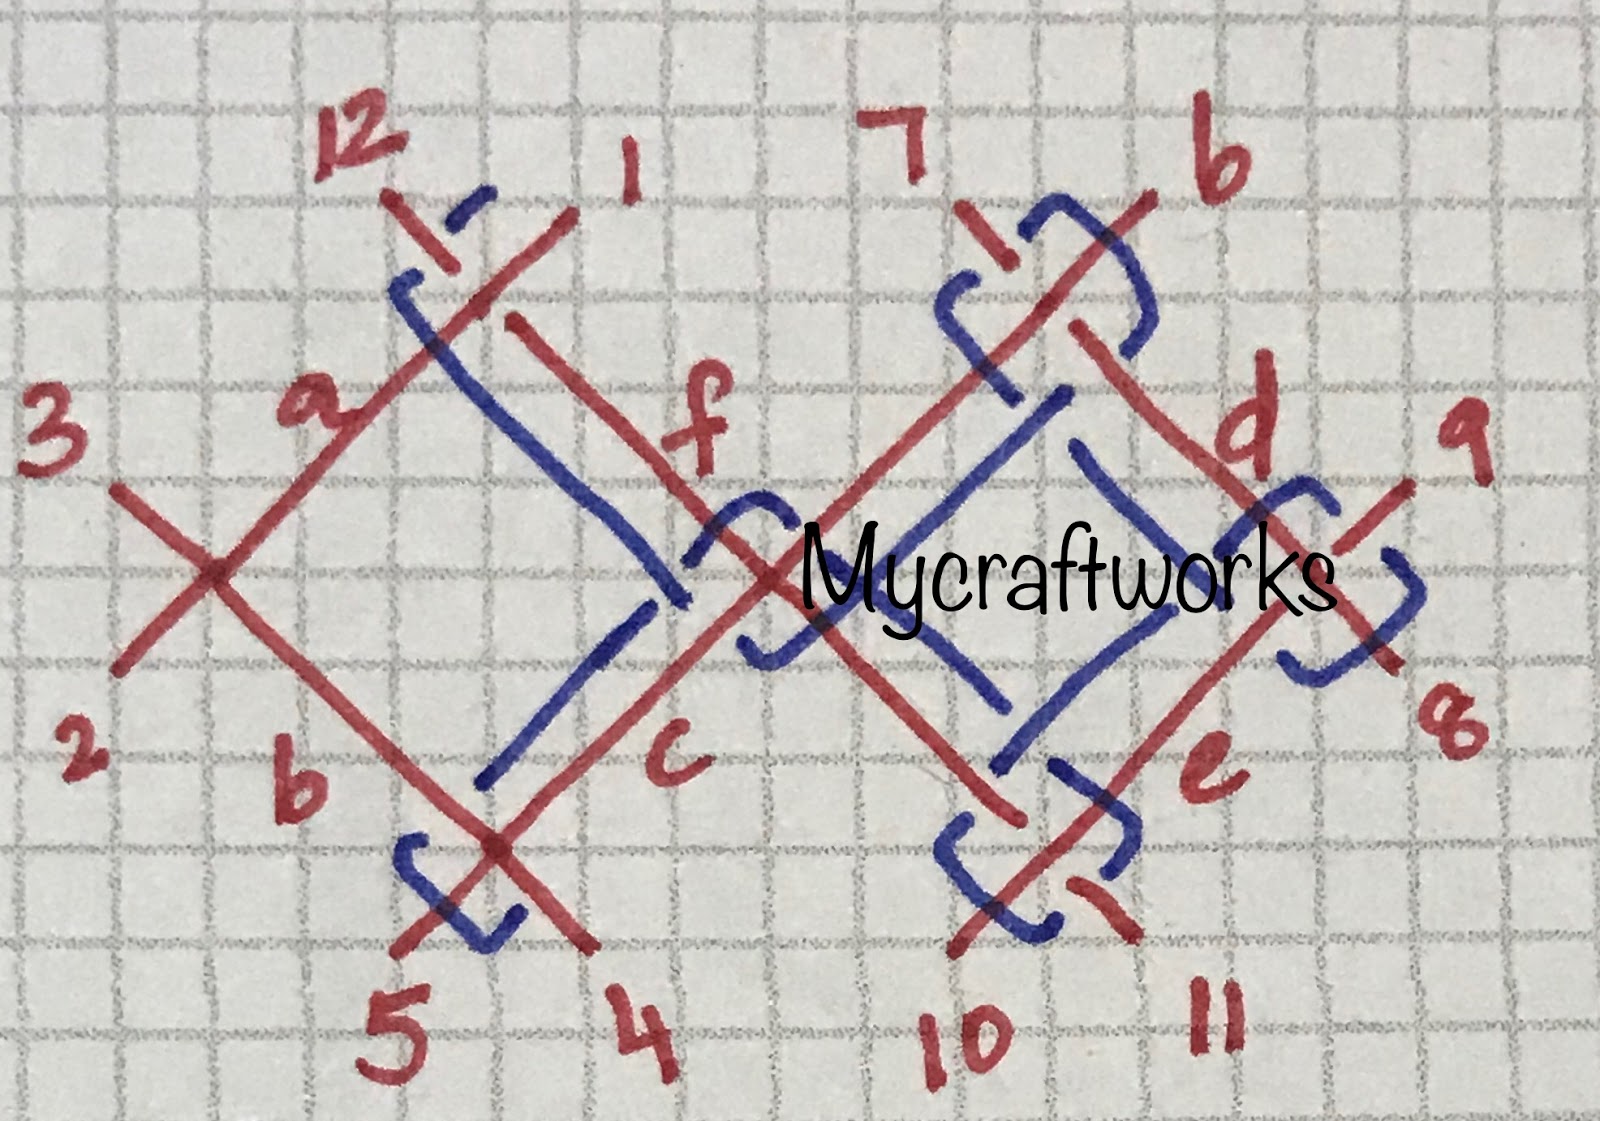
Now we will move on to the interlacing or filling the foundation.
Before that keep in mind the lines formed inside the foundation lines.  For each foundation line, parallel line is formed inside the diamonds.


Start between the points 1 and 12.
Come under the extended line at 12.
Come over the line 'a'.
 Under the imaginary line next to 'a'
 over the imaginary line near 'c' 
 under the line 'c'.

Come over the line 'f'
Under the imaginary line next to 'f'
Over the imaginary line near 'd'
Under the line 'd'


Come over the line 'c' at the corner,
under the line 'd' at the corner
over the line 'c'
under the line parallel to 'c'
over the imaginary line near 'e'
under the line 'e'


Over the corner at line 'd'
Under the corner at line 'e'
over the line 'd'
under the line parallel to line 'd'
over the imaginary line near the line 'f'
under the line 'f''


Over the line 'e' at the corner
under the line 'f' at the corner
over the line 'e'
under the parallel line to 'e'
over the parallel line to 'c'
under the line 'c'


over the line 'f'
under the line parallel to 'f'
over the imaginary line near the line 'b'
under the line 'b'
over the line 'c' at the corner


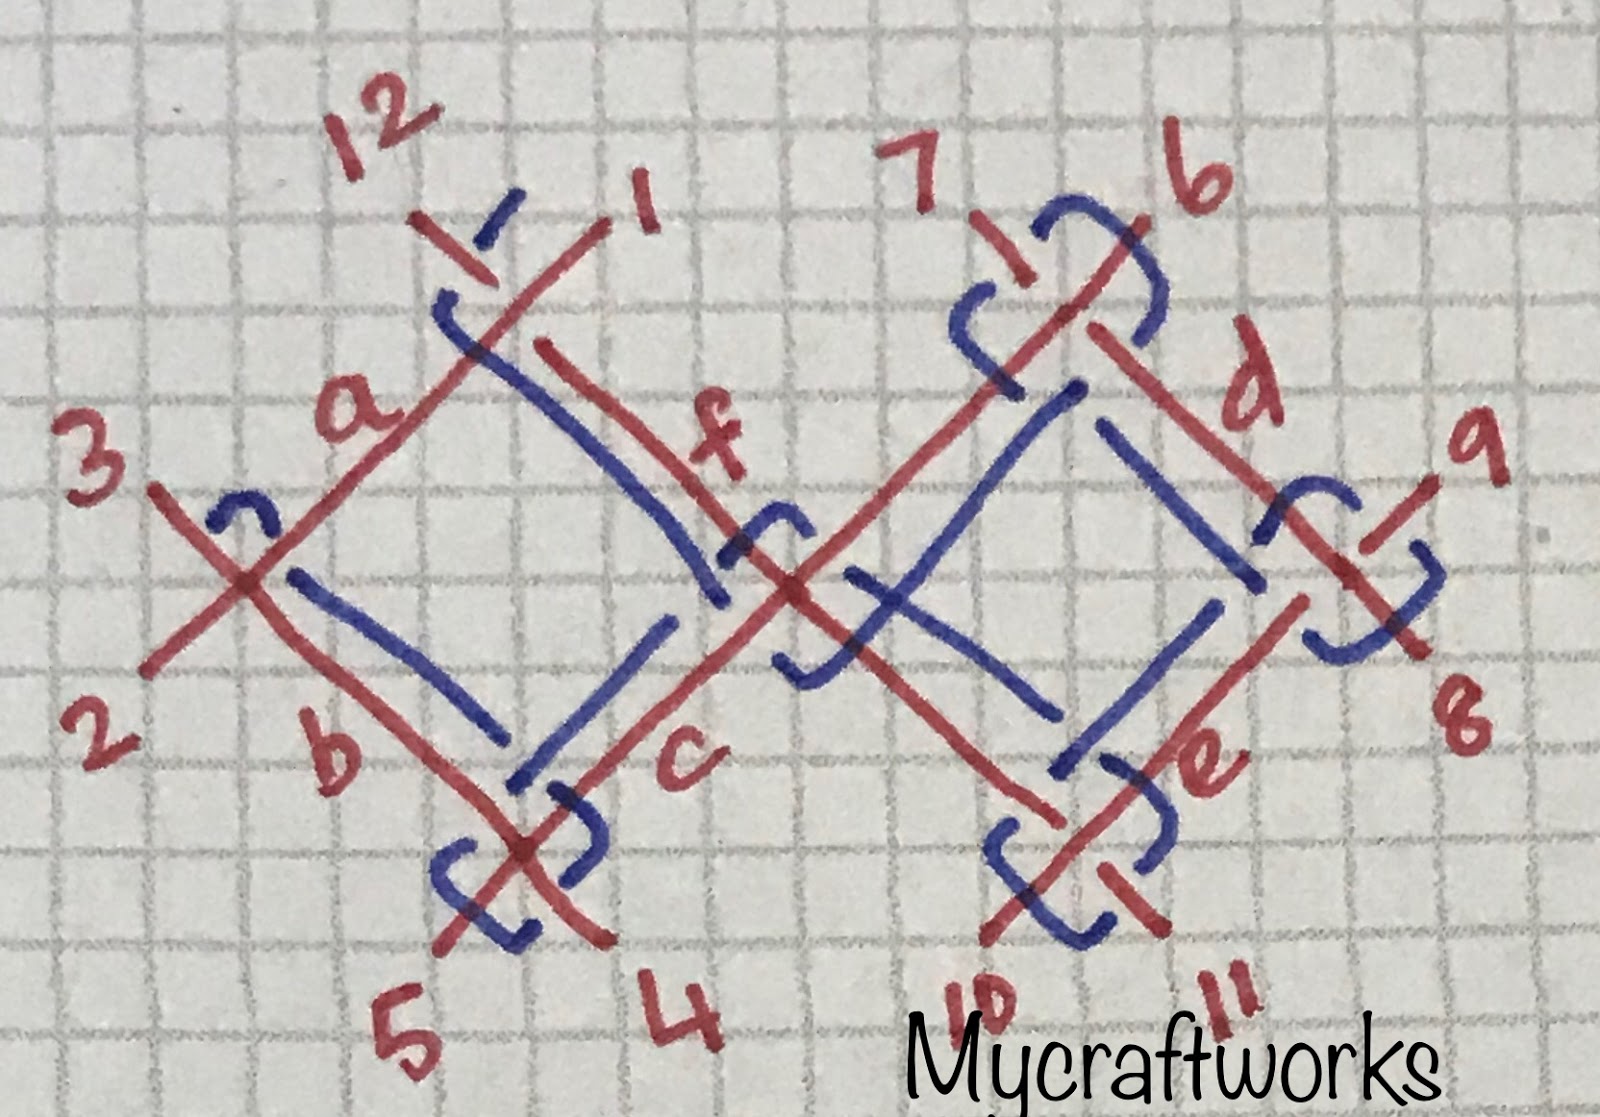
under the line 'b' at the corner
over the line 'c'
under the line parallel to 'c'
over the imaginary line near the line 'a'
under the line 'a'


over the line 'b' at the corner
under the line 'a' at the corner
over the line 'b'
under the line parallel to the line 'b'
over the line parallel to the line 'f'
under the line 'f'
over the line 'a' at the corner
In at the starting point.
Interlacing is now complete.

Kutch motif with two diamonds is now complete.  In this manner you can work any number of continuous diamonds.  In my next post I will come up with the working of five continuous diamonds.  Till then, enjoy practicing .  Have a happy time with needle and thread.

Wednesday, January 15, 2020

Embroidery design - Running stitch

Hi all

Today I am happy to share the embroidery design for this month.  I am starting with the running stitch which is the basic one.


For the flower I have used the whipped running stitch.  For all the other parts running stitch is used.


Threads used:- 3 strands of anchor threads are used
----------------------------------------------------------------
Flower  - 13, 19
Stem and leaves - 258, 269

You can finish this into a small pin cushion, or frame it.  I will be finishing all the designs into a small quilted wall hanging.  If you try this design do send me the pictures to shamiimmanuel@gmail.com.  I will post you pictures under this post.

I will be posting my next design on 15th of next month.

Wednesday, January 8, 2020

Kutch work - border design1

Hello all

This is my first design for you all to practice Kutch work which includes the single diamond motif. It is outlined with back stitch. The small flower like design is done with Algerian eye stitch which consists of only straight lines. The centre of the Kutch diamond is stitched with a small cross stitch.


I have used anchor thread numbers 323 and 203.
For Kutch work and Algerian eye flower I have used 3 strands of thread,  for back stitch I have used 4 strands of thread.

This design can be used as borders for Kurtis and sarees.   I will update this post with the yoke pattern using this design.  In my next post I will come up with a satin embroidery neck.  


Next kutch work tutorial will follow soon.  So do keep watching.

Saturday, January 4, 2020

Kutch embroidery Introduction and tutorial1

Kutch embroidery is a style of Indian embroidery from the region of Gujarat. 

The design consists of continuous diamonds ad squares thus forming beautiful designs.  It is done in two steps. The foundation (framing) and the filling (interlacing). All the diamonds or squares should be of even sizes.

If anyone masters the technique for some basic structures, they can create beautiful Kutch embroidery for dresses. 

I will be posting the detailed tutorial for some basic structures. Later on we can move on to patterns for dresses. Let me start with the basic diamond structure. The pictures and explanations are given below.

Video tutorial 


Practice in a cotton fabric with the fabric fixed in an embroidery hoop. Use all six strands in the beginning.

The above diamond shape is the basic shape in kutch work.  


Before stitching imagine that the corners of the diamond extends like this.

Start at 1(Bring the needle from under the fabric at 1)
i.e) Out at 1
       In at 2
Line a is formed.

  
Out at 3
In at 4
Before going thru 4 the running thread should pass over line a.
Line b is formed.
Passing the threads over and under the previously formed lines is the technique of kutch work which forms beautifully weaved designs.

 
Out at 5
In at 6
Before going in at 6 the running thread should pass over the line b.  Line c is formed.
Note that now the line b is over line a at one end and under c in the other end.  

  
Out at 7
In at 8
Here the running thread should pass over the line c and go under the line a before going in at 8.
Line d is formed.  The line d passes over line c at one end and passes under line a at the other end.

Now notice all the lines.  Each line pass over at one and and pass under at the other end.
The foundation is now complete.

 This is how it looks at the back.

The next step is to do the interlacing or weaving the foundation.

For the second step bring the thread out at a point near the arrow i.e) between the points 1 and 8.
Imagine there are lines parallel to a,b,c and d inside the diamond.


The explanation here may look complicated but the process is simple if u under stand the concept of over and under.
Pass the needle under a1(Since here it is under the next pass is obviously over)
pass over a.
The running is passing through the lines a and c. So imagine two parallel lines for and c.  So the thread should go under the line parallel to a and over the line parallel to c.  This part you have to visualize in your mind.
Now pass the needle
 under c
You have reached the corner.

Now pass the thread 
over c2 (because the previous pass is under)
under d1
Now you can see the line parallel to d is formed and one corner is filled.

  
Now pass the thread 
over d
under the line parallel to d
The running thread passes through lines d and b.  So imagine a line parallel to b and the thread should pass over that line.
Now pass the thread under b.
Now the line parallel to b is formed.  We have reached the second corner.

  
Pass over b2
Pass under c1
Second corner is filled.

  
Pass over c
This line passes through lines c and a. The line parallel to c is already formed.  So imagine a line parallel to a.
pass under the line parallel to c and
  over the imaginary line parallel to a.
pass under a.
Now the line parallel to b is formed.  We have reached the third corner.
  
  
Now we will work on the next corner.
Pass over a2
Pass under b1
Third corner is filled.

  
Pass over line b
Pass under the line parallel to b
Pass over the line parallel to d
Pass under the line d
Now the line parallel to a is formed.
We have the reached the last corner .

  
Pass over d2.
Finish the filling by going in at the starting point.

Basic kutch diamond is now complete.

I will be back with the next motif  next wednesday.  On Monday I will be posting a small design you can practice with the single diamonds.  Till then, Have a happy time with your needle and thread.  

Thursday, January 2, 2020

WELCOME 2020

Hello all

Happy New Year to all of you.  I am so grateful that 2019 has been productive on the crafty side though there are so many ups and downs and a loss of a dear family member. Hope this 2020 will also be more productive than before.

Last year I have worked on some embroidery designs for the blog to be given as free designs. So 15th of each month I will post a free design and the sample. Also, working on some Kutch work tutorials for beginners. I will be posting one Kutch design per month based on the tutorials. This is a small step I have taken in my journey with embroidery. My aim is to make embroidery kits in future. 

Tomorrow I will be posting the introduction for Kutch embroidery and the necessary things needed to do the embroidery.  So do watch my space.

Blog post will not be complete without a embroidered or crochet photo. It is a ribbon embroidery project which I have completed during dec 2019. Yet to add beads. Will be posting it soon. Till then have a happy time with your needle n thread. 
 

*/