Tuesday, December 28, 2021

Long tailed Daisy mirror work - Video tutorial

 Hi all 

Hope all are doing well and good.  Today I am happy to share with you that I have added a video tutorial in my channel for doing mirror work using long tailed daisy stitch.  In my last blog post I have given the picture tutorial.  you can view it here.  You can see the video tutorial below.


Dear readers, if you like my videos kindly subscribe my channel and press the bell icon to receive the notifications when I publish a video.  

In my next post I will come up with a crochet finish.  Till then, have a happy time with your needle and thread.  

Saturday, December 25, 2021

Mirror Work - 5 using Long tailed Lazy Daisy Stitch

 Hi all

Merry Christmas to all of you.

Hope all are doing well and good.  It's been more that a week I have posted here.   So today I am happy to share  with you another mirror work using the simple lazy daisy stitch.  

Fix the sequin using a small stab stitch on the holes on both the sides of the sequin.
  You can also fix it using glue. 

Stitch a round of chain stitch around the sequin. Try to keep the number of chains even. 

Make a round of buttonhole stitches through the chain stitches.  Tutorial is available here

Now Bring the needle through any one chain stitch.

The above photo is rotated here. 
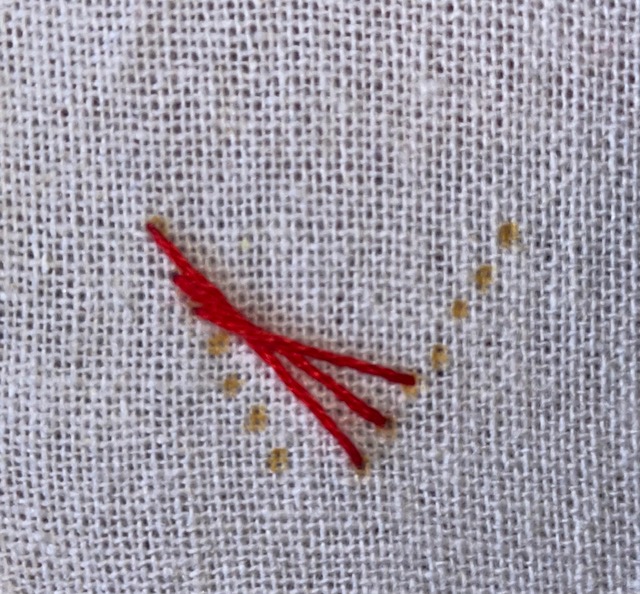
 Make a long tailed Lazy daisy stitch through the chain where the needle comes out. 

Anchor the tail a little slanting to the right as show above.

Make the next long tailed lazy daisy stitch in the next stitch.
Anchor the tail a little left (i.e - at the point where the first stitch is anchored)

This is how it looks like. 

Do the next set of long tailed lazy daisy stitch in the next two chain stitches.

Do the long tailed lazy daisy stitches around.  

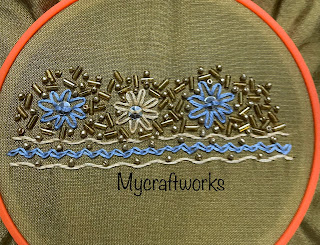
Embellished the mirror work using cut beads and small glass beads. 
You can use this as an all over design for your dresses.  

Monday, December 20, 2021

Long Tailed Daisy Flower - Video Tutorial

 Hi all

Hope all are doing well and staying safe.  Today I am happy to share with you the video tutorial for a simple embroidery flower that has been done using long tailed daisy stitch.  Already I have posted a design to work this flower.  

Pattern for the design

Picture Tutorial

I have recorded the video for the same design and you can view it below.


This design can be used an all over embroidery design for kurtis and sarees.  Also it can be altered to form borders and necklines.  It is a simple and easy design even a beginner can also give a try.  So do give a try.  Drop in your feedbacks in the comments section.  

I will be back with another embroidery stitch tutorial in my next post.  Till then have a nice day and  have a great week. 

Thursday, December 16, 2021

Fly Stitch Flower Border / Simple Embroidery Border

 Hi all

Hope all are doing good and staying safe.  Today I am happy to share with you a simple embroidery border.  I wanted to do a easy but a grand neckline embroidery for a silk saree blouse.  So I have tried this small sample using the basic stitches.  The outcome is perfect and it is beyond my expectation.  Happy to post it here in blog. Let's see the design now.


The fabric I have worked is silk cotton.  When I search google I found that the colour of the fabric is "Old gold".  Then I searched for colour combos with old gold colour and then selected a light shade of gold colour and the contrasting blue.  I was in a doubt whether this blue goes well with the fabric because I am very poor in selecting colour choices.  And to my surprise the blue combo worked very well.  So I thought I will add this colour combo in my colour palatte. 


The design with only embroidery.  It is very plain and simple and then I added the dull gold colour cut glass beads randomly.  It lifted the grandness of the embroidery.  

After adding the cut beads also, I felt something is lacking and then filled the gaps with golden beads.  And the whole outlook of the piece changed.  
The design is complete now.  

You can use this design for border or for the neckline also.  

Pattern for the design

Anchor Threads used :
Light gold - 313 
Blue - 121 

Stitches used
Lines - Laced Running Stitch (3 strands)
Zig Zag line - Zig Zag chain stitch (3 Strands)
Fly stitch flower - 4 strands
Used a sequin in the centre of the flowers.
 
Hope all of you like this design.  Will meet you with another interesting post soon.  Till then, have a nice day.

Tuesday, December 14, 2021

Crochet snowflakes for christmas

 Hi all

Hope all are doing well and good.  I have added one more set of snowflakes to the my christmas decor collection.  I have done a few days back. But got the time to post it only now.  


The pattern is from here. You can find so many other cute patterns in that website. 

I have used 4 ply local acylic yarn and a 3.5mm hook.  I haven't blocked it.  It is stiff as it is.  It is now hanging in our christmas tree.  

The month of December started with a positive vibe.  And my youtube journey is also moving on in a slow and steady pace.  I am getting  2-3 subscribers each day.  That keeps me motivated and encourages me to move on.  Also, I got my first custom order to crochet a frock through instagram.  I will post about it in my next post.  

So if you are interested in watching embroidery related videos, kindly subscribe to my channel.  

That's all for today.  See you soon in my next post.  Till then have a nice day. 


Thursday, December 9, 2021

How to embroider an easy star using straight stitches

 Hi all

Hope all are doing well and good. As we are in the festive season I am also in the mood of embroidering designs related to christmas.  So, today I have come up with the tutorial of embroidering a simple and easy star using straight stitches.  Let me show the finished star first.


Video Tutorial 👇

Let's move on to the picture tutorial now.

First trace the design as below.
We will be working on two lines at once.  Follow the next picture for stitch reference.
We are going to work straight stitches as follows:  
1-a, 2-b, 3-c, 4-d, 5-e, 6-f, 7-g
I am using 3 strands of thread. 


Hope this tutorial is helpful.  Two more tutorials to embroider a star are in line to be posted here.  Already I have posted a tutorial for embroidering a star using woven star stitch.  The video tutorial for the same is available here.   In my next post I will come up with a crochet finish.  Till then have a happy time with needle n thread. 

Tuesday, December 7, 2021

Holbein stitch Neck Design

 Hi all

Hope all are doing well and good.  It's been a long time I have done some embroidery for my dresses.  So as Christmas is nearing I thought let me do something for my blouse.  I had a kerala saree with me and the blouse which I was wearing with that saree got torned and I have been planning to buy a new one.  So I decided to embroider one with the plain silk cotton fabric material which I have got in my hand.  For the kerala saree any colour blouse can be matched.  Previously I wore a dark green silk blouse.  So this time I chose a purple colour one and done the embroidery using lavender colour thread. So now the embroidery part,


Golden stones have been glued to the centre of the design and between the 'v' part of the neck.  

Video tutorial for working this design. If you like this video kindly subscribe my channel.
 
The same design I have worked for needle n thread magazine years back.  The magazine has not been in publishing now.  Anchor has stopped its publishing. At that time I have done it in maroon fabric with golden colour thread. 

For this I have chosen anchor thread number - 96 and used 3 strands of thread. 

The pattern fits a A4 sheet paper perfectly.  Without any scaling you can print the pattern and trace it in the fabric. 

Hope all of you like this pattern.  In my next post I will come up with a crochet finish.  Till then, have a nice day. 

Sunday, December 5, 2021

Basic Embroidery Stitches - Running stitch family video tutorials

Hi all

Hope all are doing well and good.  Today I am happy to share with you the video tutorial for  all the stitches in the running stitch family.  Hope the video tutorial is clear.  Kindly watch the video and drop in your comments.  If you like my videos kindly subscribe and support my channel.  


Thursday, December 2, 2021

Christmas Snowflake ornament

 Hi all

Hope all are doing well and good.  Happy that all of you like my previous post on felt star ornament.  Today I am happy to share with you another simple snowflake design that uses simple stitches.  I have finished it into another christmas tree ornament with beaded edging.  I am happy with the outcome.   Hope you will also like it. 


Watch the video tutorial below. 
If you like my video kindly subscribe to my channel.  


Pattern for the design
--------------------------------
Used back stitch and lazy daisy stitch with 3 strands.  For the centre flower I have added a straight stitch inside each lazy daisy petal.  The outer circle is also stitched using back stitch.    For the back fabric I have stitched only the outer circle with back stitches.  Then placing the wrong sides of both the fabric together whipped up the corresponding back stitches with a white round bead for every two stitches.  Will post a clear tutorial with pictures soon.  You can watch the above video for the making of the ornament.  


Other christmas projects
------------------------------------

Hope all of you like this design.  In my next post I will come uo with the another embroidery finish.  Till then, have a nice time with needle and thread.  

This post has been featured at The Really Crafty Link party
*/