Monday, August 30, 2021

Woven Star Stitch - Embroidery Stitch tutorial

 Hi all

Hope all are doing well and good. In the embroidery stitch tutorial series, today I have come up with a simple, cute and neat stitch to embroider stars that too with a woven effect.  Yes, today's stitch is Woven star stitch.  

It is very simple to do.  The star is formed with 5 straight stitches.   Let us move on to the tutorial.  Mark 5 points as shown in the picture below. 

First make a straight stitch from 1 to 3


Now make another straight stitch from 2 to 4

Make the third straight stitch from 3 to 5

Make the fourth straight stitch from 4 to 1

Make the fifth straight stitch from 5 to 2.  While crossing the thread that goes from 1 to 3 the running thread should go under the first stitch thread.  

A star stitch is formed.

For Video tutorial Click here.

Hope all of you find this tutorial useful.   Kindly have a look at my youtube channel and subscribe if you like it.  It will be a great encouragement to me.   I will come up with a neck design with this stitch soon.  Till then, have a nice day.  

Sunday, August 29, 2021

Woven detached chain stitch - Embroidery Design

 Hi all

Hope all are doing well and good.  A day back I have posted the tutorial for doing woven detached chain stitch.  Today I am posting a design to practise that stitch.  This design is well suited for kurtis and sarees.


Here is the video tutorial for working this design


Pattern for the design
---------------------------------

Stitches used
----------------------
Flowers - Woven Detached Chain stitch
Stems - Stem stitch
Leaves - Detached chain stitch(Lazy daisy stitch)
Centre of flowers - French Knots
Circles - Satin stitch

Anchor embroidery threads
----------------------------------------
Variegated Red- 1203 (6 strands)
Green - 257 ( 3 strands for stems,
                       6 strands for leaves)
Yellow - 298 (6 strands)
Orange - 332 (6 strands)

I have included the pattern, the stitch details and thread numbers in the following picture.  You can print it for your reference or if you need only the pattern you can print the above design.  The original pattern is 12.5 cm in height and 7.5 cm in width.  If you scale down the picture the number of strands can also be reduced.  


Kindly Subscribe my youtube channel.  

Hope all of you like this design.  I will back soon with another finish.  Till then have a nice day.  

Friday, August 27, 2021

Woven Detached Chain stitch - Embroidery Stitch Tutorial

 Hi all

Hope all are doing well and good.  In the embroidery stitch tutorial series, today I am going to show the steps to do the woven detached chain stitch.  It is a simple stitch that brings the woven effect that stitches like cast on brings.   This stitch suits well for small flower buds and leaves.

Pin this image 

So let us move on to the tutorial.  I am using six strands of embroidery thread here.   It will be well and good if you know how to do lazy daisy stitch. 

First start of with a detached chain stitch(lazy daisy stitch).


Bring the needle up through the fabric inside the detached chain stitch.

Insert the needle through the thread in the right side of the detached chain stitch without picking the fabric.  Don't pull the thread tight. 

Now insert the needle from left side of the detached chain stitch without picking the fabric and pull through the thread through the chain stitch. 


Repeat the above two steps until the detached chain stitch is covered. 

Anchor the thread under the last stitch.

A woven detached chain stitch is formed.

I have worked a small flower bud along with two leaves.  It looks very pretty.  I am planning to use in as spray motifs for one of my dress.

Tomorrow I will come up with a small design to practice this stitch.  Till then, have a nice day.  

Thursday, August 26, 2021

Kutch Work Neck embroidery for beginners

 Hi all

Hope all are doing well and good.  Today I am happy to share with you a simple kutch work neck pattern.  I have already share the tutorials for working kutchwork patterns.  Also I have shared a small flower pattern with kutch work.  

Video for working this tutorial is here.

Today's pattern can be easily worked by beginners also.  Let us see the finished embroidery.  


Embroidery is done in silk cotton fabric.

Threads used - Anchor (3 strands)
-----------------------------------------------
Pink - 28 
Green - 255

This is the pattern for this design.  You can save this design and can print it in an A4 size paper.  

Hope all of you like this pattern.  I will be back with a crochet finish soon.  Till then have a nice day.

Tuesday, August 24, 2021

Easy Neck Design for beginners

 Hi all

Hope all are doing well.   Today I am happy to present a embroidery neck design for beginners.  In my last post I have posted a tutorial for embroidering a mirror.  I have incorporated that mirror work in this design.  You can view the tutorial for mirror work here. 

I started with embroider three sequins inside a heart shape.  Then added sugar beads of golden and light green glass beads around the heart border and inside also.  


Then added a line of chain stitch on neckline.  And added golden sugar bead inside each chain stitch.

Then added green colour stone chain along the chain stitch on both sides,  This forms a thick patch like neckline.  

This design can be easily worked by beginners also.  I have provided a video of the process of making this neckline.  Watch it here.  

Monday, August 23, 2021

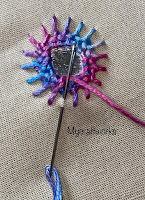
Mirror Work - 4 using up and down buttonhole stitches

 Hi all

Hope all are doing well.  Today I am happy to share with you the tutorial for the mirror work using up and down buttonhole stitches. Here I am using a 2cm diameter sequin to explain the steps.

Pin this image to your pinterest board

 Fix the sequin with two anchor stitches on both sides through the holes provided. 


Make a straight stitch from top to bottom on the left side and from bottom to top on the right side.

Take the needle out near the anchoring stitch on the left side.
 

Insert the needle under the straight stitch from right to left. Pull through the thread. Repeat the same for the next straight stitch.

Insert the needle near the anchoring stitch on the right.

Bring the needle up below the right anchoring stitch

Bring the needle under the second stitch from right to left and pull through the thread.  Repeat the same for the first straight stitch also. 

Insert the needle below the first anchoring stitch.


Now we will start framing the mirror using  buttonhole stitches up and down alternatively. 
Bring the needle up at any one point near the mirror.
Insert the needle under the threads from the middle to outside.  Pull through the thread.

Now pick a stitch from outside the sequin towards inside.  The working thread should be under the needle from the top. This forms a up buttonhole stitch.  Pull through the thread.

Again insert the needle through the thread from the middle of the sequin.  The working thread should be under the needle which from a down button hole stitch.
Now pick a stitch from outside the sequin towards the sequin with the working thread under the needle from the top. 

Repeat the above steps around the sequin. 


At last anchor the thread to the right of the last button hole stitch that is done upwards.

Beautiful framed mirror is ready.

You can view my other mirror work in the following links


Friday, August 20, 2021

Mixed stitches embroidery

 Hi all

Hope all are doing well.  Today I am here to show you a small finish which is a WIP  for a long time.   The design has been taken from a kutch embroidery book.  I have started to practice the kutch work motif(I started to do before 5 years - LOL).  But after doing the motif  I felt that I have selected the wrong colour. In the beginning of this year when I was cleaning my cupboard I got this WIP.   I traced two patterns of the same design.  But now I have decided to complete one and I will try to make it into a wall hanging.  

Video tutorial of basic Kutch diamond. 

Now let me show the design.


Some close ups


Herringbone stitch Leaf and flower.  
Only at the time of editing this blog post I realised that I have embroidered the flower using green colour(poor concentration).   Centre of the flowers are done using satin stitch.  The small leaves are also done using satin stitch. Stems are done using stem stitch. 

This is the kutch work motif.  I have used variegated thread here.  I am thinking how to turn this piece into a wall hanging.  Once I complete it I will post it here.  

Hope all of you like this pattern.  I am planning to come up with a simple craft tutorial.  So watch this space.   Till then, have a nice day. 

Linking to:
*/