Wednesday, August 24, 2022

Lazy Daisy Popcorn Stitch tutorial

Hi all
Hope all are doing well and good.  Today I have come up with the embroidery stitch tutorial for lazy daisy popcorn stitch.  It is an easy stitch.  It can be used as petals for flowers and buds.  

Let's move on to the tutorial.  
I have used 6 strands of thread for this tutorial.

1)  Do a straight stitch first.

2)  Bring the needle up below the straight stitch

3)  Insert a pin from top as shown to have equal length loops.

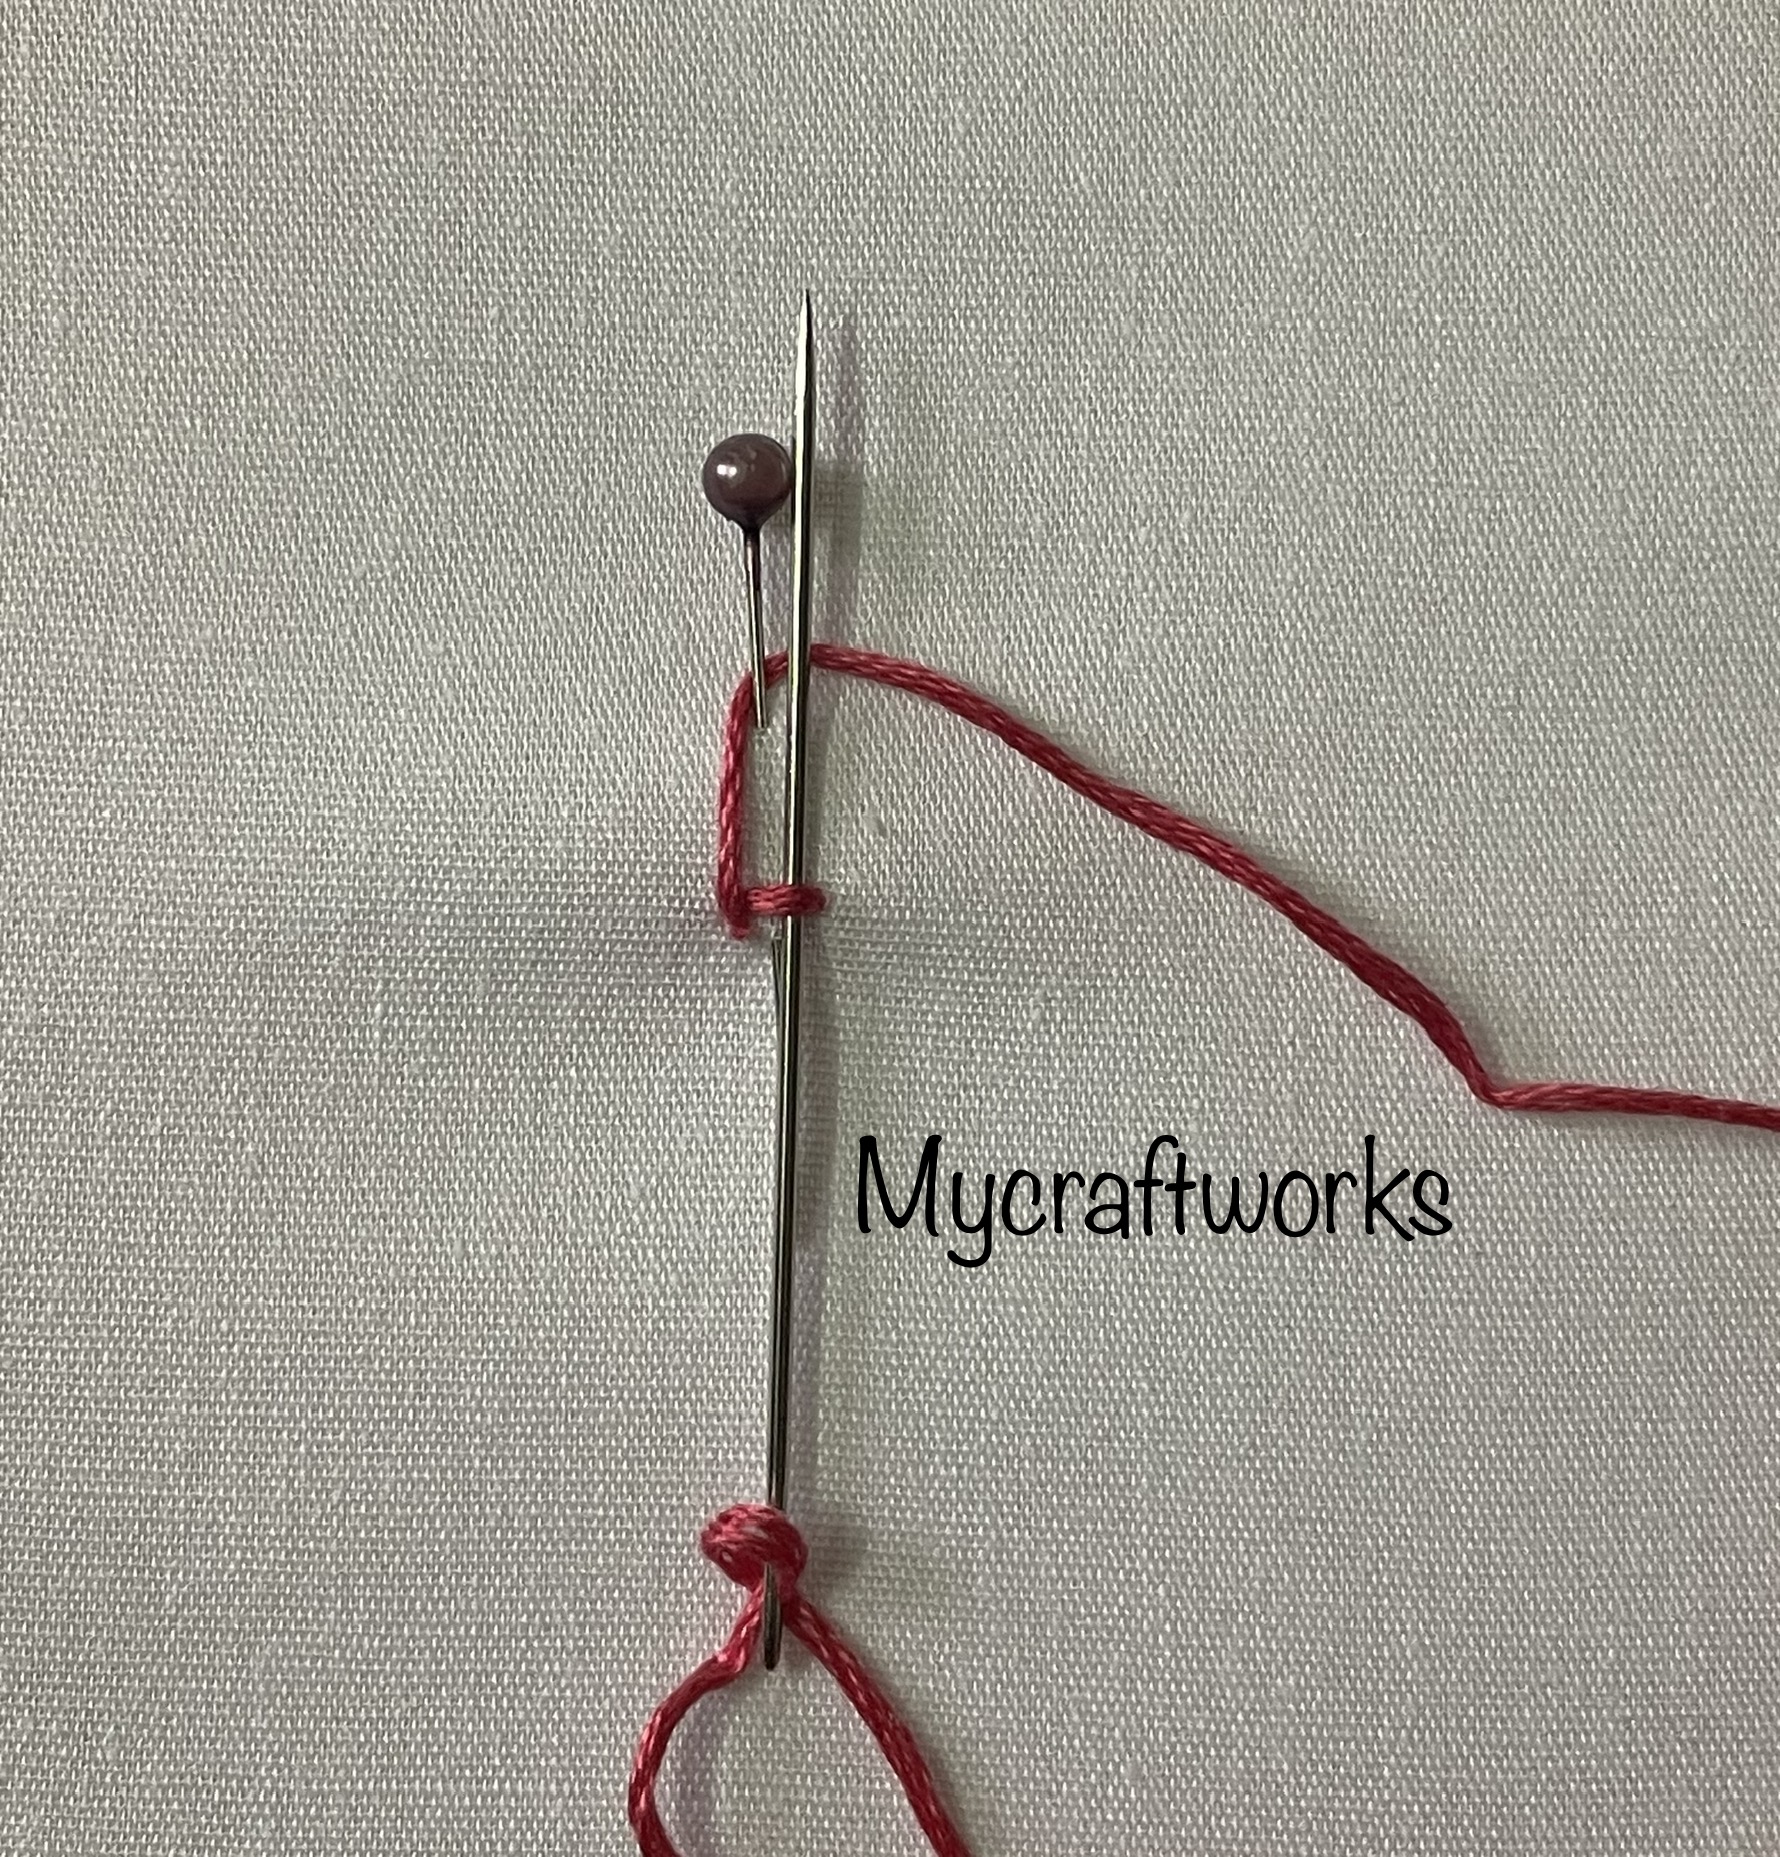
4)  Loop the thread over the needle, pass the needle down the straight stitch without picking up the fabric.  The needle should be above the thread.  

5)  Pull through the needle and thread.  One loop is formed.  

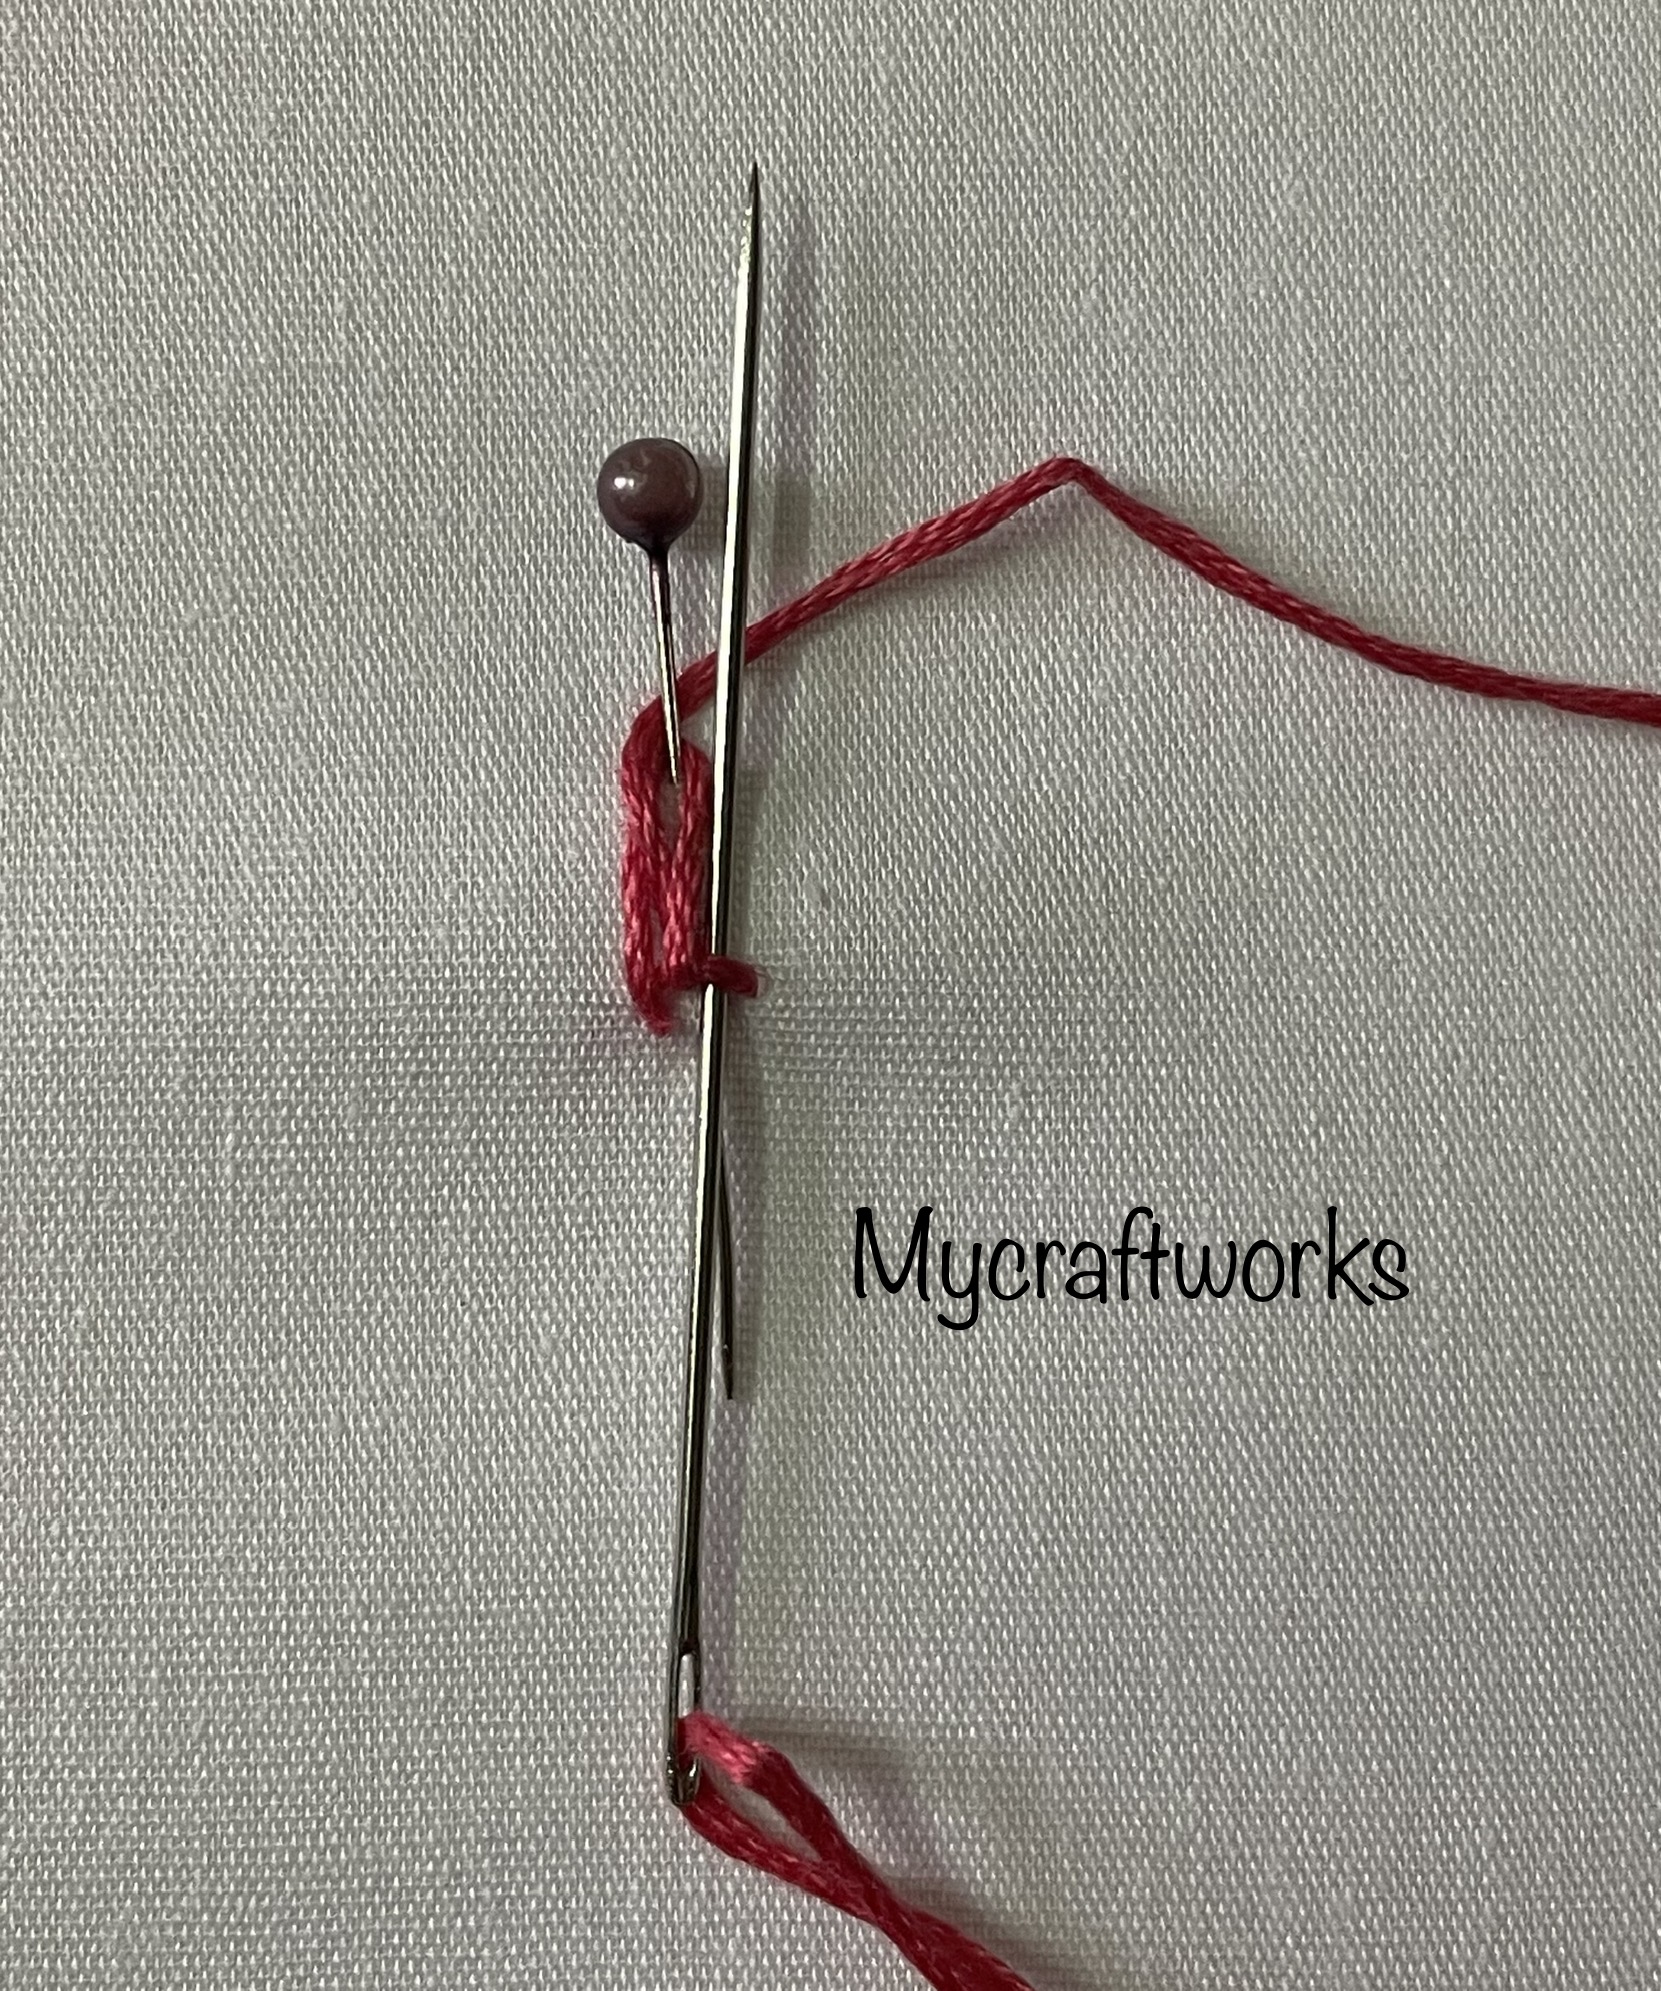
6)  Make 5 such loops right side to the previous one.


7)  This is how it looks after making the 5 loops.

8)  Now remove the pin.  You can see 5 loops.

9)  Pass the needle through the loops from right to left.

10)  The working thread should lie behind the needle.

11)  Holding the loops with the left hand wrap the thread once around the needle from left to right.

12)  Pull through the thread through the wrap made and tighten the knot.

13)  Anchor the thread at the point where the pin is place first.


A lazy daisy popcorn stitch is made.  

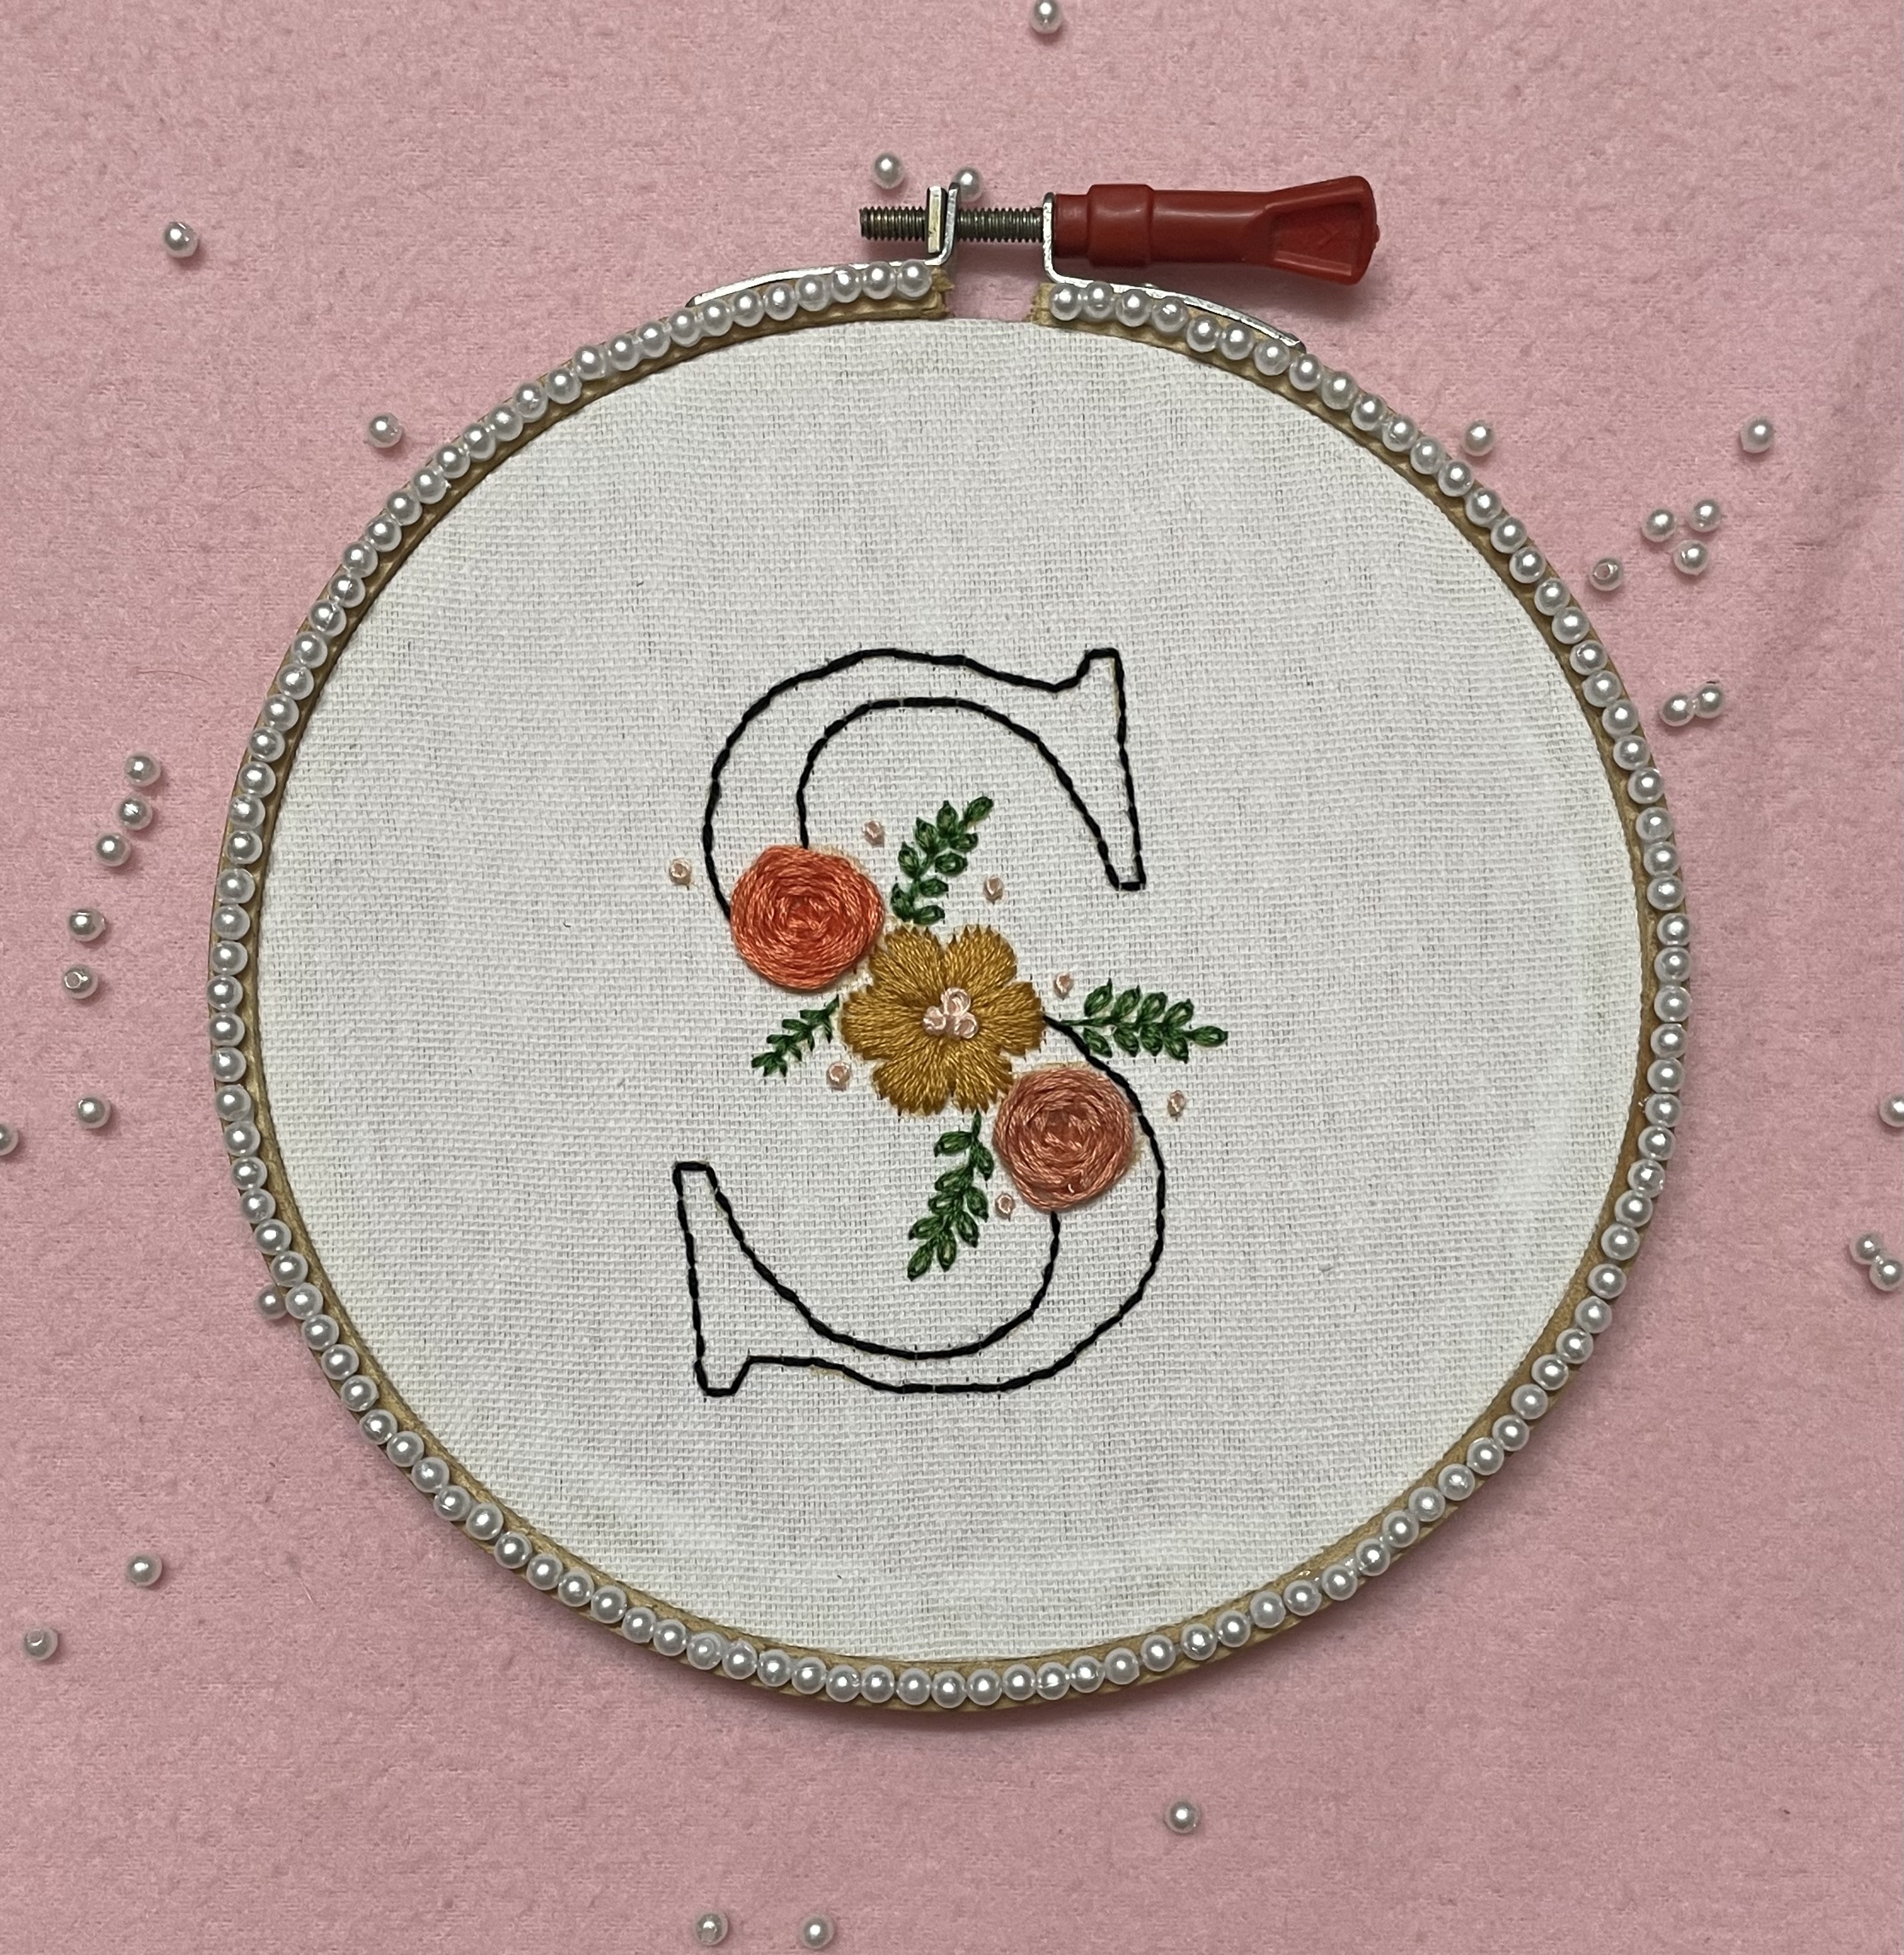
If working for a petal 5 loops will look good. For buds 3 loops is enough.  I have worked a simple design using this popcorn stitch.  You can view it here and pattern is also available.  

Also a video tutorial is available in my youtube channel.  Kindly watch it and give your support.  

Hope this tutorial is helpful.  Do try it out and give your feedbacks in the comments section.  


Tuesday, August 23, 2022

Lazy daisy popcorn flower design

 Hi all

Hope all are doing well and good.  Today I am happy to share with you another embroidery design that uses lazy daisy popcorn stitch. I will post the stitch tutorial tomorrow.  Now I am posting the design along with its design and link for video tutorial.

Pattern for the design 

Stitches used
———————
Flower - Lazy daisy popcorn stitch 
Leaves - Blanket stitch 
Stem - Back stitch 
Buds - lazy daisy base with popcorn stitch 
Circles- satin stitch 

The whole embroidery is done using 6 strands of thread to give a bold look.  There is a video tutorial in my channel.  Do watch it if you are interested.  

Tomorrow i will be back with the stitch tutorial for lazy daisy popcorn stitch.  Till then happy embroidering and have a nice day.

Sunday, August 21, 2022

Floral Alphabet embroidery

 Hi all

Hope all are doing well and good.    Today I am happy to share with you another simple embroidery design which I was longing to do for a very long time.  Floral alphabets are very popular in the embroidery design world and the way they are finished into hoop frames are simply awesome.  I wanted to do one for a very long time and last week I printed one free pattern from the net and have embroidered it. So here it is.

close up of the design

I have chosen the first letter of my name and so it is ‘s’.  The centre flower is done using satin stitch with French knots in the centre.  The other two flowers are done using woven rose stitch.  Leaves are done using fern stitch and lazy daisy stitch.  The alphabet is embroidered using back stitch.  I love the outcome and I finished it in a hoop and glued white round beads to the edges of the hoop.  

Threads used
———————
Satin stitch flower- 1001 (6 strands)
Woven roses - 329, 328 (6 strands)
Leaf - 245 (2 strands)
French knots- 06 ( 6 strands)
Letter - Black (3 strands)

Planning to do more of these kind embroidery in my free time. Hope all of you like it.  There are lots of alphabet designs available online.  Do try one and enjoy.  I will be back with a stitch tutorial soon.  Till then happy embroidering and have a nice day.

Friday, August 19, 2022

Kasuti Embroidery Border Design 2

 Hi all

Hope all are doing well and good.  The simple 2nd border in kasuti embroidery with it's video tutorial.

Video Tutorial

Click below to see the other borders

Border 1

See you with the next border.  Till then have a nice day.

Thursday, August 18, 2022

Tricolour Design

 Hi all

Hope all are doing well and good.  We celebrated our independence day on August 15th.  To celebrate it I have designed a small flower like design that uses the three colours of our flag.  I was not able to post on that day.  So posting it today.

This design uses the simple stitches so that beginners can also give a try.  I have included the lettering also so that one can practice to embroider letters.  Let's move on to the design.  


Center of the design is done using straight stitches that represent chakra in the flag.  It has 24 spokes and I have included 24 straight stitches that emerges from the centre.  Then comes 3 round of fly stitches with green, white and orange/saffron colour.  Then the fly are again layered to get a thick and bold look.  The lettering is done using back stitches.  
  • Straight stitches are done using 2 strands.
  • Fly stitches are done using 6 strands.
  • Lettering is done using 2 strands.  

Pattern for the design.
-----------------------------

Hope all of you like this design.  Do try it and drop in your feedbacks in the comment section.  In my next post I will come up with a kasuti embroidery border design.  Till then, happy embroidering and have a nice day.

Thursday, August 11, 2022

Cretan stitch flower embroidery design

Hi all

Hope all are doing well and good.  Today I am very happy to share with you another embroidery flower design.  It is very simple so that beginners can also give a try.  This design can be used as a single motif as an all over design for your dresses or it can be used as a border design by changing the direction of the motif when worked continuously.  


Stitches Used & Anchor Thread Numbers
----------------------------------------------------
Flower - Cretan stitch ( 62, 66 - 3 strands)
Centre - Rhodes stitch ( 110 - 3 strands)
Stem - Outline stitch (380 - 3 strands)
Leaves - Fly stitch (211- 3 strands)

Pattern for the design
---------------------------------

You can use the following design as a border for your dresses.


Hope all of you like this design.  Do give a try and give your feedbacks in the comment section.  

Have a nice day and happy embroidering. 

Monday, August 8, 2022

Bullion tip lazy daisy flower

 Hi all

Hope all are doing well and good. Today I am happy to share with you a simple flower that uses lazy daisy stitch tipped with bullion stitch.  I have given the video link below.  Hope you will like it. 


Have a nice day

Thursday, August 4, 2022

Kasuti embroidery design border 1

 Hi all

Hope all are doing well and good. From today I will be sharing kasuti embroidery border from simple to complex. 

Today is day1 and the border design is made up of straight line and zig zag line. 


Below is a 1 minute video tutorial on making this border. 

By seeing the design itself you can draw it in a 10 lines per inch graph paper and then trace it on to the fabric using tracing paper. 

See you with another design. Till then have a nice day. 

Wednesday, August 3, 2022

French knot flowers embroidery pattern

 Hi all

Hope all are doing well and good. Today I am happy to share with you a simple embroidery design to practice French knots. 


Pattern for this design
------------------------------
Stitches used
-------------------
Petals - French knots (12 strands, 1 wrap)
Centre of flower - French knots (12 strands, 1 wrap)
Stem - stem stitch (6 strands)
Leaf - Satin stitch (6 strands)

Hope all of you like this design.  Do give a try and drop in your feedbacks in the comments section.  Happy embroidering and have a nice day.

Monday, August 1, 2022

Lazy daisy flower tipped with French knot

 Hi all

Hope all are doing well and good.  Today I am going to share with you a simple variation of lazy daisy flower. I have used French knot to anchor the lazy daisy stitch. Here is the outcome of the flower. 

Here I have used 6 strands of thread for the lazy daisy petals. Before anchoring French knot with 2 strands is made and then the petal has been anchored.  Then with a contrasting colour thread make straight stitches inside each lazy daisy petals.  Added 3 French knots inside the flower with 1wrap of 12 strands. 

I have made a video tutorial for this flower in my YouTube channel.   Have a look at the video and make these simple flowers for your dresses. 

Hope all of you like this tutorial.  Will see you soon with another stitch tutorial. Till then have a nice day. 

*/