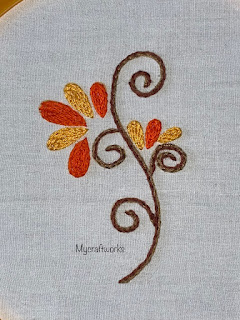
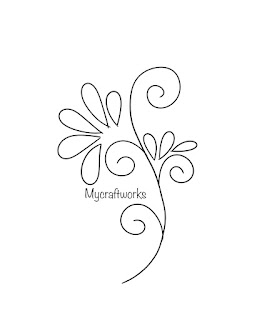
Hope all are doing well and good. Yesterday I have shared the tutorial for doing the pueblo stitch. Today I am happy to share with you a simple embroidery design. Come let us have a look at the design.
Video Tutorial
It is a simple floral design. You can use this design horizontally for borders. For the time being I have drawn the pattern as a single motif. I am in the process of converting this to a neck design. Will post the design once it is completed.
Hope all are doing well and good. In the embroidery stitch tutorial series today I am happy to share with you the tutorial for doing pueblo stitch. I have seen it as a variation of split stem variation at first and while googling it has been given as a variation of back stitch. But after working it, the pueblo stitch is apt under the family of stem stitch.
Video tutorial is below
This stitch uses two colour of threads. For this tutorial I have used 3 strands of red and 3 strands of blue. Totally 6 strands are used. This stitch gives a braid like effect. Now let us move onto the tutorial.
1). Bring the needle up at one point. Take a stitch as you take for the stem stitch.
2) Before pulling through the thread split the threads as shown . I have splitted so that the blue thread comes down and red colour goes up. Now pull through the thread.
3) One stitch is formed
4) Now take the next stitch as we do for stem stitch and this time split the thread so that red colour comes down and blue colour goes up. Pull through the thread thread.
5) Continue this process alternating the colours up and down.
6) A line of pueblo Stitch is formed
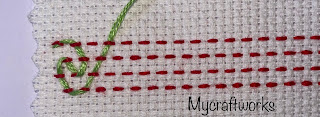
The second line in the below picture shows the pueblo stitch keeping the red colour thread down and blue colour thread up throughout the stitch line.
Hope this tutorial is useful. If you find this tutorial useful do drop in your feedback’s in the comments section.
Hope all are doing well and good. Last year I have posted a picture tutorial for doing a cast on stitch flower. Today I am happy to show you the video tutorial for working the flower.
There are so many other embroidery related videos in my channel. If you are interested in watching those videos kindly subscribe my channel.
Will be back with another embroidery border design tomorrow. Till then, have a nice day.
Hope all are doing well and good. Today I am happy to share with you a simple crochet pattern for a 3 months old baby. It consists of only chains, double and single crochets. So a beginner can also attempt it. Here is the frock
Making of the frock step by step is given in the following video. Do have a look if you want to see how the frock grows.
I used 4 ply yarn and 3.5 mm crochet hook.
Let’s move on to the pattern
This frock is worked in rounds.
Abbreviations:
V-st : dc, chain 2, dc
Shell : 2 DC , chain 1 , 2 DC dc - double crochet sc - single crochet rep - repeat
Ch 88 + 1
Round 1:
DC in 2nd chain from hook. DC in the remaining 87 chains Join with slip stitch to first DC.
Round 2:
Chain 2, DC in first DC
DC in the next DC’s
V-st in the next DC
[ DC in the next 21 DC
V-st in the next dc] rep 3 times
Join with slip stitch.
Round 3:
Chain-2, DC in the first DC
Dc in the next 21 DC
V-st in the next ch-2 space
[ DC in the next 23 DC’s
V-st in the next chain 2 space] 3 times
Dc in the next dc
Join with slip stitch to first dc.
Round 4:
Chain-2, DC in the first DC
Dc in the next 22 DC
V-st in the next ch-2 space
[ DC in the next 25 DC’s
V-st in the next chain 2 space] 3 times
Dc in the next 2 dc
Join with slip stitch to first dc.
Round 5:
Chain-2, DC in the first DC
Dc in the next 23 DC
V-st in the next ch-2 space
[ DC in the next 27 DC’s
V-st in the next chain 2 space] 3 times
Dc in the next 3 dc
Join with slip stitch to first dc.
Round 6:
Chain-2, DC in the first DC
Dc in the next 24 DC
V-st in the next ch-2 space
[ DC in the next 29 DC’s
V-st in the next chain 2 space] 3 times
Dc in the next 4 dc
Join with slip stitch to first dc.
Round 7:
Chain-2, DC in the first DC
Dc in the next 25 DC
V-st in the next ch-2 space
[ DC in the next 31 DC’s
V-st in the next chain 2 space] 3 times
Dc in the next 5 dc
Join with slip stitch to first dc.
Round 8:
Chain-2, dc in the 1st DC
DC in the next 26 DC
*[dc in the chain 2 space
Skip the next 33 DC
Dc in the next chain-2 space] *
Dc in the next 33 DC
Rep from * to * once
Dc in the next 6 DC’s
Join with slip stitch to first dc.
Round 9 - 14:
1 DC in each DC around - 70 DC
Join to first dc.
Round 15:
2 DC in every 15th DC and 1 DC in every other DC’s
Join to first dc.
Round 16:
2 DC in every 10th DC and 1 DC in every other DC’s .
Join to first dc.
Fasten off colour A.
Round 17:
Join colour B.
1 DC in each DC.
Round 18:
(1 DC, chain-1, skip 1 DC ) repeat around
Round 19:
Slip stitch into chain 1 space
(Chain 2, DC, chain 1, DC) in the same chain1 space
V-st in each each chain 1 space around
Join with slip stitch to first dc .
Round 20:
Slip stitch to chain 1 space
(Chain 2, DC, chain 1, 2 DC) in the same chain1 space
(SC in the next chain1 space
Shell in next chain1 space) rep around
Join with slip stitch to first dc.
Round 21:
Slip stitch to chain 1 space
(Chain 2, DC, chain 1, 2 DC) in the same chain1 space
(DC in the next SC
Shell in next chain1 space ) rep around
Join with slip stitch to first DC.
Round 22:
Slip stitch to chain 1 space
(Chain 2, DC, chain 1, 2 DC) in the same chain1 space
[ skip the next 2 DC
2 DC in the next DC
Skip 2 DC
Shell in chain 2 space ] rep around
Join with slip stitch to 1st DC .
Round 23:
Slip stitch to chain 1 space
(Chain 2, DC, chain 1, 2 DC) in the same chain1 space
[ skip the next 3 DC
3 DC in between the 2 DC’s (3 dc group is formed)
Skip next 3 DC **
Shell in chain 2 space ] rep around & finish at **
Join with slip stitch to 1st DC .
Round 24 - 27:
Slip stitch in to chain2 space
[ shell in chain2 space
1 DC in each DC of 3 DC group] rep around
Fasten off colour B.
Round 28 & 29:
Join colour A.
Rep round 24.
Fasten off colour A.
Round 30:
Join colour B.
Slip stitch to chain2 space.
(2dc, chain2, 2dc) in same space & around.
Fasten off.
Hope the pattern is clear. Do give a try and drop your feedback’s in the comments section.
Hope all are doing well and good. Already I have posted a simple running stitch border design. Today I am happy to share with you the video tutorial for the same.
Hope all of you like it.
If you are interested in more such border designs click the following link for the next border.
Hope all are doing well and good. Today I am happy to share with you an embroidery neckline that uses chemanthi stitch flowers. Already I have posted a simple design for practising chemanthi stitch. I have extended that design to form a neck design. You can view that design here.
This is before gluing the half Pearl beads to the centre of the flower. Hope all of you like this design. Will be back soon with another running stitch border design.
Hope the pictures are clear. I have added a video for the above tutorial in my YouTube channel. Do watch it if you are interested and drop in your feedback’s.
Hope all are doing good and staying safe. Yesterday I have posted a tutorial for embroider a simple border design using stepped running stitch. Today I am happy to share with you the video tutorial for doing the same. Do have a look and drop in your feed backs in the comments section.
Hope to see you soon with another video. Till then have a nice day.
Hope all are doing good and staying safe. Though there are lots and lots of embroidery stitches the simple running stitch itself has its own variations and varieties. Kantha embroidery in India is based only on running stitch. On exploring about running stitch variations I have learned the following border pattern that make use of stepped running stitch. I haven't got a picture tutorial but I do have a video tutorial for the same. Do check it out.
Let us move on to the border design. The video tutorial for this border design is in the link given below
This design uses 4 rows of stepped running stitch. I have used 14 ct aida fabric to explain the stitch. Because the fabric makes neat rows of running stitches. I am using 3 strands of threads for this design. The pictures itself makes the process clear.
4 rows of stepped running stitch
From here on the thread passes through the stitches without picking the fabric. You can use same colour thread or a different colour. I have used a different colour with 3 strands.
Repeat the steps again till end.
Hope all of you like this border design. If you are lover of geometrical designs then this one is for you. Do try this and drop your feedbacks in the comments section. In my next post I will come up with the next design I have learned. Till then, have a nice day and stay safe.
Last year was a productive year on the crafty side. Made a lot of things, Started my you tube channel, learned so many new things and started selling my handmade items through insta. After starting that page I have got my first custom order to make a crochet frock for a 3 year old for her birthday. I am so happy on receiving that order. The customer chose a design from the photographs I send and the tricky part is I have to make the frock according to the measurements send by them. That was not in my comfort zone. But I don't want to leave that order. So took courage and said a yes to them and I have to finish it within 15 days.
Placed the order for the yarn and it took 9 days to arrive. I started crocheting the frock when there is 6 days left. Managed to shape the neck according to the measurements. And the frock started to grow and this was the final result. I have completed the frock within 3 days.
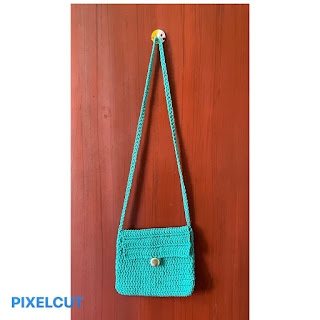
They have asked me a matching bag and hair clips. So I made a small sling bag that goes with the bag and a matching hair clip with a simple flower.
Now I am more confident in crocheting frocks and this year I have planned to design crochet frocks and skirts. More than crocheting, designing takes time. If we have the pattern in hand we can crochet anything in a jiffy. So that's all for today. Tomorrow I will come up with a simple embroidery border. Till then have a nice day and happy crocheting