Monday, October 25, 2021

Christmas tree using wheatear stitch

 Hi all,

Hope all are doing well and good.  Thanks for your response for my last post of running and whipped running stitch design.  As christmas is approaching I thought of embroidering a x'mas tree using the simple wheatear stitch.  I am finishing this into a hoop wall hanging.  How to finish a design in the hoop to a wall hanging will be shown in the next post.  

This is the x'mas tree which I have embroidered. 


I have used two shades of green for the tree, brown for the base of the tree and the star is done using woven star stitch.  The base is done using satin stitch.  

Video tutorial below.  Kindly subscribe my channel.

This is before adding beads.

Pattern for the design
----------------------------------

Anchor thread numbers 
---------------------------------------
Green - 237, 245 ( 3 strands)
Brown - 375 ( 6 strands)
Red - 46 ( 6 strands)

If anybody is interested in getting a kit for this project do mail me at shamiimmanuel@gmail.com or drop in your message in the comments section.  It will be soon available in my amazon seller page

In my next post I will be finishing this piece into a hoop wall hanging along with the kit details.  Till then, have a nice day and have a happy time with your needle n thread. 

Updated: You can see the video of finishing the hoop into wall hanging here

This post has been linked to Craftastic monday, Handmade Monday

Tuesday, October 19, 2021

Running & Whipped Running Stitch Embroidery design

 Hi all

Hope all are doing well and good.  Running stitch is the basic of all the embroidery stitches.  There are many variations using running stitch.  Today I am happy to share with you an embroidery design that uses running stitch and whipped running stitch.  You can another design using running stitch here.  Let us see the design first.


The curls are stitched using running stitches.  The outline of the petals are stitched using whipped running stitch.  petals are filled using running stitches.  The tear drops and the stalk of the flower are stitched using running stitches.  I will be posting the tutorial for running and whipped running stitches soon.  

Pattern for the design
--------------------------
Threads used: 2 strands of anchor 
------------------------------------------
Cream - 301
Orange - 925

Pictures of the progress of the design


Hope all of you like this design.  I will be back with another post soon.  Till then, have a nice day. 

Friday, October 15, 2021

How to crochet a simple and easy headband?

Hi all

Hope all are doing well and good.  I love headbands.  But during my childhood I rarely wear headbands.  Recently I have started to crochet hair accessories and fell in love with it.  

You can view them here and here

Previously I crocheted two headbands using a pattern from the internet.  This time I have tried using the simple double crochet stitches and attached a flower to it.  Simple, neat and elegant headband was ready. 

This headband has been crocheted for a 1 year old.  So I made the rows of dc till it measures 15 inches.  Otherwise you can measure the circumference of the head and make it 2 inches lesser to fit the head perfectly.  

Kindly subscribe to my channel.

For this project I use 4 ply yarn and 3.5mm hook. 


Headband Pattern:

chain 8

Row 1:

Dc in  2nd ch from hook
Dc in remaining chains.
Ch 2 Turn.

Row 2 - 37:

Dc in each dc across, ch 2, turn .
 
Join 1st and last row using slip stitches.

Flower

Ch 5, Join with Sl st to 1st chain.
Inside ch 5, 
(Ch 3, 3dc, Ch 3, Sl st) 5 times
Fasten off. 

I  am trying to make more using simple stitches and will show it soon.  I am working on a simple embroidery design.  Tomorrow I will be back with that.  Till then, have a nice time with your needle and thread.

Happy crocheting. 

Tuesday, October 12, 2021

Crochet scallop flower

 Hi all 

Hope all are doing well and good.  Yesterday I was trying to crochet some star or snowflakes for christmas.  Unexpectedly I have resulted in this crochet flower pattern.  So happy to show you these scallop flowers.   I will update this post soon with the video of crocheting this flower. 

Pattern:

You can use any yarn and crochet hook of your choice.  I used 4 ply yarn for the red flower and anchor knitting cotton for the peach and yellow flowers and a 3.5 mm hook. 

Ch - Chain
Sl st - slip stitch
2dctog - make 2 dc leaving the last loop on hook, pull through 3 loops
3dctog - make 3 dc leaving last loop on hook, pul through 4 loops

Ch 5
sl st to first chain ro form a ring.

Rnd 1:
Ch 2
2dctog into ring
[Ch 3, 3dctog into ring] 5 times
Ch 3
Sl St on top of 2dctog.

Rnd 2:
[5dc into ch-3
Sl st on top of 3dctog] 5 times
5dc in last ch-3
Sl st in 1st sl st.

Fasten off.

Flower before adding the bead.

The beads in the centre add more beauty to the flower. 


Hope all of you like this pattern.  In my next post I will come up with a chemanthi stitch neck design which I am working on.  Till then, have a nice day. 

Monday, October 11, 2021

Hand embroidery flower using chemanthi stitch

 Hi all 

Hope all are doing well and good.  In my last post I have given the step by step pictures for doing a variation of chemanthi stitch.  Today I am happy to share with you the video tutorial for the same along with a practice design.  Let me go straight into the design.


Video tutorial for doing this chemanthi flower is below

Pattern for the design
-------------------------------

Stitches used & Anchor Thread numbers 
----------------------------------------------------
Flower - Chemanthi stitch (298 - 3 strands)
Stem - Split stitch(400 - 4 strands)
Leaves - Fishbone stitch(400 - 4 strands)

This is how it looks before adding the beads.

You can also add french knots in the centre.  A kurti neck design using this design is in my hoop.  Will post it soon once finished.   Hope all of you like this design.  In my next post I will come up with a simple crochet flower which I have come up today unexpectedly.  Till then, have a nice day.

Friday, October 8, 2021

Chemanthi Stitch flower Variation | Embroidery Stitch tutorial

 Hi all

Hope all are doing well and great.  Last week I have posted the tutorial for doing the Chemanthi stitch. You can see the video tutorial here

And today I have come up with a variation of the chemanthi stitch.  It is also worked in a circle but the petals are seen separately.  Along with the tutorial I have provided a design also.  Let us see the design first.

Pattern for this design is at the end of the blog post.

If you are lazy to scroll down the page click below for the picture tutorial

Let's move on to the tutorial.

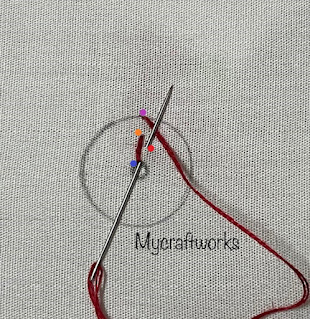
1) Start with a circle.  Draw a small centre circle also. 

2) Bring the needle up in the centre circle.

3)Insert the needle at the orange dot and bring out at lavender colour dot. 

4)Pull through the thread

5) Insert the needle again at blue dot(starting point) 
 come out at red dot
(This dot should be between orange and blue dot).  

6)  Pull through the thread.  

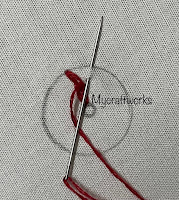
7)Again insert the needle at orange dot(this dot is immediately next to the first orange dot).
Come out at lavender dot(this is the same point as the first dot).
Pull through the thread.

8)Insert the needle again at the starting point( blue dot).
Come out at the second red dot
(this dot is immediately next to the first red dot). 
Pull through the thread. 

9)First stitch is formed.

10) Continue the steps from 3-9 around the circle.  The next petal should be a little right to the first one as shown below.


11) Chemanthi stitch flower with a french knot. 

If you are in youtube kindly subscribe to my channel

Pattern for the design 
---------------------------------

Used 3 strands of thread throughout this design. 

Hope this tutorial is helpful to you .  I will be back with the video tutorial for this stitch soon. Till then have a nice day.  

Wednesday, October 6, 2021

Simple Crochet Purse

 Hi all

Hope all are doing well and good.  For the past one and a half years kids are attending online classes.  And from last month my elder started going to school for 3 days a week and from November 1st my younger one will also start going to regular school.  So as a back to school project my younger one asked me a pouch and this is what I came up with.  Two purses for both of my kids.

If you are new to my blog, kindly follow my blog for more updates.  Also I have a youtube channel named "Embroidery Tutorials and Designs".  If you are interested in watching embroidery and crochet videos kindly subscribe to my channel.  Click here to subscribe.


Video Tutorial
-------------------

  • I have used a variegated yarn and made rows of hdc's so that it form a pattern with no holes and there will be no need to sew a lining. 
  • After crocheting the rows I have turned the piece and folded into half and then joined the sides using sc's. 
  • The from the opening Crocheted some more rows of hdc's for the flap.  
  • Attached magnetic closure for the first one and a velcro for the second one.


This is just a simple purse so that a beginner can also crochet.  I will soon update this post with the video tutorial once I upload it in my youtube channel

In my next post I will come up with a embroidery stitch tutorial.  So do follow my blog. 

Have a nice day. 

Monday, October 4, 2021

Simple Kasuti Embroidery Neckline

 Hi all

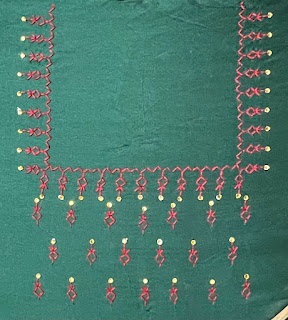
Hope all are doing well and good. For the past few years I have embroidered some kurtis using kasuti embroidery.  But haven't designed any necklines.  Since the time I started doing kasuti sampler I am thinking of doing a simple kasuti neckline.  Finally the day came and I have designed this simple neckline along with the video.  

This is the final look of the neckline I have done.


Video tutorial
---------------------

Before attaching the golden stones

Pattern for the design'
---------------------------------
You can print it in an A4 paper.  For this size I have used 4 strands of thread.  The single design can also be used as an all over motif for dresses.  

Hope all of you like this design.  In my next post I will come up with a simple crochet finish.  Till then, Have a nice day. 

Linking this post to

Saturday, October 2, 2021

Kasuti Embroidery Trimmings and Motifs - Part 3

 Hi all

Hope all are staying safe and doing good.  In the beginning of April I have started to do a kasuti sampler in aida cloth.  You can see both the posts in the following links:

Kasuti Embroidery Trimmings and Motifs - Part 1

Kasuti Embroidery Trimmings and Motifs - Part 2

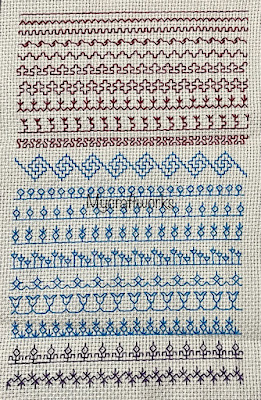
Today I have added 5 more trimmings and 4 motifs in that sampler.  All these trimmings are worked on  10 ct aida with 3 strands of anchor thread.  Come let us see the trimmings now.  


The first trimming has a diamond with three spokes and an inverted 'v' on the fourth side . The diamonds are connected with horizontal lines and another inverted 'v'.

The second trimming is a floral motif .  This also has an inverted 'v' element where the stalk of the flower rest.  All the motifs are connected to each other through horizontal lines.   I am planning to work this trimming as a border for a dress and the floral part separately as a butti all over the dress. 

The third trimming is a development of the first one.  On top of each diamond there are three spokes.  To fill the space between the diamonds another three spoke elements have been added.  I am working on a neck design using this trimming.  Next week I will be posting it.  

The fourth trimming is also like a simple flower with 2 creepers on both the sides of the stalk. 

The fifth trimming is a development of the zig zag one with 3 spokes up and down alternatively. This will be so beautiful for necklines. 

We will move on to the motifs now.  These are worked with 2 strands of anchor thread in 14 ct aida. 


So far the sampler looks like this


So far I have completed 20 trimmings and 9 motifs.  Will be back with another set soon.  

In my next post I will come up with a simple crochet project.  Till then have a nice day.

*/