Tuesday, March 29, 2022

Shell Chain stitch - Video Tutorial

 Hi all

Hope all are doing well and good.  I am happy to share with you the video tutorial for shell chain stitch.  

This stitch belongs to chain stitch family.  This stitch has big chain and a small chain done alternatively.  Very simple and easy to do.  


Do give a try.  This stitch well suits for lines and curves.  I hope it is useful.  Please drop in your feedbacks in the comments section. 

Friday, March 18, 2022

Kasuti Embroidery Design / Holbein Stitch Design

 Hi all

Hope all are doing well and good.  Today I am happy to share with you a simple  kasuti embroidery design that can be used for dresses.  It can be used as an over all design for sarees or kurtis.  Also if it is worked repeatedly it forms a wide border for the dresses.  

Let's see the design first.


I have used 3 strands of anchor embroidery threads throughout this design.   I have made a video to show the stitching of this design.  If you are interested check the following video.
  
 
Now onto the pattern.


You can use a graph paper to draw this design.  Usually 10 lines per inch graph paper is the best to draw the kasuti patterns.  Hope all of you like this design.  I am working on a kasuti neckline with another pattern.  

Thursday, March 17, 2022

Tulip Stitch - Embroidery Stitch Tutorial

 Hi all.

Hope all are doing well and good.  It's been a long time I have posted a tutorial for an embroidery stitch.  Today I am happy to share with you the step by step tutorial for doing the tulip stitch.  This stitch belongs to the chain stitch family.  It is a simple stitch that can be worked as a stand alone stitch or it can be stitched in a line. Let's see the tutorial.  For doing this stitch it will be well and good if you know how to do lazy daisy stitch

Video tutorial 👇

Start with a inverted lazy daisy stitch.


An inverted lazy daisy is made.

Now bring the thread up to the left of the lazy daisy.  The point the thread comes up with be in the middle of the stitch and pass the needle through the tail of the lazy daisy without picking up the fabric. 

Now put the needle in through a point to the right of the lazy daisy stitch  i.e) symmetrical to the point where the thread comes up.  Pull through the thread.  It will take the shape of a broad 'v'.  
Tulip stitch is formed.

Hope this tutorial is clear and helpful.  Will be back with another design soon.  Till then, have a nice day.

Sunday, March 13, 2022

flower with satin stitch look

 Hi all

Hope all are doing well and good. Today I am happy to share with an embroidery design that uses straight stitch but the outcome looks like a satin stitch flower. Also this design has leaves that are worked using lazy daisy stitch and fly stitch.  

Video tutorial here

Let’s have a look at the design. 


Pattern for the design 
——————————-
Hope all of you like this design. Have a nice day. 


Monday, March 7, 2022

Silk thread embroidery design


 Hi all

Hope all are doing well and good. Today I am very happy to share with you a simple and easy embroidery design which I have done as a commissioned order from my friend. 

I have developed this design according to the measurements of the blouse she has given me and it came out perfect. 

Video tutorial here. 

It is a soft silk red fabric and she needs embroidery only in thread that too in a single colour. So I have chosen some what dull golden silk thread and used 4 strands for doing the complete embroidery. I have completed the neck part.  Can’t wait to share it with you all. So the embroidery design now. 

The flowers are done using satin stitch. Stems are done in back stitch. Small leaves are done in lazy daisy stitch. Big leaves are done in fishbone stitch. At last added golden Pearl half beads. I am so happy that it gives a grand look. 

The pattern for the design 

You can print it in A4 size paper. 

I am working on the sleeve portion. Once completed I will upload it with the pattern. Till then have a nice day.  


Friday, March 4, 2022

Mirror work - 6 using lazy daisy stitch variation


Hi all
Hope all are doing well and good.  Today I am happy to share with you another mirror work done using lazy daisy stitch variation.  
Here I am using a 0.5" sequin. 


1)  Fix the sequin using glue or using the stab stitch through the holes in both sides of sequin.

2)  Draw a circle around the sequin with a gap of 0.5 cm from the sequin.

3)  Stitch two straight stitches vertically over the sequin.

4)  Stitch two horizontal stitches over the previous vertical stitches.

5)  Bring the needle up near the sequin.

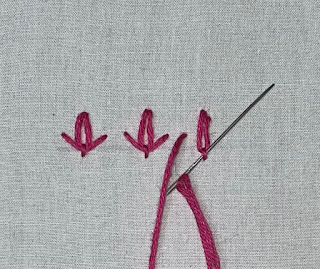
6)  Pass the needle under the base stitches and pick up a small length of fabric near the outer circle with the working thread over the needle .

7)  Pull through the needle.  First stitch is made.

8)  Bring the needle up next to the first stitch and repeat the same.

9)  Pass the needle under the base stitches and pick up a small length of fabric near the outer circle.

10)  Loop the thread over the needle.

11)  Pull through the thread and anchor the stitch outside the stitch as we do for lazy daisy stitch.

Repeat steps from 8 around the sequin.

The mirror is beautifully framed.  
*/