Friday, July 30, 2021

Mirror Work - 3, Buttonhole frame mirror work

 Hi all

Hope all are doing well and staying safe.  I have started a mirror embroidery series and the first two tutorials are done already.  You can view them here and here.  Today I am happy to share with you the next tutorial of mirror work using buttonhole stitch  It forms a nice frame for the mirrors.  Mirror work sarees and blouses are in trend sometime back but now minimal mirror work kurtis are back with the mirror work around the neck and sleeves. 

Let's move on to the tutorial.  For this tutorial I have used a 1.5cm diametre mirror.  

First attach the mirror to the fabric with fabric glue.

Now let us anchor the mirror to do the frame.
Bring the needle up through 1, In through 2.
Up through 3, In through 4
Up through 5, In through 6
Up through 7, In through 8

Now, Bring the needle up through 9, In at 10
Up through 11, In at 12
Up through 13, In at 14
Up through 14, In at 15.

We can do this anchoring without gluing the mirror to the fabric.  But it will be a bit difficult since the mirror moves.  So it is always better to glue the mirror first. 

The next step is to frame around these stitches using buttonhole stitches/blanket stitches.

Bring the needle up through the fabric at any one point outside the mirror. 

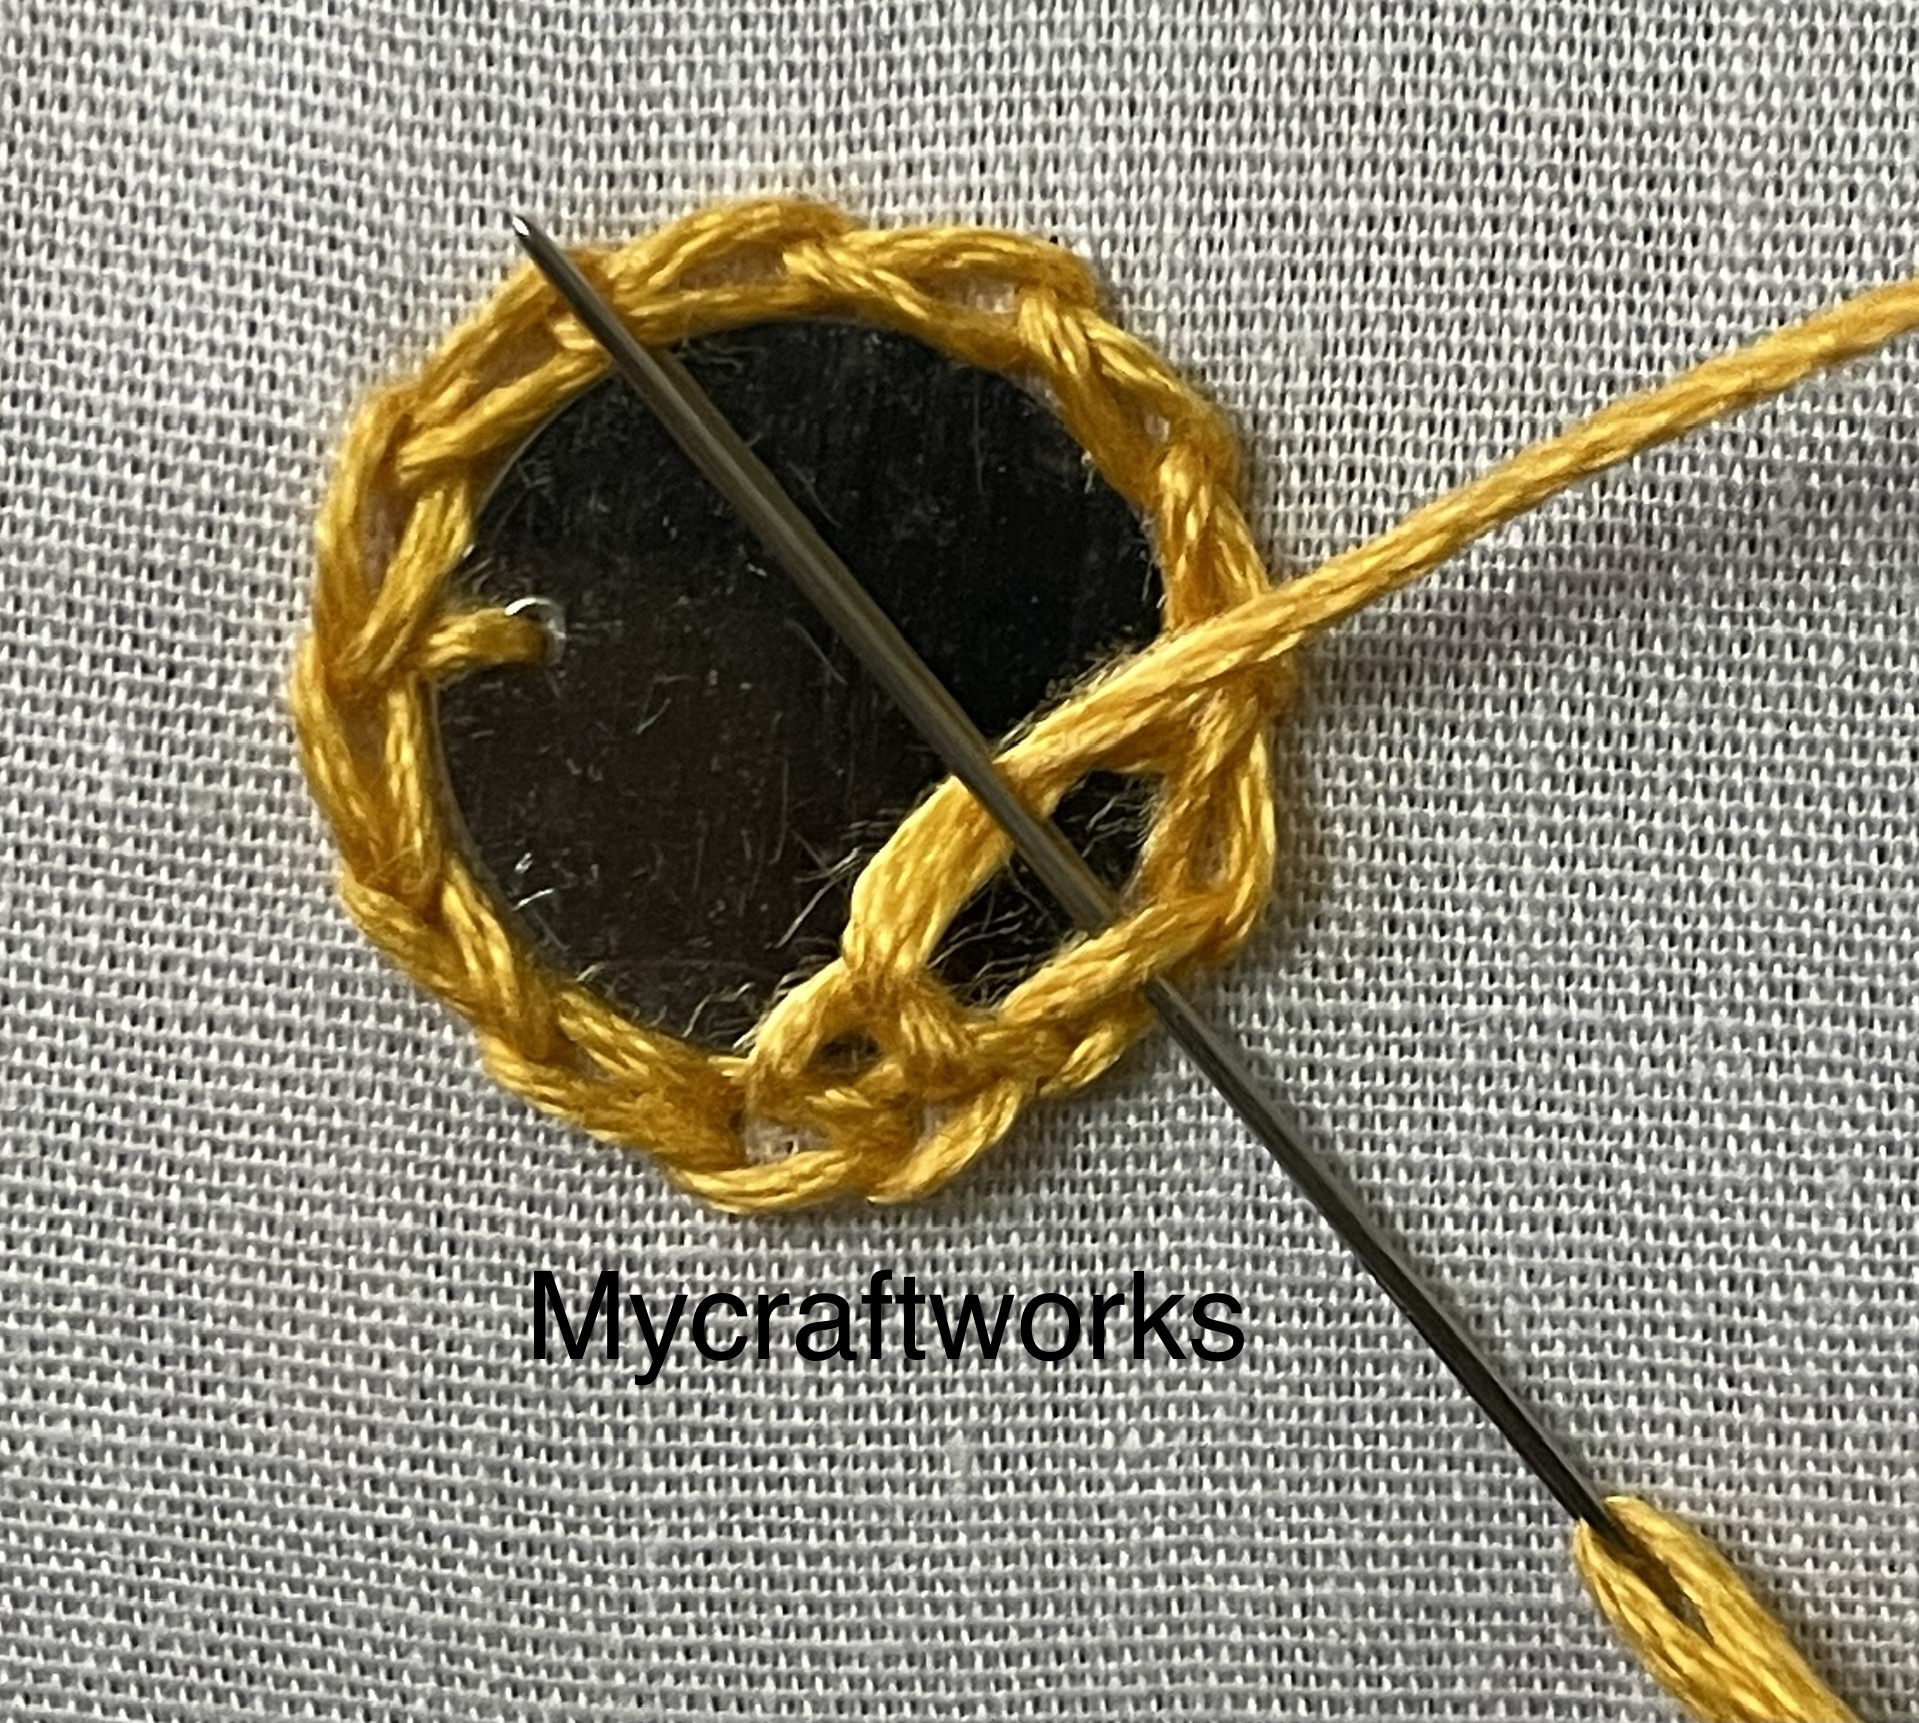
Insert the needle through the anchoring stitches from inside out as shown above.

Pull through and tighten the stitch.

Before starting the buttonhole stitches, do a back stitch to the right of the running thread.

Pull through the thread, a buttonhole stitch is formed. 

Again insert the needle under the anchoring threads from inside and bring it out with the working thread under the needle.  Pull through the thread and the next buttonhole stitch is formed.

Continue in the same manner around the mirror, keeping the buttonhole stitches close as much as possible.

After completing the around the mirror, the frame will look like this.  Anchor the thread at last inside the first buttonhole stitch formed using back stitch. 

To add more beauty to the mirror, I added detached wheat ear stitch around the buttonhole frame.

Then added french knots to the tip of wheatear stitch and long french knots in between the wheatear stitch

There are so many ways to embellish the mirror work.  You can add sugar beads instead of french knots.

Hope this tutorial is useful. Will be back with another interesting post.  Till then, have a nice day.

This post has been linked to 

Wednesday, July 28, 2021

Crochet pineapples square doily

 Hi all

Hope all are doing well and good.  Crochet thread doilies always shows the designs intricately.   I am always attracted towards the pineapple designs though I have saved many other designs. In the following links you can see my doilies that includes pineapple patterns.

Pink Pineapple doily

Pineapple and Bells Doily

Tapestry doily with pineapple edging

christmas Amaryllis doily.

But this time I have crocheted a pineapple doily in square shape. I have found the chart in pinterest.  Will give the link later.  Let us see the doily now. 


Thread: Anchor mercer crochet thread no 20(Art 4054)(For similar thread click here)

Ready to make one for you.  Grab your threads from the following links and start making one. 

These are amazon affliate links. As an Amazon Affiliate, I may receive a small commission from any qualifying purchases made via these affiliate links. This does not result in any additional cost to you.

Hope all of you like this doily.  Tomorrow I will come up with a small cross stitch finish.  Till then have a nice day and happy crocheting. 

Tuesday, July 27, 2021

Embroidery Design - Wheatear Stitch

 Hi all

Hope all are doing well and good.  Yesterday I have shared the tutorial for doing the wheatear stitch.   Today I have posted a simple design to practice the same.  


Pattern for the design
-----------------------------

I have used two shades of green for the stalks. Start with a straight stitch for the tip.  Then proceed with the wheatear stitches till the 'v' shapes are drawn and the remaining part of the stalks are stitched with back stitch.  I have used 4 strands of threads to do the wheatear and back stitch.

After completing the wheatear stitch I have added french knots in red and yellow at the tip of the wheat ears.  I have used 6 strands of thread with 1 wrap.   This is just a simple design to practice wheatear stitch.  

Hope all of you like it.  Tomorrow I will be back with a finished crochet square.  Till then, have a nice day.  

For the other embroidery designs click here.  
                               For the picture dictionary of the designs click here.                                         

This post has been linked to

Monday, July 26, 2021

Wheatear Stitch - Embroidery stitch tutorial

 Hi all

Hope all are doing well and good.  In the embroidery stitch tutorial series today I am going to show the step by step tutorial of doing wheatear stitch.  It is a simple stitch which looks like a lazy daisy stitch having two horns.  Let see the tutorial.

1) Bring the needle up through the fabric at point 'A'.
2) Insert at 'B' and the then come up at 'C'.  It takes the shape of a V.  Pull through.

3)  Again insert the needle in at 'B' and then come up at 'D'.  
The point D is straight below 'B' or you can follow the stitch design.  Pull through.

4) A 'V' shape is formed with the working thread coming out below.

5)  Bring the needle under the 'V' shape without picking the fabric.  

6) Insert the needle again at point 'D' and pull through.  

7)  A wheatear stitch is formed.  If only one wheatear stitch is worked it is 'detached wheat ear stitch. 

You can continue working the wheatear stitch along a line or according to design continuously.

Continue the same from a little below the starting point of the previous stitch. 
Go in as shown in the picture and come out to the right and follow the same steps as above.


Two continuous wheatear stitches are formed

Hope this tutorial is useful.  Tomorrow I will post a simple design to practice wheatear stitch. Till then, Have a nice day.

Friday, July 23, 2021

Crochet Miniature Frock

 Hi all

Hope all are doing great.  Nowadays I am crocheting more than doing embroidery.  Exploring a particular area gives more ideas and this project is one such finish which I have done seeing a picture.  Previously I have crocheted one such minature frock and you can view it here.  This is my second one. 


I have used 4 ply acrylic wool yarn with a 4mm hook.  Let's see the tutorial.
With colour A Start with a magic ring. chain 3(counts as first dc),  
15 dc in magic ring. 
Sl  st to 3rd chain of ch 3.


Chain 4(first dc and chain 1), 
dc in the base of the same chain
(dc, ch-1, dc) in each dc around
sl st to 3rd chain of ch-4.

Sl st to ch-1 space.
chain 3(counts as dc)
dc, ch-1, 2dc in the same ch-1 space.
(2 dc, ch-1, 2 dc ) in each ch-1 space around
Sl st to 3rd chain of ch-3.  Fasten off colour A.

 
Join color B, to any ch-1 space
(ch -3, dc, ch-1, 2 dc) in the same ch-1 space
[(2 dc , ch - 1, 2 dc ) in next ch-1 space] - 3 times
Skip 4 groups of (2dc, ch-1, 2dc)
[(2 dc, ch-1, 2 dc) in next ch-1 space] - 4 times
Sl st to top of ch-3.
(The frock is in two layers now)

Sl st to ch-1 space
(ch 3, dc, ch-1, 2dc ) in the same ch - 1 space
(2dc, ch - 1, 2 dc)  in each ch-1 space around
Join with sl st on 3rd chain of chain-3.
(Repeat the same step once more)

Sl st to ch-1 space
(ch 3, 2dc, ch-1, 3dc) in the same space
(3 dc, ch - 1, 3 dc) in each ch - 1 space around
Join with sl st to 3rd chain of first chain 3.
Repeat the same step once more.
Fasten off colour B.

Join Colour A to any one ch - 1 space.  
*(7 dc in the same ch - 1 sp. (or) ch -3, 6 dc in the same ch-1 sp.
sc in between the next two 3 dc groups.)*
Repeat from * to * around 
Sl st to first dc. Fasten off. 

Your miniature frock is ready.

Thursday, July 22, 2021

Mirror Work - 2, Easy mirror work for beginners

 Hi all 

Hope all are doing well and great.  I have started a series for mirror work tutorials.  The first tutorial using simple straight stitches can be viewed here.  Today I have given the step by step tutorial of framing a mirror to the fabric using chain stitch and buttonhole stitch.  Then I have given a border using fly stitch


Let's move on to the tutorial.  For this tutorial I have used a 2 cm dia sequin.  Since the sequin has holes on the two sides I have anchor the sequin with two small stab stitches.  If you are using a mirror glue the mirror using fabric glue to the fabric and then start with the tutorial. 

I am using 6 strands of anchor embroidery thread here.

1)  Anchor the Sequin with two stab stitches.

2)  Work a circle of chain stitches around the sequin. 

3) Bring the needle up through the fabric from inside anyone chain stitch and pull the thread up.

4)  Now we are going to do the buttonhole stitch.  For that insert the needle through the next chain stitch without picking the fabric. The working thread should be under the needle from the top.  One buttonhole stitch is made. The stitch is made inside the sequin.

5)  Continue in the same way as we do in step 4 for the next chain and through out the chain circle.

6) This is how it will be at the last circle.   Now we have to make the last buttonhole stitch between the last and the first chain.

7)  For the last stitch insert the needle under the first buttonhole stitch and pull the thread through.  Finish this round by inserting the needle at the place where you come up in the beginning to do the buttonhole stitches. 

8) The framed mirror with chain stitches and buttonhole stitches is ready.

I have added a border using fly stitch around the chain stitch.  For each chain stitch I have done a fly stitch and now the mirror work looks like this,

We can also add a sugar bead while anchoring the fly stitches or we can glue a stone at the tip of each fly stitches as an embellishment. 

Hope this tutorial is useful.  Will be back with a crochet finish tomorrow.  Till then, watch this space and have a nice day.

This post is linked to :

Wednesday, July 21, 2021

Star Hotmat Doily

 Hi all

Hope all are doing well and good.  Today I am happy to share with you a doily -mandala which I have crocheted for my amazon store.  The pattern is from here. 

I have made it in two colours.  Crocheted using 4 ply acrylic wool with a 3.5mm hook.  They are very easy so that it can be whipped up within an hour.  


This doily can be used as a centre piece for a table with a flower vase or it can be used as hotpads in the dining table.  This doily is made up of dc's, chains and slip st.  Any beginner can also try this.  


These doilies are available for sale in my amazon store - India.  Do check out the other products also. I making more doilies and purses these days.  I am ready with the next mirror work tutorial.  The tutorial for first mirror work is here. Thanks for reading this post. 

Have a nice day.

This post has been linked to :
*/