Wednesday, June 22, 2022

Flower embroidery using couching

Hi all

Hope all are doing good.  Today I am happy to share with you another simple design that uses couching stitch.  Hope all of you will like it.  


Progress of the design is shown in the following pictures.  
You can see the working of the design in my video tutorial.

For this design I have used 6 strands of thread for the laid thread(maroon colour) and 3 strands for couching(Cream colour)


Pattern for the design
----------------------------------

In my next post I will be back with a tutorial for doing pachis work.  Till then, have a nice day and happy embroidering.  

Friday, June 17, 2022

Laced Chain Stitch - video Tutorial, How to do laced chain stitch

 Hi all

Hope all are doing good.  Today I am happy to share with you the video tutorial for doing the laced chain stitch.


Hope all of you find this tutorial useful.  I will be back with a new embroidery design.  Till then happy embroidering.  Do subscribe my channel if you like my videos. 

Have a nice day.  

Tuesday, June 14, 2022

Sunflower embroidery

 Hi all

Hope all are doing well and good.  When it comes to embroidery design I always have a liking to embroider flowers.  I haven’t tried embroidering a sunflower.  Today I have tried to embroider a sunflower  using simple stitches.  Though it is not perfect in the centre I like it.  There are so many ways to embroider a sunflower.  This is one of the simple way.  Let’s see the embroidery first and then we will look into the details.  

The flower petals are done using straight stitches.  3 stitches are done for a single petal.  Then three layers of French knots.  I would have been better if I have used only read and brown.  I am not satisfied with the beige colour in the centre.

Stem is done using whipped stem stitch and flowers using fly stitch.

Pattern for the design 


1 - fly stitch 
2 - whipped stem stitch 
3 - straight stitch 
4 - French knots

Anchor thread colours

1 & 2 - 262 - 2 strands 
3 - 298 - 3 strands 
4a - 46 - 2 strands- 2 wraps 
4b - 355 - 2 strands- 2 wraps 
4c - 368 - 2 strands- 1wrap

Hope all of you like this post.  Soon I will update this post with the link for the video tutorial.  Also will try to embroider sunflower using other stitches.  Do try this and let me know the outcome.

Happy embroidering.

Thursday, June 9, 2022

Rosette Stitch Rose embroidery Design - Video Tutorial

 Hi all

Hope all are doing well and good.  Lastly I have posted a tutorial for doing rosette stitch rose.  Today, I am happy to share with you all a video tutorial that shows the working of a simple pattern with the rosette stitch rose.  It is a simple design that beginners can also attempt.   Here is the video tutorial.


If you like my video, consider subscribing my channel.  That will encourage me to do more.  In my next post I will come up with a kasuti pattern with its video tutorial.  Till then, happy embroidering and have a nice day.  

Monday, June 6, 2022

Rosette Stitch Rose Tutorial

 Hi all,

Hope all are doing well and good.  Today I am happy to share with you the tutorial for doing rosette stitch rose.   It's a very simple rose beginners can also try.  


Let's move on to the steps now.
Bring the needle up at one point.  Then take a small stitch from below and bring it up again at the initial point.  Don't pull through the needle.

Wrap the thread around the needle, till you need the size of the flower.

Here I have taken three wraps.

 
Pull through the needle and thread.  Don't pull it completely.  Leave a small loop below.

 
Place a needle marker inside the last wrap and close the loop tight.  Anchor the thread outside the wraps on top.  

Remove the needle marker and bring the working needle at the point inside the last wrap.

Pull through the needle and thread and anchor the thread outside the last wrap below.

Rosette stitch rose is ready.

Tomorrow I will post a simple design to work this rosette stitch rose.  Till then, happy embroidering and have a nice day.

Friday, June 3, 2022

Mirror Work 7 - using Cretan Stitch

 Hi all

Hope all are doing well and good.  Today I am happy to share with you another mirror work that has been done using cretan stitch.  


For this tutorial I have used a sequin.   I have drawn a circle around the sequin and from that circle and at a distance of 1 cm marked equally spaced dots. 

1)  Glue the sequin to the fabric or attach it to the fabric using small stitches using the holes on both sides of the sequin.


2)  Make base stitches using straight stitches.  


3)  Bring the needle up between any two dots near the sequin.

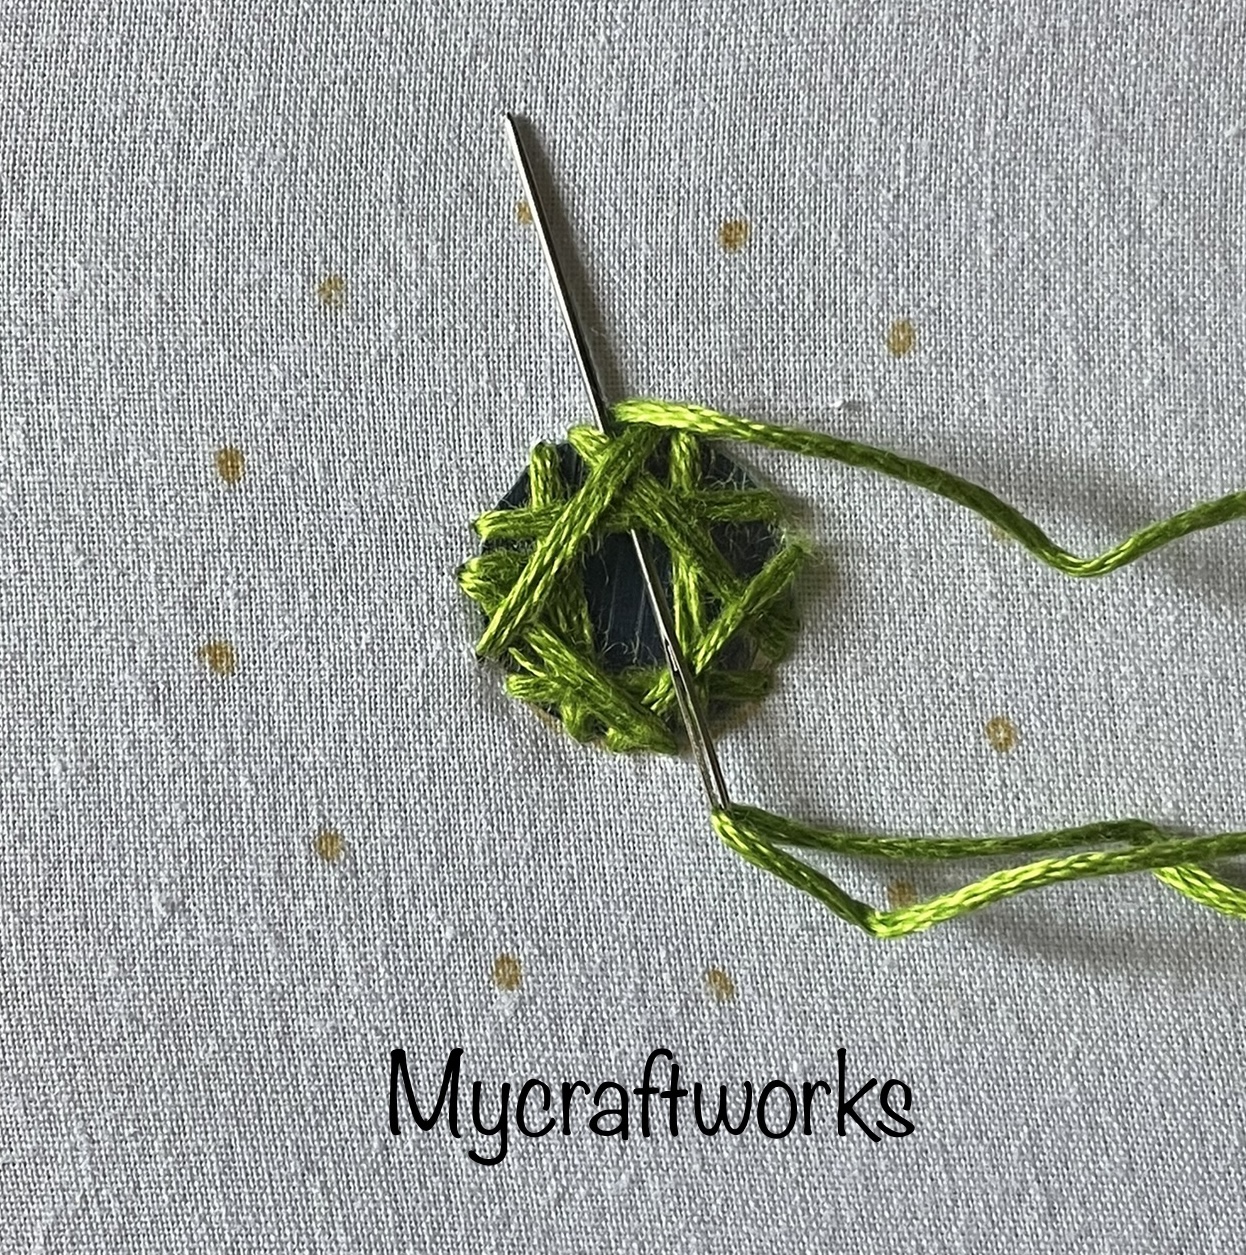
4)  Pass the needle below the base stitches from the centre of the sequin.  The working thread should be on the right side of the needle and pull through the thread firmly around the base stitches.

5)  Take a stitch from the dot that is to the right of the initial point.  The stitch should go in at the dot and come out in the midway of sequin and the dot.  Pull through the thread.  The working thread should be in the right side of the needle.

6)  Again pass the needle under the base stitches with the working thread under the needle.

7)  Take the next stitch from the next dot like as before and pull through.

8)  Continue the steps 7 & 8 in clockwise direction.  Anchor the thread in the first point where it comes up initially.  

9)  The sequin is beautifully framed using cretan stitch.

The following work is done with 24 dots equally spaced around the sequin .

Hope all of you found this tutorial useful.  I will be back with another interesting tutorial soon.  Till then have a nice day.  

Thursday, June 2, 2022

Zentangle Pattern - Amy Video Tutorial and filling a journal page with Amy

 Hi friends

Hope all are doing well and good.  Yesterday I have posted about how to draw the zentangle pattern - Amy.  

Today I am  happy to share with you the video tutorial for doing it and a journal page which I have filled using the pattern.  Though I embroider most of the time, I doodle patterns like this to break the monotony. I used to draw a mandala or a zentangle pattern, colour at times, and sometimes use to quill flowers.  This pattern I have drawn on one such day and then I have made a video tutorial for the same. 

Kindly click subscribe if you like my videos.

These are some of the pictures I have taken while filling my journal page using this pattern.  Here I have used 4x4 cm squares.
  
Coloured using Uniball signo gel ink


You can find more on zentangles here.

Hope all of you like this doodles.  See you with another interesting post.  Till then have a nice day.

Wednesday, June 1, 2022

Zentangle Design - Amy , How to draw

 Hi friends

Hope all are doing well and good.  After a long time I have done some doodling and this time I have tried the zentangle pattern 'Amy'.  Let me show the steps in drawing the pattern 'Amy'.  This is the design.


Start with a square with 4 x 4 cm.  Divide it in the centre both horizontally and vertically.


Join the centres and form a diamond.

Follow the pictures to complete the pattern.


You can find more on zentangle here.

Hope all of you like this pattern.  Will come up with more zentangle patterns.  Till then have a nice day.
*/