Wednesday, June 30, 2021

Easy crochet flowers for studs

 Hi all

Hope all are staying safe and doing good.  These days I am doing only embroidery projects.  Always embroidery projects take a long time to get finish when comparing to crochet.  All my embroidery and cross stitch project in my WIP basket will take long time to finish.  So to get instant satisfaction of finishing something I used to crochet coasters and potholders/ hotpads.  

Yesterday for a change I started to whip up these easy crochet flowers that doesn't need a pattern to follow.  You can whip it up in an evening.  To add an extra touch I have glued a pearl in the centre of the flowers and they looks even more beautiful.  So let us see the flowers.  


All these flowers are made using Anchor pearl 8 cotton and Anchor crochet cotton no.20.  I have used 1.5mm hook to crochet these. I have planned to make earring using these flowers.  So I have used threads to whip up these flowers .

Pattern
--------------
In magic circle, 
ch 2, 4 dc, sc
(5dc, sc) 4 times
Join with the 2nd chain of first ch-2.  Finish off. Weave in the ends.  

or

In magic circle,
 Ch 2, 4 dc, sl st
(ch 2, 4 dc, sl st)4 times
Join with the 2nd chain of first ch-2. Finish off.  Weave in the ends.  


These set of flowers are also done using the same pearl 8 cotton and anchor crochet cotton 20.  

Pattern
----------
In magic circle
(Ch 2, dc, Ch 2, sl st) - 5 times 

I like these tiny flowers than the first set.  Also I have made only one rose flower.  I will make more of these to make a wreath and then will share the pattern here.  If you are interested in making these flowers grab the supplies through the above links and start making these tiny flowers.  They will brighten up your work table. 

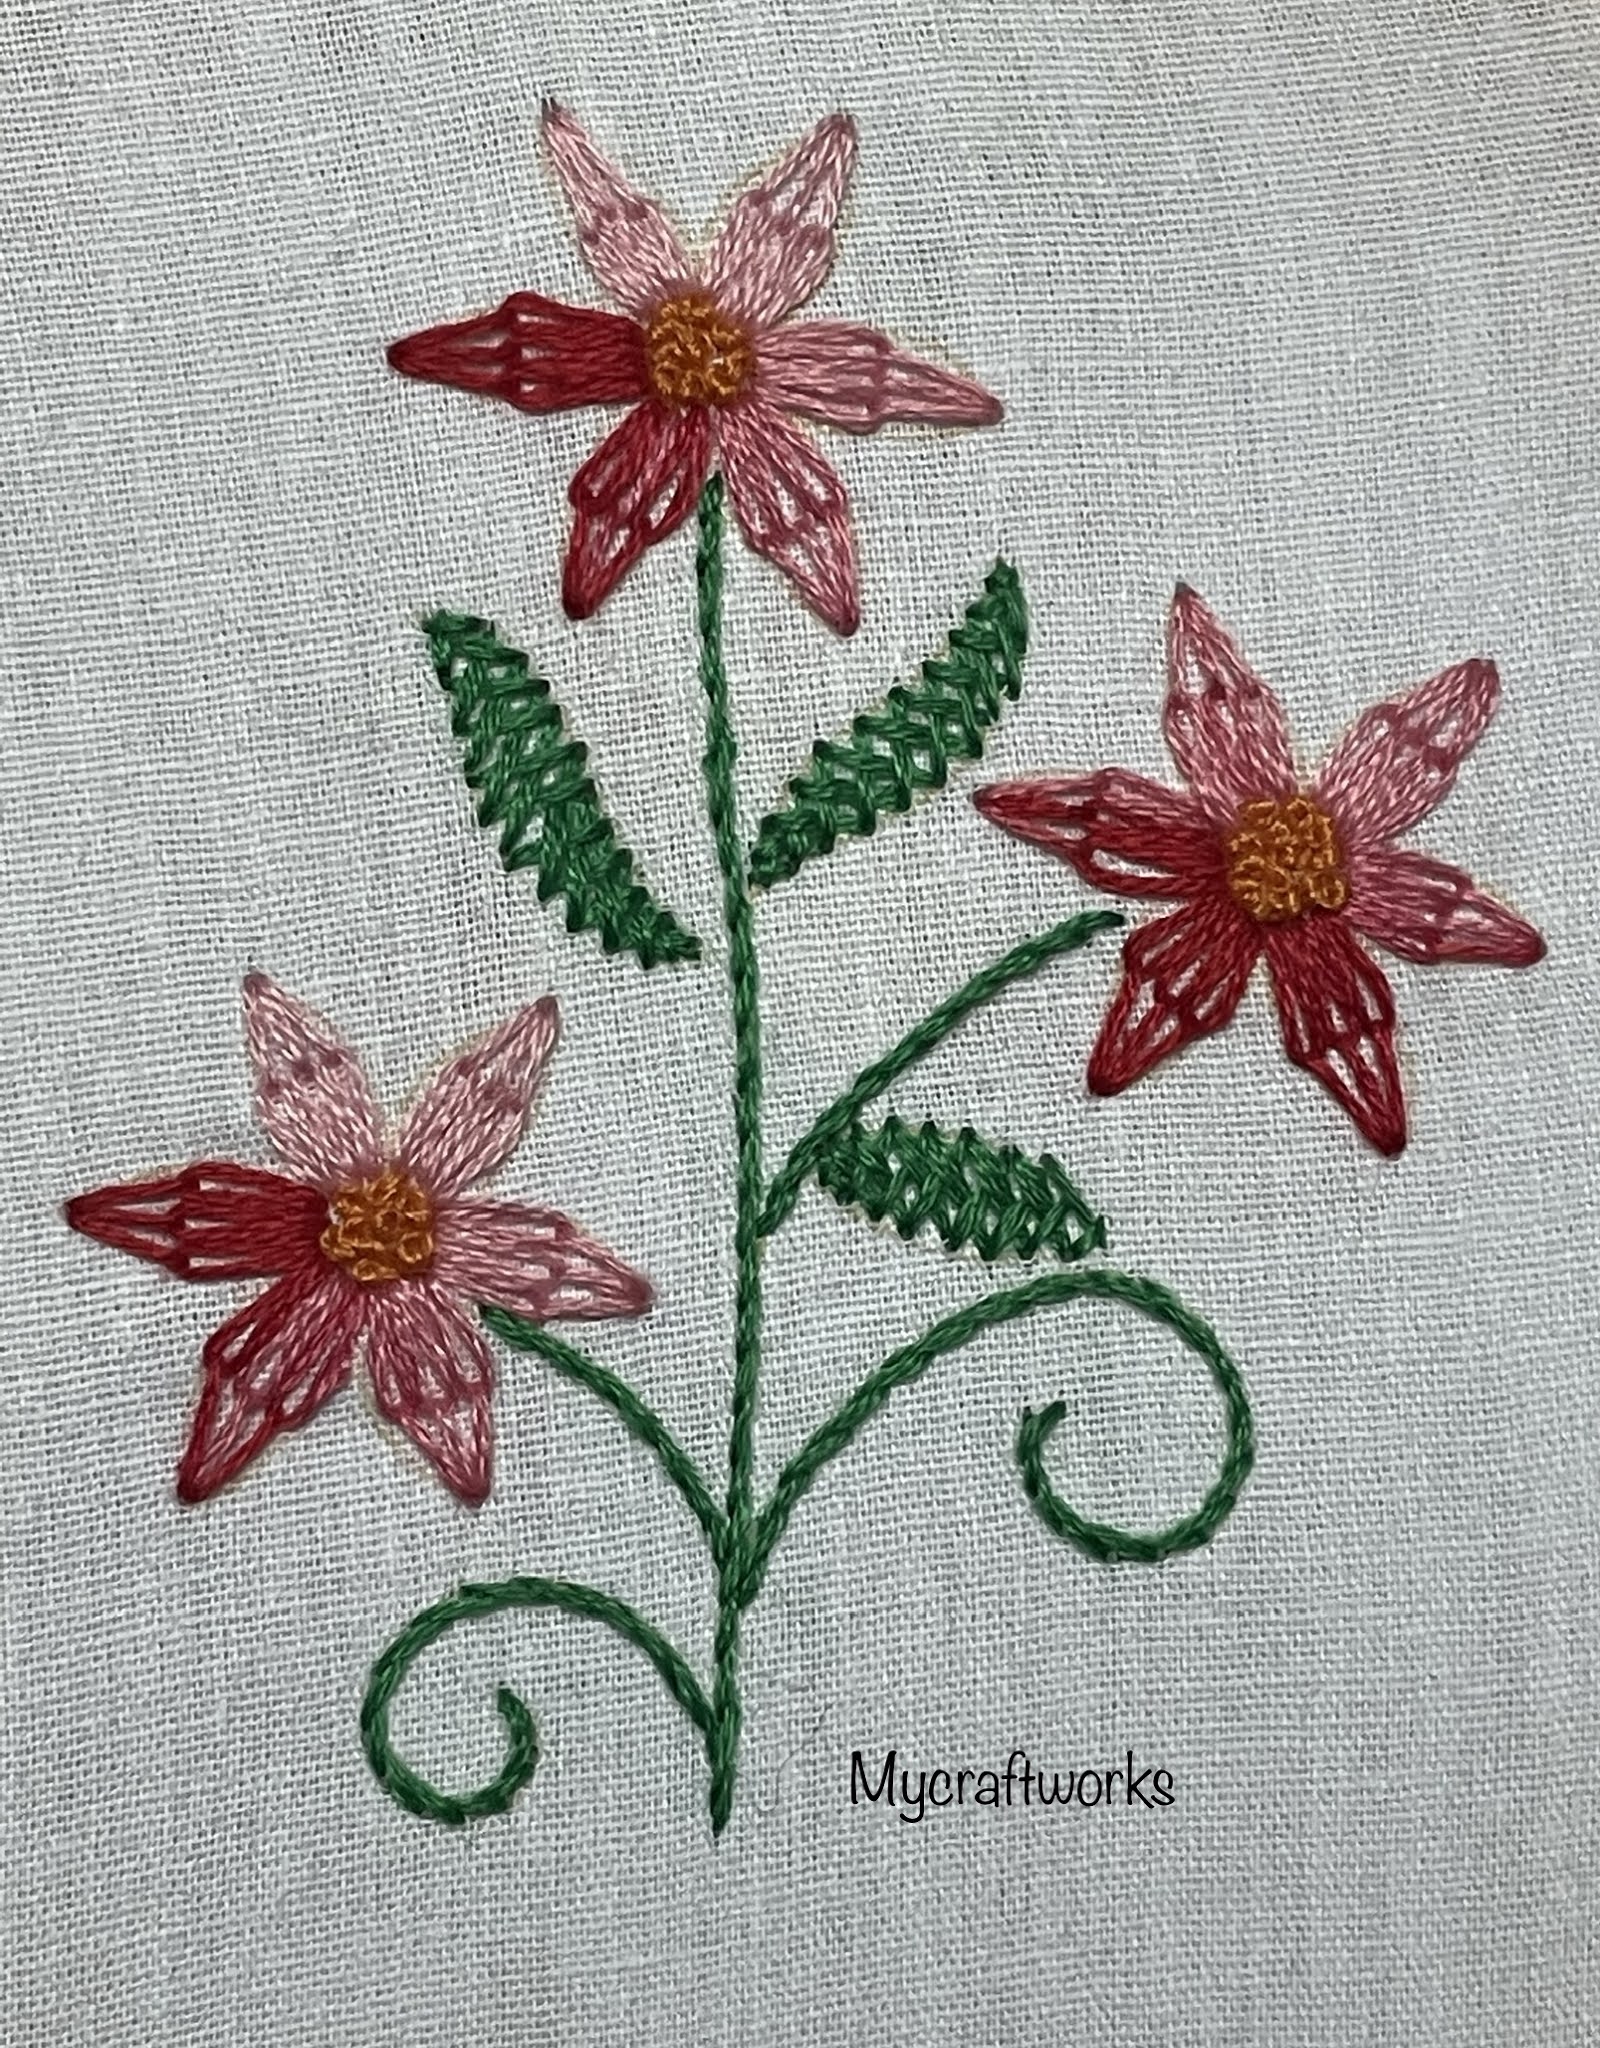
Hope all of you like these tiny flowers.  I will come with more crochet roses and the steps in making a wreath out of it soon.  Tomorrow I will meet you with a rainbow of lazy daisies.  Till then have a nice day. 

This post contain affiliate links.  I may receive a small commission from any qualifying purchases made via these affiliate links at no additional cost to you.

This post has be linked to the following parties.

Monday, June 28, 2021

Embroidery Finish after a long time - Kutch work kurti

 Hi all 

Hope all are staying safe and doing good.  Two months back I have started to embroider a kurti using kutch work.  You can view it here. I should have finished it within that week itself.  But other projects took its turn and this kurti was almost hidden in the WIP basket.  Two days back when I was going through the WIP's I took this kurti and decided to finish it before proceeding with the other projects.  I have completed only one sleeve portion in May.  Day before yesterday started with the the neck portion and today I have completed the neck and the other sleeve.  

Have a look at the neck design.  The material is chiffon cotton..  Anchor embroidery threads of three strands have been used all over the design.  The blue colour circles are eyelet stitch.


Sleeve portion
---------------------

Closeup of the neck design
----------------------------------------

I am a person who does not stick to one project.  But day before yesterday I have decided to work only on this project alone and I am happy I have finished it. 

Do you want to learn kutch embroidery?  I have some basic tutorials for you here.  From that page start with the link for single diamond.  Once you get the hang of the stitch you will be addicted to do kutch work.  I am preparing some kutch work kurti kits for those who are interested in doing kutch work.  Please do have a look at the other kutch work kurtis here.   If any one of you interested in getting a kit on any particular design from that page do leave a comment or write to me at shamiimmanuel at gmail dot com.  I will prepare it for you or if any of you want to work any of the designs for you do mail me. I will do it for a reasonable rate. 

Hope all of you like this kurti.  Tomorrow I will come up with some crochet small flowers.  Till then have a nice day.

Saturday, June 26, 2021

Embroidery and Crochet books I own & Review

 Hi all 

In this page I will be listing the embroidery books I own.  I will update this page once a week. 

2) Long and Short stitch Embroidery - A collection of flowers from Milner craft series

Click Here to purchase

I love to do needle painting.  It takes a lot of time to finish a small design.  Whenever I saw a design that is done with long and short stitch, I also wanted to do one.  So one fine day I ordered the above book through amazon.  The price of the book is very reasonable.  But the information present in the book is priceless.  The pages of the book are all photo sheets.  The cover itself is very beautiful and they are all like painting.

The book contains the basics of long and short stitch.  The direction to be stitched and the colour way that has to be used to achieve the effect of shading is explained in detail.

The book starts with the basic shapes of a petal to more complicated shapes of leaves in a step by step way.  Then comes smaller flower motifs and then medium flowers and finally a good selection of beautiful flowers. 

Each project includes the outline of the pattern, then a picture to show the direction of the stitch flow and a finished picture of the project.  

Another important thins in each project is that each project includes the list of thread numbers needed for that particular project and that is the best gift I got from this book because I am very poor in colour selection.  

I have completed only one project till now.  For the small flower I took a whole day but the result is very very beautiful.  I have blogged about it here.

Next I will be doing the following flower.  It's like a dream project to me.  The above piece of embroidery is like a treasure to me.  Though we can stitch these flowers for pillow cover or table linens, I will only frame it because the finished piece will be an absolute piece of art.  


For those who are interested in needle painting it is a must buy book.  I will give 5 stars to this books. 


1)Embroidery Stitches Step by step - Lucinda Ganderton

Click here to purchase

  • This book is a visual encyclopedia of stitches. 
  • It contains more than 200 stitches with step by step instructions. 
  • It starts with an introduction to embroidery, materials, tools and techniques used in embroidery. 
  • Then it contains a gallery of stitches. 
  • From that we can select a stitch which pleases us and can select the particular page to learn it. 
  • Stitches are categorized into different sections such as line and border stitches, Filling stitches, Openwork stitches, Needlepoint stitches.
  • It is a quick reference of stitches. 
  • The quality of paper is very good. 
  • High quality photographs are used.
  • It is worth buying for beginners. 

It would have been better is some designs are provided for practice.  Otherwise anyone who wants to learn embroidery can add it to your library.  

Friday, June 25, 2021

Easy embroidery pattern for beginners - Long tailed Daisy

Hi all 

Today I am happy to share with you another easy embroidery design for beginners.  In my last post I have posted the step by step tutorial for doing the long tailed daisy stitch.   Today's design is to practice that stitch.  This design can be used as all over motifs for sarees, cushions, kurtis etc.  


Pattern for the design
----------------------------------
Stitches used
Centre of flowers - French Knots
Stems - Stem stitch
Leaf - Herringbone stitch

Anchor Thread numbers
Flowers - 1203(3 strands)
French knots - 308(3 strands, 1 wrap)
Leaves and stem - 230(3 strands)

Hope all of you like this tutorial.  Tomorrow I will be back with the embroidery books I own.  Till then have a nice day.

Thursday, June 24, 2021

Long Tailed Daisy - Embroidery Stitch Tutorial for beginners

 Hi all,

Hope all are doing good.  Three days back I have conducted a game to guess a stitch.  But there was a problem in posting the answers.  One of my friend told that she was not able to type in the text box of the contact form.  And some said they have send the answers but I didn't receive it in my mail.  On the whole I came to know that the contact form was not working properly from a remote system other than mine.  But 4 to 5 of them those who had personal contact with me through the mail they guessed the stitch.  For those who guessed the stitch I have send the e-book to their mail.  If any of you are willing to get the e-book please do leave a comment in the comments section. 

The name of the stitch is "LONG TAILED DAISY".  

This stitch is an embroidery stitch for the beginners.  A variation of lazy daisy i.e) Lazy daisy stitch with a long tail is long tailed daisy stitch.  Let me show how to work the long tailed daisy stitch and a flower out it.  Also I have shown how to stitch a leaf out of that stitch.  Long tailed daisy can also be used to form the petal of a flower.  

Click Here for the Video Tutorial

How to work long tailed daisy?

Take the needle out through the fabric.  Insert the needle in the same place and pick a small amount of fabric upwards as we do for chain stitch and lazy daisy stitch. 

Bring the thread over the needle and pull the needle through the fabric.  A chain is formed like this.  

 
Now anchor the thread a little above the stitch formed forming a tail.  A long tailed Daisy stitch is formed.

How to work a long tailed daisy flower and leaf?

Now let us see how to work long tailed daisy stitch to form a flower and leaf.  Here I have worked the stitch in a circle.  From the outer edge of the circle I have made the stitch next to each other with the tail anchored around the circle in the centre.  

Now draw a leaf shape. First stitch a long tailed daisy in the centre i.e) start from one end and anchor at the opposite end.  
 

Now stitch the second stitch to the left or right of the first stitch.  I have stitched it to the left.  Start from near the first one and anchor the tail exactly at the first anchoring point.   Then stitch the third stitch to the right of the first stitch with the tail anchor at the same place.  A leaf like structure is formed .


Hope the tutorial is clear.  I will be back with a simple design to practice the stitch.  Til then have a nice day.  

Tuesday, June 22, 2021

Kantha Embroidery - Dhaneer Sheesh in leaf

 Hi all

Hope all are staying safe and doing good.  Yesterday I have posted the tutorial for working dhaneer sheesh stitch in arrow shape.  Today I am going to show how to apply that stitch to a leaf.  

Start with a leaf structure and draw some lines slantingly as shown in the picture below.   We are going to stitch the area marked with black lines.  


Start from the centre of the leaf and complete any one portion. After completing half of the leaf it will look like as shown.

Now complete the other portion. and the leaf with dhaneer sheesh looks like below.

Now work the outline of the stitch in Paichano or whipped running stitch.  A completed leaf look like the one below.

Soon I will post a design to work on dhaneer sheesh arrow in leaf.  Till then have a nice time.

This post has been linked to following link parties

Kantha Embroidery - Dhaneer Sheesh in arrow shape, Paichano-Wipped Running Stitch

 Hi all

Hope all are staying safe and doing good.  In kantha embroidery series today's stitch is working dhaneer sheesh stitch in arrow shape.

Dhaneer sheesh stitch when worked in arrow shapes forms a nice and unique border.  Let's move on to see the design.  Here we have to stitch inside the Start with the left end of the arrow and move towards right.  We have to fill the space inside the arrows.  If you are new to this page please refer working of dhaneer sheesh stitch here.

Trace the following design to work dhaneer sheesh in arrow shape


Start working the running stitch from the left end of the arrow and move towards right.  First row is complete.


Now start from the right side and just below the first row and continue in the same manner.

After completing the design it will look like this.  Dhaneer sheesh in arrow is completed. 

PAICHANO / WHIPPED RUNNING STITCH

Another one basic stitch used in kantha embroidery is Paichano.  It nothing but whipped running stitch used in crewel embroidery.  Most of us know what is whipped running.  But for those who don't know how to work whipped running stitch, follow the steps below.

Work a line of running stitches.

Bring the needle up near the last stitch.  Insert the needle under the thread of the last stitch from top without picking the fabric. Pull through the thread.

Same way insert the needle under all the stitches from the top without picking the fabric. 
  

The running stitch base is whipped now and the paichano stitch in kantha embroidery is ready.

Hope the tutorial is clear.  Tomorrow I will post the design to work the dhaneer sheesh arrow in leaf.  Till then have a nice time with needle and thread.  

You can check the following image link for a fusion of crochet flower and kantha emrboidery cushion and a rich kantha work duppatta.  
 As an Amazon Affiliate, I may receive a small commission from any qualifying purchases made via these affiliate links. This does not result in any additional cost to you.

Sunday, June 20, 2021

Guess the stitch - Win an e-book / Giveaway - 1

 Hi all

Hope all are staying safe and doing good.  Today just for fun I have decided to do a guessing game.  Yesterday I was stitching a design for another embroidery stitch tutorial.  I thought let me show the flower and ask the viewers to guess the stitch.  


Those who guess the stitch do send your answers through the contact form in the right side bar of my web page.  Please do the following steps
  1.   write your name in the name box,
  2.  Email  in the email box
  3. 'Stitch name'  in the message box.  Along with the stitch name kindly say 'yes' or 'no'.  Please do give your consent to add you to my email list to get notifications of my latest blog posts. 

If you are viewing the page in mobile do go to the web version of the page and you will find the contact form in the right side bar.

For those who are giving the right answers I will mail you my e-book "FIVE EMBROIDERY DESIGNS FOR BEGINNERS".  The book includes printable patterns, stitch tutorial and stitch key for the designs found in the following picture .  All the designs were posted in  my blog.  But in the PDF I have compiled everything together.


What to do if you don’t know the answer? Simply fill in the contact form with your name and email I’d. I will send you a small surprise to your mail. 

I will take the answers till wednesday 12 pm IST.  On Wednesday evening I will tell the stitch name with the tutorial of the stitch and a design for  you to stitch with that stitch.  

Waiting for your answers.  It will encourage me to publish more regarding embroidery.  Thank you and have a nice day.  

Saturday, June 19, 2021

Kantha Embroidery Design - 4

 Hi all

Hope all are staying safe and doing good.  In Kantha embroidery series today I am happy to share with you another design that uses Chakra Butti and Bejod stitch.  This design can be used repeatedly to cover an area of the fabric.  


Pattern for the design
------------------------------

Stitches used
-------------------
Flowers - Chakra Butti
Stem - Running stitch
Small circles  - straight stitches one upon another

The fabric which worked is black colour silk cotton.  Anchor embroidery threads of colour numbers 926, 324 and 185 are used.  3 strands of threads are used throughout the design.   

This post may contain affiliate links. As an Amazon Affiliate, I may receive a small commission from any qualifying purchases made via these affiliate links. This does not result in any additional cost to you.

Kantha Embroidery - Bejod stitch leaf

 Hi all

Hope all are doing well and good.  In kantha embroidery there are so many ways to work a leaf.  The simplest way is to work running stitch along the leaf design.  Another unique way of stitching kantha leaf is using Bejod stitch to fill the leaf.  

If you are new to kantha embroidery you can view the basic stitches from here.  

All my posts related to kantha embroidery can be viewed here.

Today I am going to share the bejod stitch which again is a running stitch and how it is used to fill a leaf.  Bejod stitch is also running stitch worked in the following pattern.

First start with a leaf picture. 

Stitch the outline of the leaf and vein with running stitch. 
 

Now start working on anyone side of the leaf.  The leaf will look good if we work each part with different colour.  Here I have started with the right side.  Stitch a line of running stitch near the vein.  

Next row of stitches appear between the gaps of the previous line of running stitch. 

Continue the fill the leaf pattern. After completing the both the portions the leaf will look like this,

If you work both the sides of the leaf in the same colour it will not be that much appealing.  So work the leaf in two different colours.  
                       

Hope all of you like this tutorial.  I will post the next kantha embroidery design tomorrow.   Till then have a happy time. 
*/