Plaid filling stitch is a decorative hand embroidery stitch used to fill large areas with a neat, woven look. It is worked by stitching evenly spaced vertical and horizontal lines that cross each other, creating a checked or plaid pattern. This stitch is simple to learn, uses straight stitches, and looks attractive even with basic color combinations. Plaid filling stitch is ideal for borders, motifs, and all-over designs on fabrics like cotton, linen, and Aida, making it beginner-friendly and versatile.
Video Tutorial Below
I hope this plaid filling stitch inspires you to add beautiful texture to your embroidery projects. With a little practice, the plaid filling stitch becomes easy and enjoyable. Try it on your next project and enjoy the rhythm of stitching. Have a happy time with your needle n thread.
Looking for simple embroidery designs for kurtis? In this tutorial, you’ll learn how to transform a plain kurti into a beautiful embroidered kurti using a basic flower design and easy embroidery stitches. Perfect for beginners, this step-by-step embroidery video tutorial will guide you how to add floral embroidery to kurtis with simple hand embroidery techniques. Start your DIY kurti embroidery project today and give your wardrobe a fresh, handmade look!
Video Tutorial
Hope all of you like this tutorial. See you soon with another design. Till then have a nice day and have a happy time with your needle and thread.
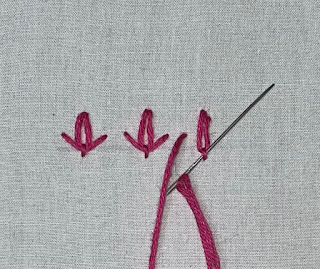
Hope all are doing well and good. It's been a long time I have posted a tutorial for an embroidery stitch. Today I am happy to share with you the step by step tutorial for doing the tulip stitch. This stitch belongs to the chain stitch family. It is a simple stitch that can be worked as a stand alone stitch or it can be stitched in a line. Let's see the tutorial. For doing this stitch it will be well and good if you know how to do lazy daisy stitch.
Video tutorial 👇
Start with a inverted lazy daisy stitch.
An inverted lazy daisy is made.
Now bring the thread up to the left of the lazy daisy. The point the thread comes up with be in the middle of the stitch and pass the needle through the tail of the lazy daisy without picking up the fabric.
Now put the needle in through a point to the right of the lazy daisy stitch i.e) symmetrical to the point where the thread comes up. Pull through the thread. It will take the shape of a broad 'v'.
Tulip stitch is formed.
Hope this tutorial is clear and helpful. Will be back with another design soon. Till then, have a nice day.
Hope all are doing well and good. In the embroidery stitch tutorial series today I am happy to share with you the tutorial for doing pueblo stitch. I have seen it as a variation of split stem variation at first and while googling it has been given as a variation of back stitch. But after working it, the pueblo stitch is apt under the family of stem stitch.
Video tutorial is below
This stitch uses two colour of threads. For this tutorial I have used 3 strands of red and 3 strands of blue. Totally 6 strands are used. This stitch gives a braid like effect. Now let us move onto the tutorial.
1). Bring the needle up at one point. Take a stitch as you take for the stem stitch.
2) Before pulling through the thread split the threads as shown . I have splitted so that the blue thread comes down and red colour goes up. Now pull through the thread.
3) One stitch is formed
4) Now take the next stitch as we do for stem stitch and this time split the thread so that red colour comes down and blue colour goes up. Pull through the thread thread.
5) Continue this process alternating the colours up and down.
6) A line of pueblo Stitch is formed
The second line in the below picture shows the pueblo stitch keeping the red colour thread down and blue colour thread up throughout the stitch line.
Hope this tutorial is useful. If you find this tutorial useful do drop in your feedback’s in the comments section.