Hi all.
Hope all are doing well and good. It's been a long time I have posted a tutorial for an embroidery stitch. Today I am happy to share with you the step by step tutorial for doing the tulip stitch. This stitch belongs to the chain stitch family. It is a simple stitch that can be worked as a stand alone stitch or it can be stitched in a line. Let's see the tutorial. For doing this stitch it will be well and good if you know how to do lazy daisy stitch.
Video tutorial 👇
Start with a inverted lazy daisy stitch.


An inverted lazy daisy is made.
Now bring the thread up to the left of the lazy daisy. The point the thread comes up with be in the middle of the stitch and pass the needle through the tail of the lazy daisy without picking up the fabric.
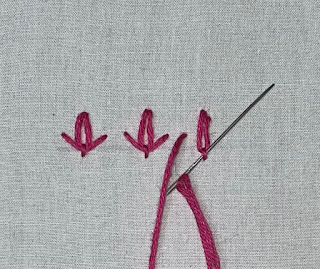
Now put the needle in through a point to the right of the lazy daisy stitch i.e) symmetrical to the point where the thread comes up. Pull through the thread. It will take the shape of a broad 'v'.

Tulip stitch is formed.
Hope this tutorial is clear and helpful. Will be back with another design soon. Till then, have a nice day.
This comment has been removed by a blog administrator.
ReplyDelete