Showing posts with label Fly stitch. Show all posts

Wednesday, October 12, 2022

Stem stitch flower design

 Hi all

Hope all are doing well and good.  Today I am happy to share with you a simple embroidery design to practice stem stitch.  In this design you can practice shading with stem stitch and also I have given some pictures to show how to work a pointed leaf using stem stitch.  


The stem is worked in rows of stem stitch using three shades of green. In the lower two leaves two rows of stem stitch is done and inside the leaf is filled with fly stitch.  Flower is worked using stem stitch.  Centre of the flower is done using straight stitches and the outlined with back stitch with a French knot in the centre.  

The leaves in the top is worked with one row of stem stitch with fly stitch inside.

Throughout the design I have used 3 strands of thread.  For backstitch I have used six strands of thread. 

Pattern for the design 

—————————-

 
Below is the video tutorial to work this design 

Tips to work pointed leaf in stem stitch 


Hope all of you like this design.  Do give a try and drop your feedback's in the comments section.  

See you soon with another post.  Till then have a nice time.

Thursday, August 18, 2022

Tricolour Design

 Hi all

Hope all are doing well and good.  We celebrated our independence day on August 15th.  To celebrate it I have designed a small flower like design that uses the three colours of our flag.  I was not able to post on that day.  So posting it today.

This design uses the simple stitches so that beginners can also give a try.  I have included the lettering also so that one can practice to embroider letters.  Let's move on to the design.  


Center of the design is done using straight stitches that represent chakra in the flag.  It has 24 spokes and I have included 24 straight stitches that emerges from the centre.  Then comes 3 round of fly stitches with green, white and orange/saffron colour.  Then the fly are again layered to get a thick and bold look.  The lettering is done using back stitches.  
  • Straight stitches are done using 2 strands.
  • Fly stitches are done using 6 strands.
  • Lettering is done using 2 strands.  

Pattern for the design.
-----------------------------

Hope all of you like this design.  Do try it and drop in your feedbacks in the comment section.  In my next post I will come up with a kasuti embroidery border design.  Till then, happy embroidering and have a nice day.

Thursday, August 11, 2022

Cretan stitch flower embroidery design

Hi all

Hope all are doing well and good.  Today I am very happy to share with you another embroidery flower design.  It is very simple so that beginners can also give a try.  This design can be used as a single motif as an all over design for your dresses or it can be used as a border design by changing the direction of the motif when worked continuously.  


Stitches Used & Anchor Thread Numbers
----------------------------------------------------
Flower - Cretan stitch ( 62, 66 - 3 strands)
Centre - Rhodes stitch ( 110 - 3 strands)
Stem - Outline stitch (380 - 3 strands)
Leaves - Fly stitch (211- 3 strands)

Pattern for the design
---------------------------------

You can use the following design as a border for your dresses.


Hope all of you like this design.  Do give a try and give your feedbacks in the comment section.  

Have a nice day and happy embroidering. 

Tuesday, June 14, 2022

Sunflower embroidery

 Hi all

Hope all are doing well and good.  When it comes to embroidery design I always have a liking to embroider flowers.  I haven’t tried embroidering a sunflower.  Today I have tried to embroider a sunflower  using simple stitches.  Though it is not perfect in the centre I like it.  There are so many ways to embroider a sunflower.  This is one of the simple way.  Let’s see the embroidery first and then we will look into the details.  

The flower petals are done using straight stitches.  3 stitches are done for a single petal.  Then three layers of French knots.  I would have been better if I have used only read and brown.  I am not satisfied with the beige colour in the centre.

Stem is done using whipped stem stitch and flowers using fly stitch.

Pattern for the design 


1 - fly stitch 
2 - whipped stem stitch 
3 - straight stitch 
4 - French knots

Anchor thread colours

1 & 2 - 262 - 2 strands 
3 - 298 - 3 strands 
4a - 46 - 2 strands- 2 wraps 
4b - 355 - 2 strands- 2 wraps 
4c - 368 - 2 strands- 1wrap

Hope all of you like this post.  Soon I will update this post with the link for the video tutorial.  Also will try to embroider sunflower using other stitches.  Do try this and let me know the outcome.

Happy embroidering.

Friday, August 20, 2021

Mixed stitches embroidery

 Hi all

Hope all are doing well.  Today I am here to show you a small finish which is a WIP  for a long time.   The design has been taken from a kutch embroidery book.  I have started to practice the kutch work motif(I started to do before 5 years - LOL).  But after doing the motif  I felt that I have selected the wrong colour. In the beginning of this year when I was cleaning my cupboard I got this WIP.   I traced two patterns of the same design.  But now I have decided to complete one and I will try to make it into a wall hanging.  

Video tutorial of basic Kutch diamond. 

Now let me show the design.


Some close ups


Herringbone stitch Leaf and flower.  
Only at the time of editing this blog post I realised that I have embroidered the flower using green colour(poor concentration).   Centre of the flowers are done using satin stitch.  The small leaves are also done using satin stitch. Stems are done using stem stitch. 

This is the kutch work motif.  I have used variegated thread here.  I am thinking how to turn this piece into a wall hanging.  Once I complete it I will post it here.  

Hope all of you like this pattern.  I am planning to come up with a simple craft tutorial.  So watch this space.   Till then, have a nice day. 

Linking to:

Tuesday, April 13, 2021

Embroidery design for hoop - Fly stitch

 Hi all

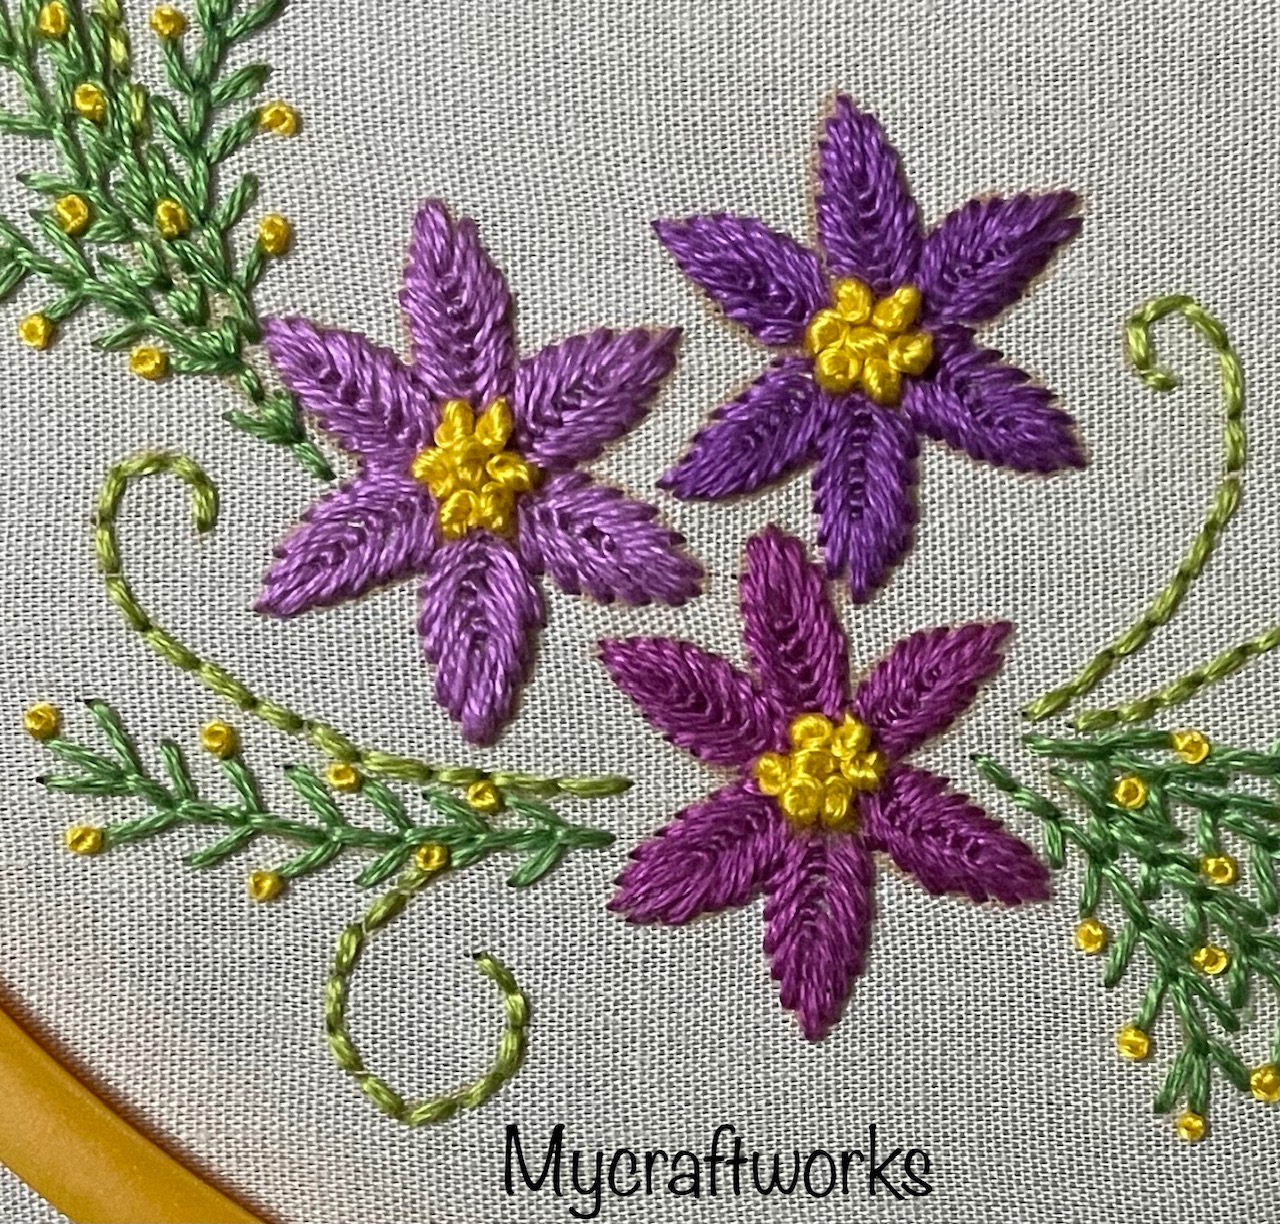
Hope all are doing great.  I am sure you have like my previous pattern on kutch work. In January I have posted a small fly stitch flower design to practice.  Again In my embroidery design series with various stitches,  today I am happy to share with you a design that can be used for embroidery hoop wall hanging.  I have drawn this design that fits a 5" hoop perfectly.  Let's see the design now.


Stitches Used:
  • Flowers - Closed fly stitch
  • Centre of flowers - French knots
  • Spirals - Back stitch
  • Letters - Back stitch
  • Floral sprays - Fly stitch with french knots

Anchor Thread numbers:
  • Flowers - 89, 92, 94 (3 strands)
  • Centre of flowers - 298 (6 strands, 1 wrap)
  • Spirals- 255(3 strands)
  • Letters- 89(3 strands)
  • Floral sprays - 257(3 strands), 298(3 strands, 1 wrap)

For other embroidery stitches click here. 

Tomorrow I will update this post with the pattern for this design and the tutorial for fly stitch in a separate post.

Monday, January 4, 2021

Fly stitch Embroidery design

 Hi all

Hope all are doing well.  Fresh new beginnings always refreshes me and this year also I have some plans to be implemented in my crafty journey. In my next post I will write about the plans and projects I want to complete this year.  

Today I am happy to share with you another free design that uses the simple fly stitch.  I will add the tutorial for the fly stitch soon and will update the link here.  


Pattern for the design
----------------------------------

Stitches used
--------------------
Flower and leaves - fly stitch
Stem - stem stitch

Threads used - Anchor
--------------------------
Flower - 1005 (2 strands)
Stem - 255 (4 strands)

Hope all of you like this design.  Do give a try and let me know in the comments.

Wednesday, January 18, 2017

Embroidered yoke - 1, Gifts

Thanks for all your comments in my last post.  Today I have come up with an embroidered yoke along with its pattern.  It is embroidered with the simple stitches.


STITCHES USED:
-------------------------
Fly stitch(3 strands)

Anchor thread no's: 530(blue) and 225(green)

For the center I have glued a round stone of green and blue colors.  I will be attaching this piece to a kurti later.  

During christmas I have received a gift from my blogger friend Mini.  She has sent me so many goodies-( a cross stitch magazine, cross stitch kit, a post card, cross stitch card, mini hangers, a crochet bookmark, a pincushion, embroidery thread, cross stitch cloth of finer count) some of them are in my wishlist to buy. Especially the cross stitch magazine and the mini hangers.,  I love it.  Thanks Mini.


I have made a little progress in my needlepoint project and a good progress in granny stripe blanket,  Also, done two set of motifs in the kasuti sampler.  In my next post I will come up with the stitching part for January for the SAL's I am participating.  Till then Happy stitching.

Saturday, November 9, 2013

Saree blouse

Today I have come up with the blouse for the saree which I have posted here.  The design is very simple.  Two lines with whipped running stitch.  In between the lines chain stitch is done in a zig zag manner and for the sleeves herringbone stitch is used.  Then the star shape is done using the fly stitch.  That's all. 

 
A close up

Now the blouse along with sleeves.
 
 
Close up of the sleeves.
 

Hope all of you like it.  Waiting for your feedbacks.


Friday, January 27, 2012

Flower design for center


Flowers are outlined using stem stitch.  Fly stitch is used for filling red color flowers.  Buttonhole stitch is used for brown and pink color flowers.  Centre of each flower is embroidered using buttonhole stitch and interior part is satin stitch.  I have used this design as a center for my table cloth. 

Tuesday, December 13, 2011

Fly stitch and Button hole stitch in churidhar tops


This is the neck design of the tops.  I have used palistrina knot for the neck line. And used fly stitch inside the two lines.  Added cut beads for the bottom neck line. You can find the tutorials for the fly stitch and palistrina knot in the website www.embroidery.rocksea.org

This design I have taken from the blog http://sadalas.blogspot.com which she has given under the title kashmiri designs.  I have changed the design a bit for me to be comfortable.
The inspiration behind this work is Sara of www.embroidery.rocksea.org and Lakshmi of www.sadalas.blogspot.com.  Thanks to both of them though I didn't know them in person.

This  is the completed tops.


Close up of the design.


Tuesday, October 18, 2011

Embroidery, Herringbone and fly stitches

Herringbone and fly stitches I have tried Herringbone stitch and Fly stitch in my old churidhar tops.  Have a look.
*/