Hope all are doing well and good. Today I am happy to share with you an easy kutch work motif that can be used as a single motif or as a border when worked continuously. I have provided the complete video tutorial also. Do try and share your comments.
Video tutorial
Pattern for the design
----------------------------------
I have used 3 strands of thread throughout the design to embroider this motif. Here are some ways you can use this motif.
Hope you all like this design. See you soon with another interesting design. Till then, happy embroidering and have a nice day with your needle and thread.
If you love traditional embroidery, Kutch work is a beautiful style to explore! Known for its bold patterns and intricate stitches, it adds a rich, handmade charm to any outfit. In this post, I’ll share a simple and beginner-friendly Kutch work neck design perfect for your kurtis. Whether you’re just starting out or looking for an easy project to practice your skills, this video will help you create a stunning neckline with minimal effort. Let’s get stitching!
This design is "Stitched on black silk cotton fabric" gives a rich, elegant base — especially for embroidery or detailed needlework.
Stitches used
-----------------------
Kutch work - 3 strands
Stems - Split back stitch - 3 strands
Leaves - Fly stitch - 3 strands
Circles - Chain stitch with a half pearl bead glued inside
Neckline - Reverse chain stitch
The video tutorial is attached below for you to watch.
The pattern for this exquisite design is thoughtfully provided to inspire and guide your craftsmanship. Unlock your creativity with the included pattern and bring this beautiful design to life!
You can print this design in an A4 paper in landscape mode without any scaling.
I hope you enjoyed exploring this beginner-friendly Kutch work neck design for kurtis! With a little patience and practice, you can create beautiful, traditional patterns that add a touch of elegance to your outfits. Don’t forget — the pattern is provided to make your stitching journey even smoother. Happy stitching and keep creating magic with every thread!
Hope all are doing well and good. Today I am happy to share with an easy kutch work motif that can be used for sarees and kurtis. It makes a simple and neat centre design for cushion covers also.
Video Tutorial below
Pattern for the design
-----------------------
I used 3 strands of thread throughout the design. Hope you all like this design. See you soon with another design. Till then have a nice day with your needle and thread.
Today I am happy to share with you a simple kutch work round design. This design consists of the basic Kutch work motif fiver. Also running and herringbone stitches added more beauty to this design.
Video tutorial 👇👇👇
Pattern for the design
———————————
The design is stitched with 3 strands of thread throughout. I have used variegated thread or this pattern. This design can be used for cushion covers, yoke part of dresses and all over butti in sarees.
Hope you all like this design. See you with another design. Till then, have a nice day.
Hope all are doing well and good. Today I am happy to share with you another simple Kutch work design that can be used as borders. This can also be used in the yoke part of a kurti. You can also expand this design to make it as an overall design. Hope you like it.
Video Tutorial
Pattern for the design
——————————
I have used 6 strands of thread to embroider this design. You can use sequins or mirrors for the circle part.
I am hoping that this design will be useful. See you soon with another design. Till then have a nice day. Have a nice time with needle n thread.
Hope all are doing well and doing. Today I am happy to share with you a kutch work yoke design. It is worked on silk cotton fabric with 6 strands of anchor thread.
Hope all are doing well and good. Today I am happy to share with you an easy Kutch embroidery motif that can be used as an overall motif for your sarees or as a single motif for your Kurtis.
I have used two colours for this design for a change a dark and light shade of purple. And I have used 3 strands of thread throughout the design. Video tutorial is available below.
You can draw this pattern in a 8 lines per inch graph paper and trace the design onto the fabric using tracing paper.
Video Tutorial below
Hope you all like this design. Do give a try and drop in your feedback’s in the comments section.
I am preparing an ebook with all the Kutch work designs I have created for my projects and YouTube videos. Hoping to release it soon.
See you soon in my next design. Till then have a nice time with your needle n thread.
Hope all doing well and good. Today I am happy to share with you a simple and easy kurti neck design for this festive season. Also I am sharing the complete pattern both for neck and border. Come have a look.
Video tutorial
Kindly consider subscribing my YouTube channel
I have so this design on a black colour silk cotton fabric. Used 6 strands of anchor embroidery threads throughout the design.
Pattern for the design
——————————————
You can print this design in an A4 paper. Then place the pattern below a tracing paper and trace it into a complete design.
If you like this design please consider subscribing my YouTube channel. It will encourage me to create more designs and make it available for free here.
Hope you all like this design. See you soon with another design or stitch video. Till then, have a nice time with your needle n thread.
Hope al are doing well and good. Today I am happy to share with you a simple neck design that uses the technique of kutch work.
I have worked a small portion of the design. The full pattern has been provided for the back neck of the blouse. Soon the design for the sleeve portion and the front neck portion will be updated. You can also draw the sleeve and neck from the design provided now.
Video Tutorial
This design can be printed in A4 size paper without scaling. you can use it for your personal use. 6 strands of thread can be used for this design. For the neckline reverse chain stitch is used that too with 6 strands.
See you soon with another design or stitch video. Till then, have a happy time with your needle n thread.
Hope all are doing good. Today I am happy to share with you a simple and easy Kutch work motif that looks like snowflake. It can be used as a filler motif for your dresses. Hope you will like it.
Video Tutorial
Pattern for the design
——————————————
Use all 6 strands of thread to work this design. Hope you all like this design. See you with a stitch tutorial soon. Till then, have a nice time with your needle n thread.
Today I am happy to share with you a simple kutch work motif. It can be used as buttas all over the dress or if used continuously it makes a nice border to your dresses. Hope you all will like it.
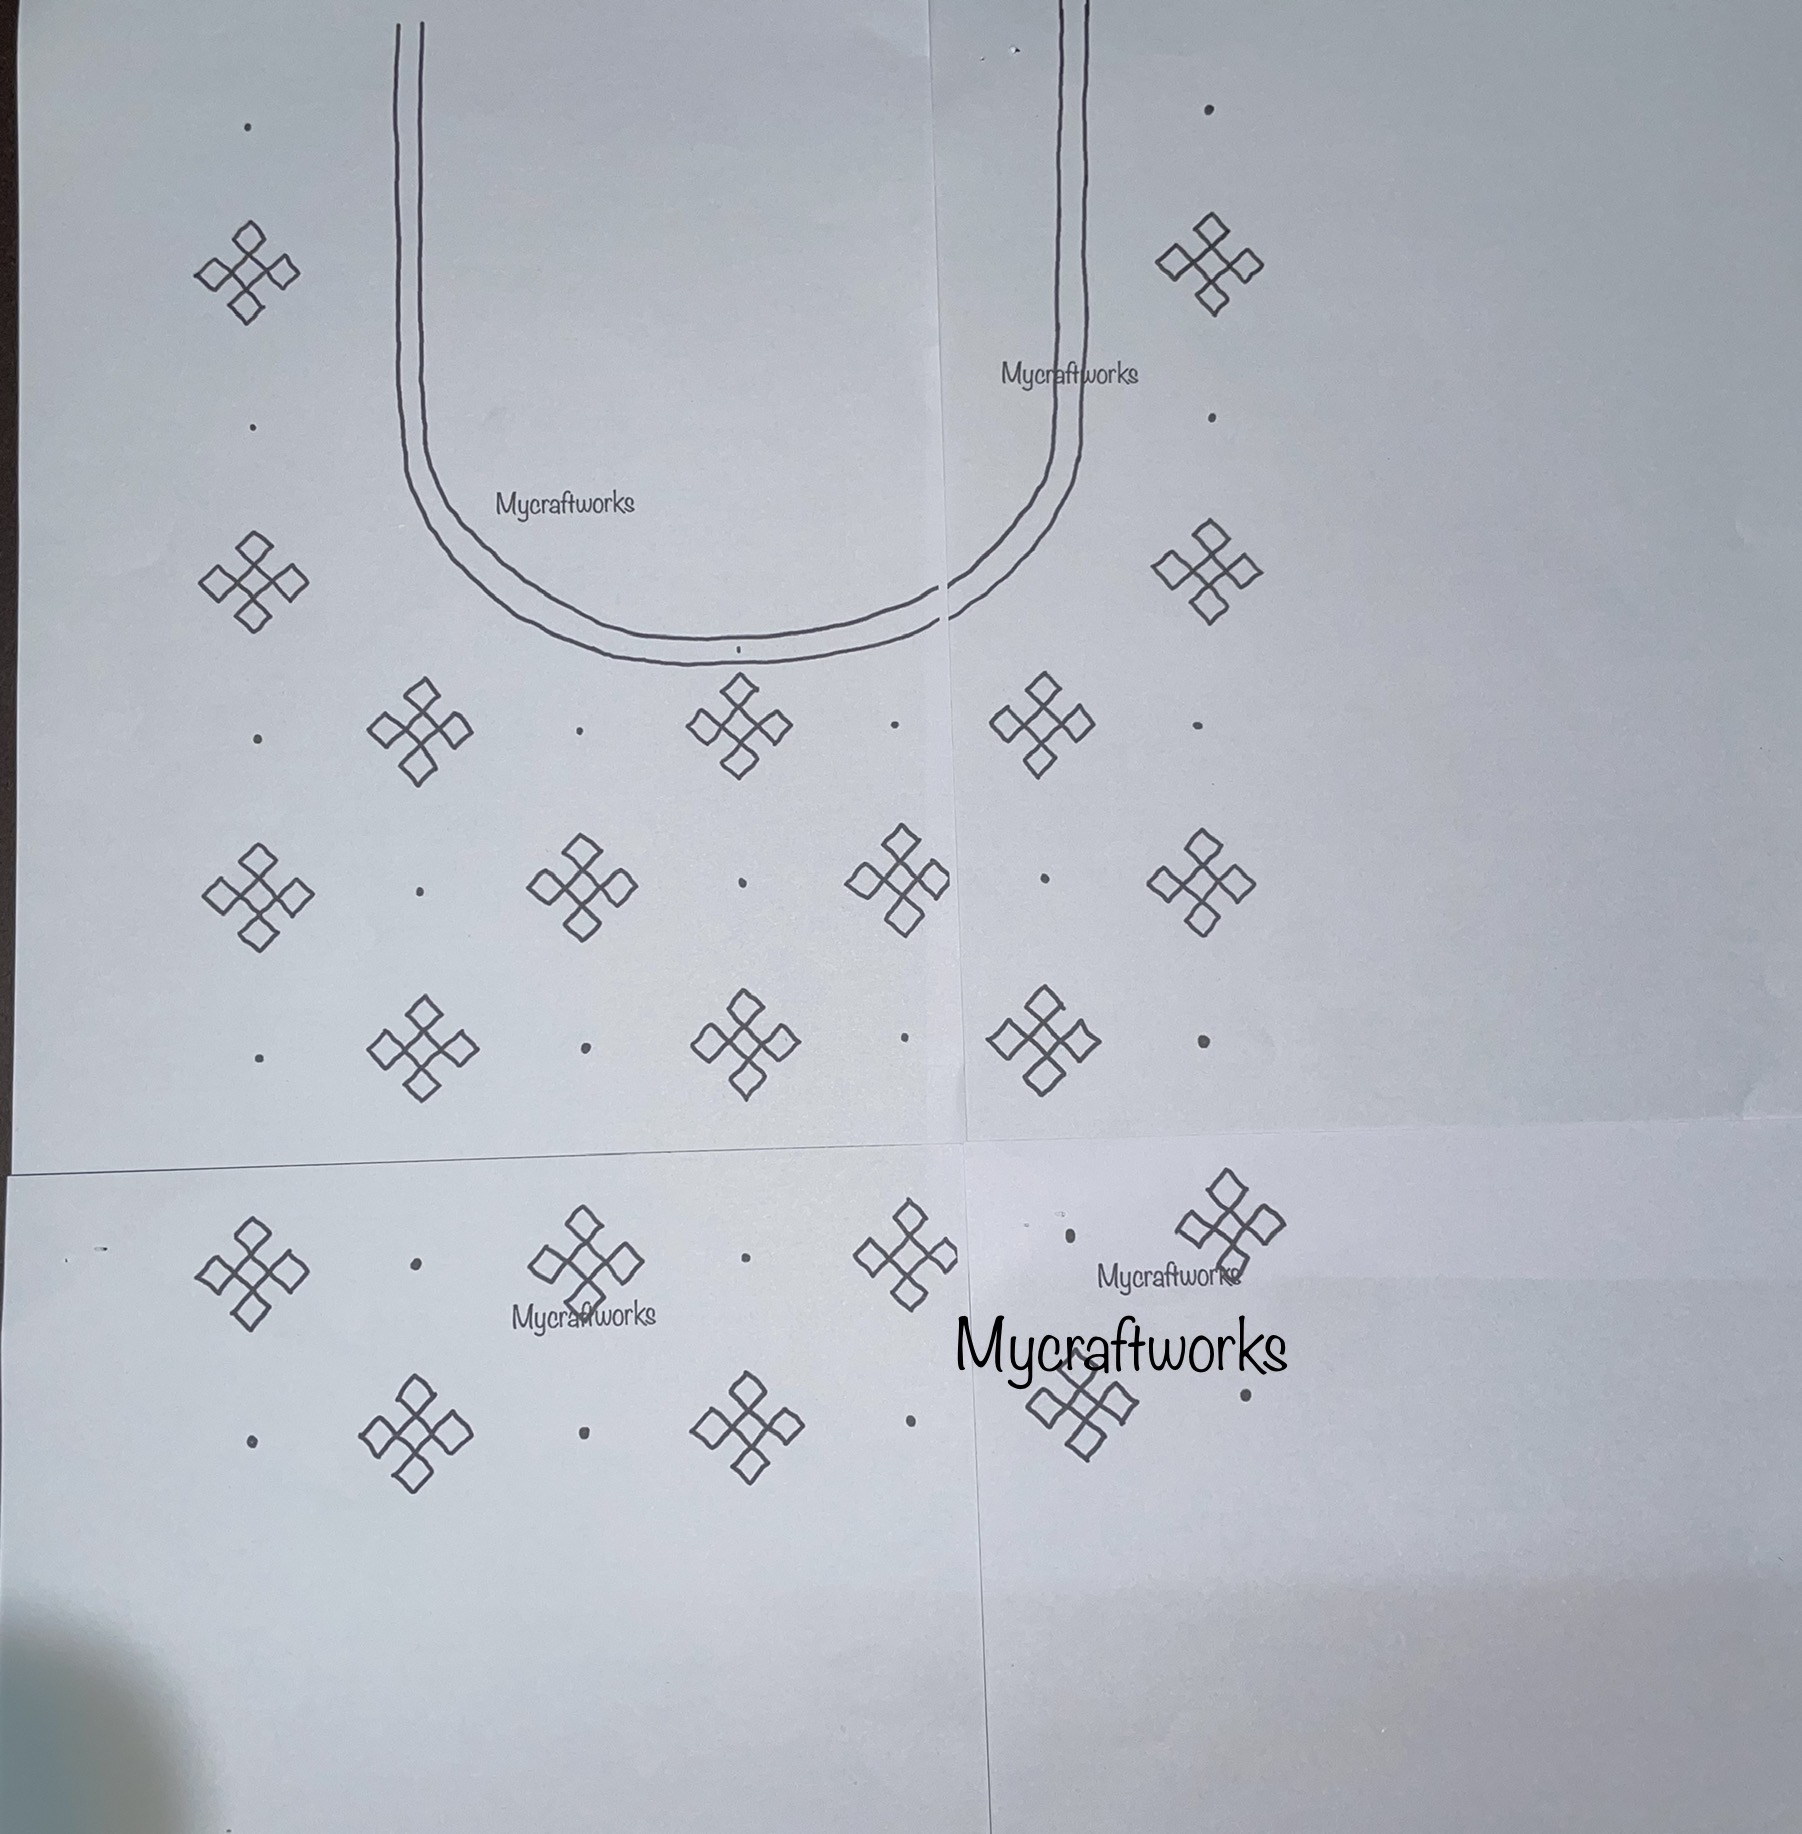
Hope all are doing well and good. Today I am going to share with you a simple neck design of kutch work that is suitable for beginners. Last year I had a plan to design necklines for beginners with patterns of both soft and hard copy. Though I have done many embroideries because of my youtube journey I was not able to design neck designs with patterns.
This year I have decided to execute that plan into action. And here is my first neck design. I am a lover of kutch work and those who love geometrical designs will surely love kutch work. With that in my I have designed this pattern so that beginners can also give a try. Over to the pattern.
This design has been done in silk cotton fabric with 6 strands of anchor cotton embroidery thread. Neckline is done using Arrowhead stitch and small kutch work motif fiver is scattered over the yoke portion.
I have made a video tutorial for working this design. You can view it below.
Pattern for the above design
-----------------------------------------
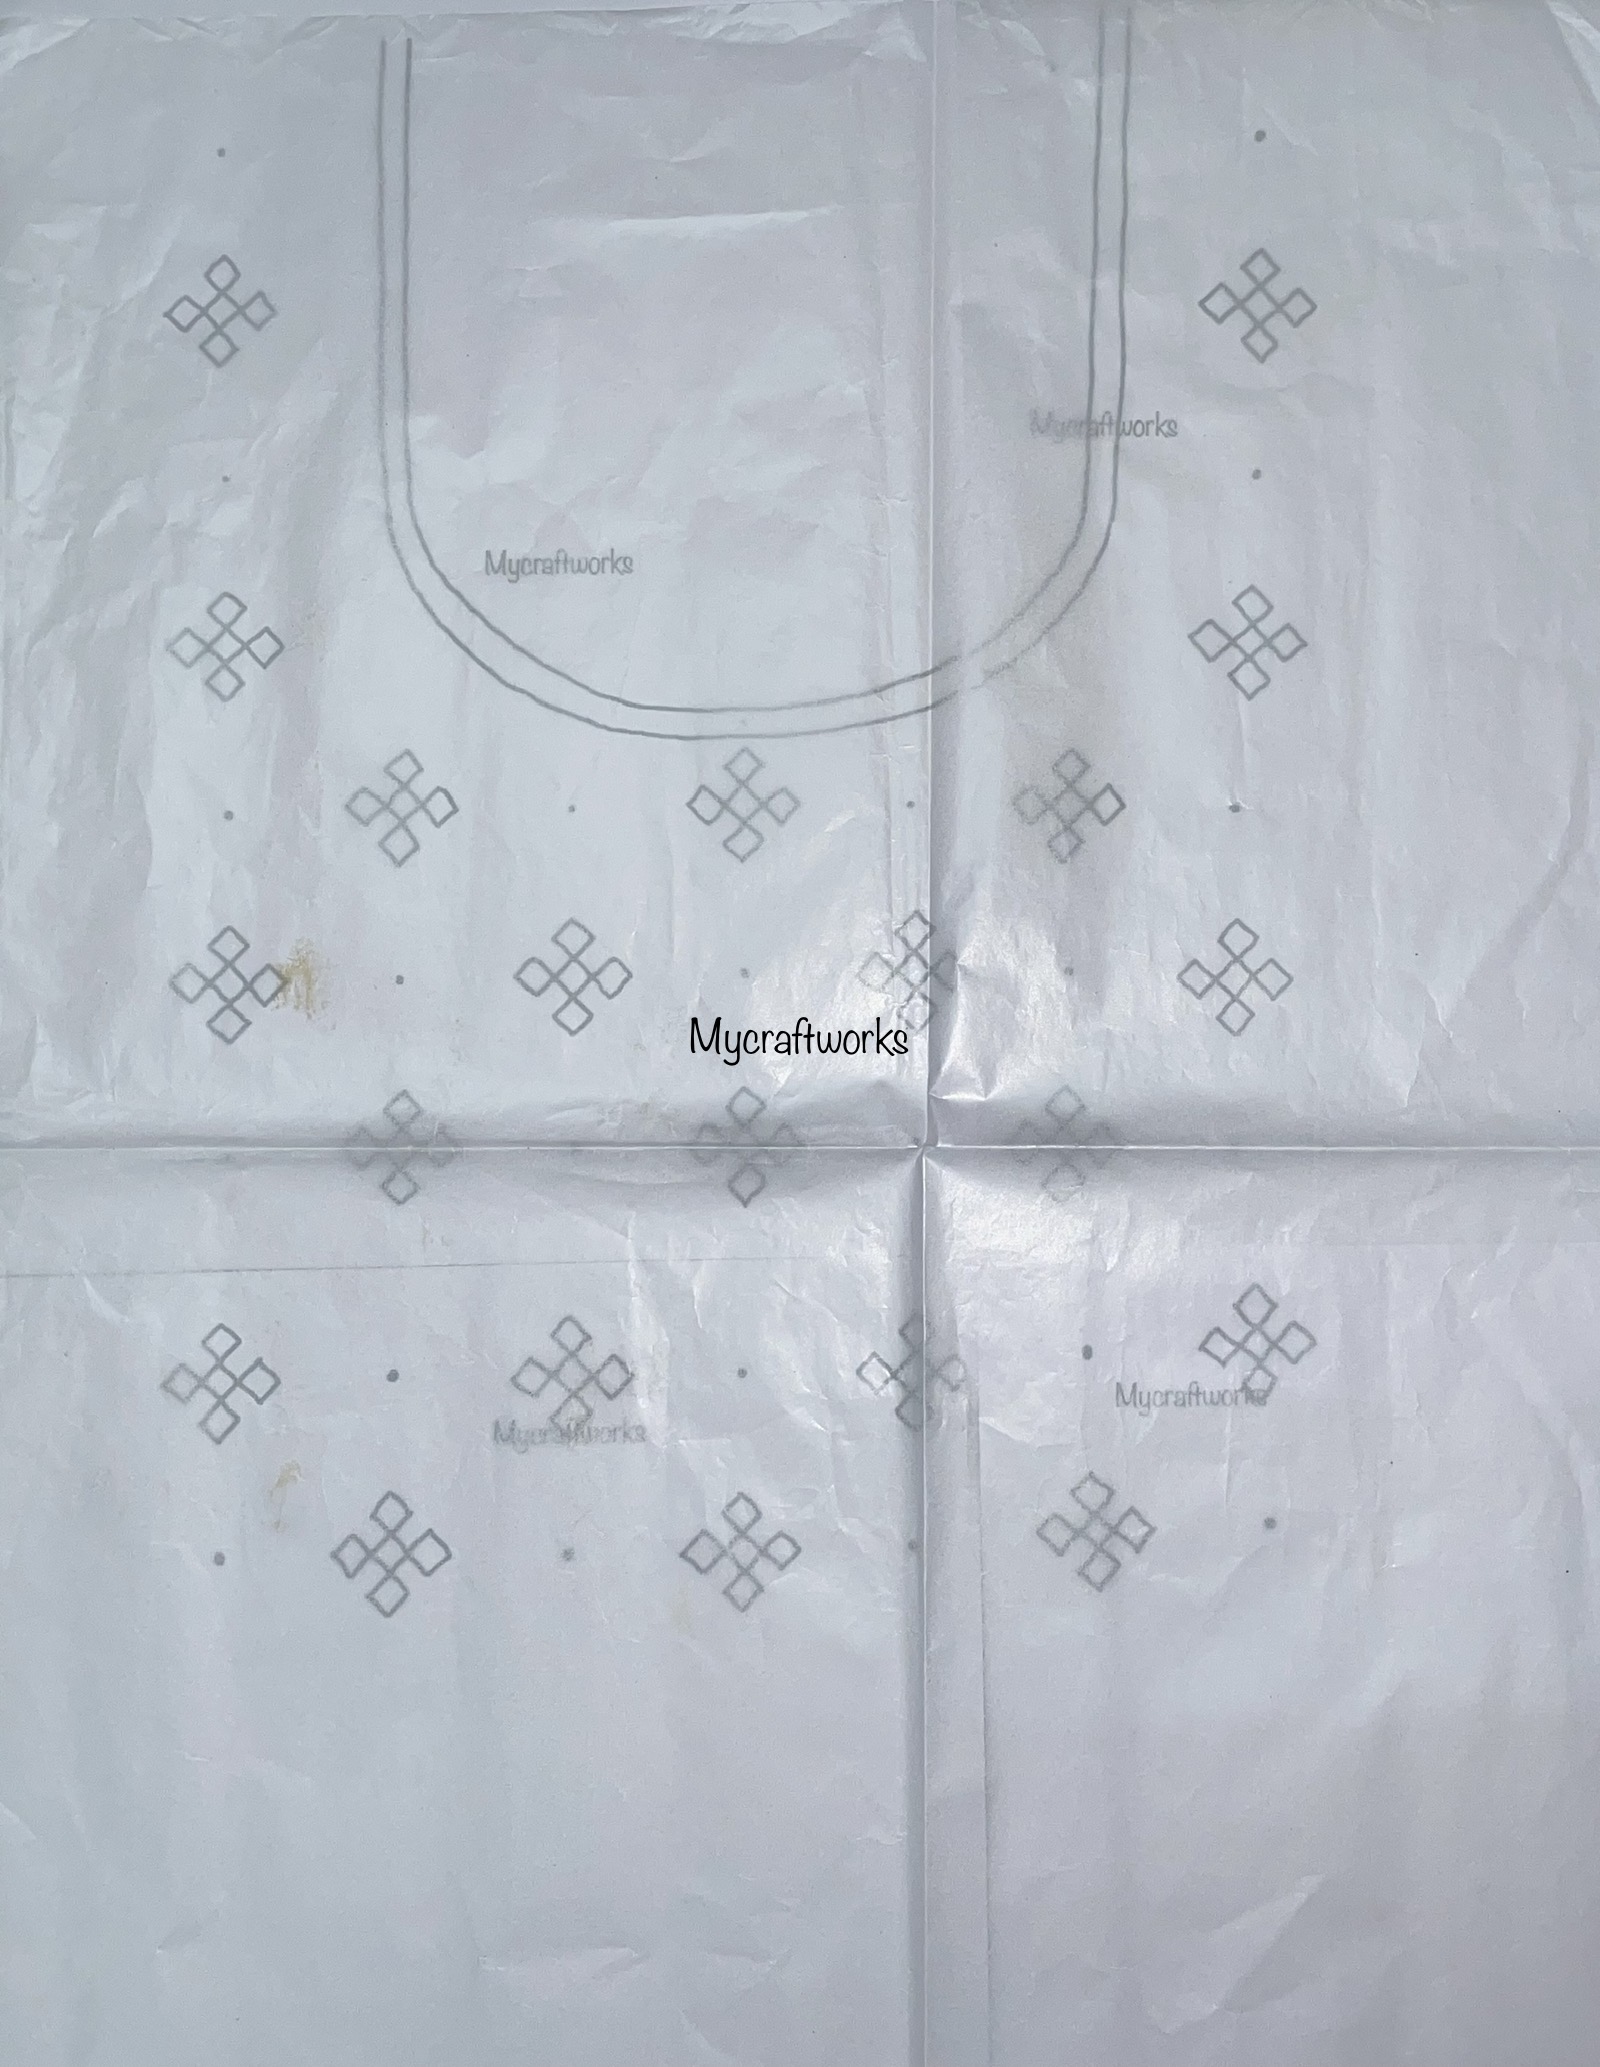
I have drawn the pattern in A4 paper so that you can download it and use it for your personal use. First download all the 4 parts, arrange it and with a tracing paper place over it you can make one full neck design. Then using carbon paper you can trace it in your fabric and start doing embroidery.
How to trace the pattern?
Place the four papers as shown. Place cello tapes to join two papers so that it doesn't move.
Now place a tracing paper over it and trace the pattern in one sheet.
Then use a carbon paper to transfer the design to the fabric. Soon I will post the tutorial to transfer the design using pin and prick method.
Hope all of you like this design. Do use it in your dresses and if you give a try do send me a picture to shamiimmanuel@gmail.com. I will be back with another stitch tutorial. Till then, have a nice day and happy embroidery.
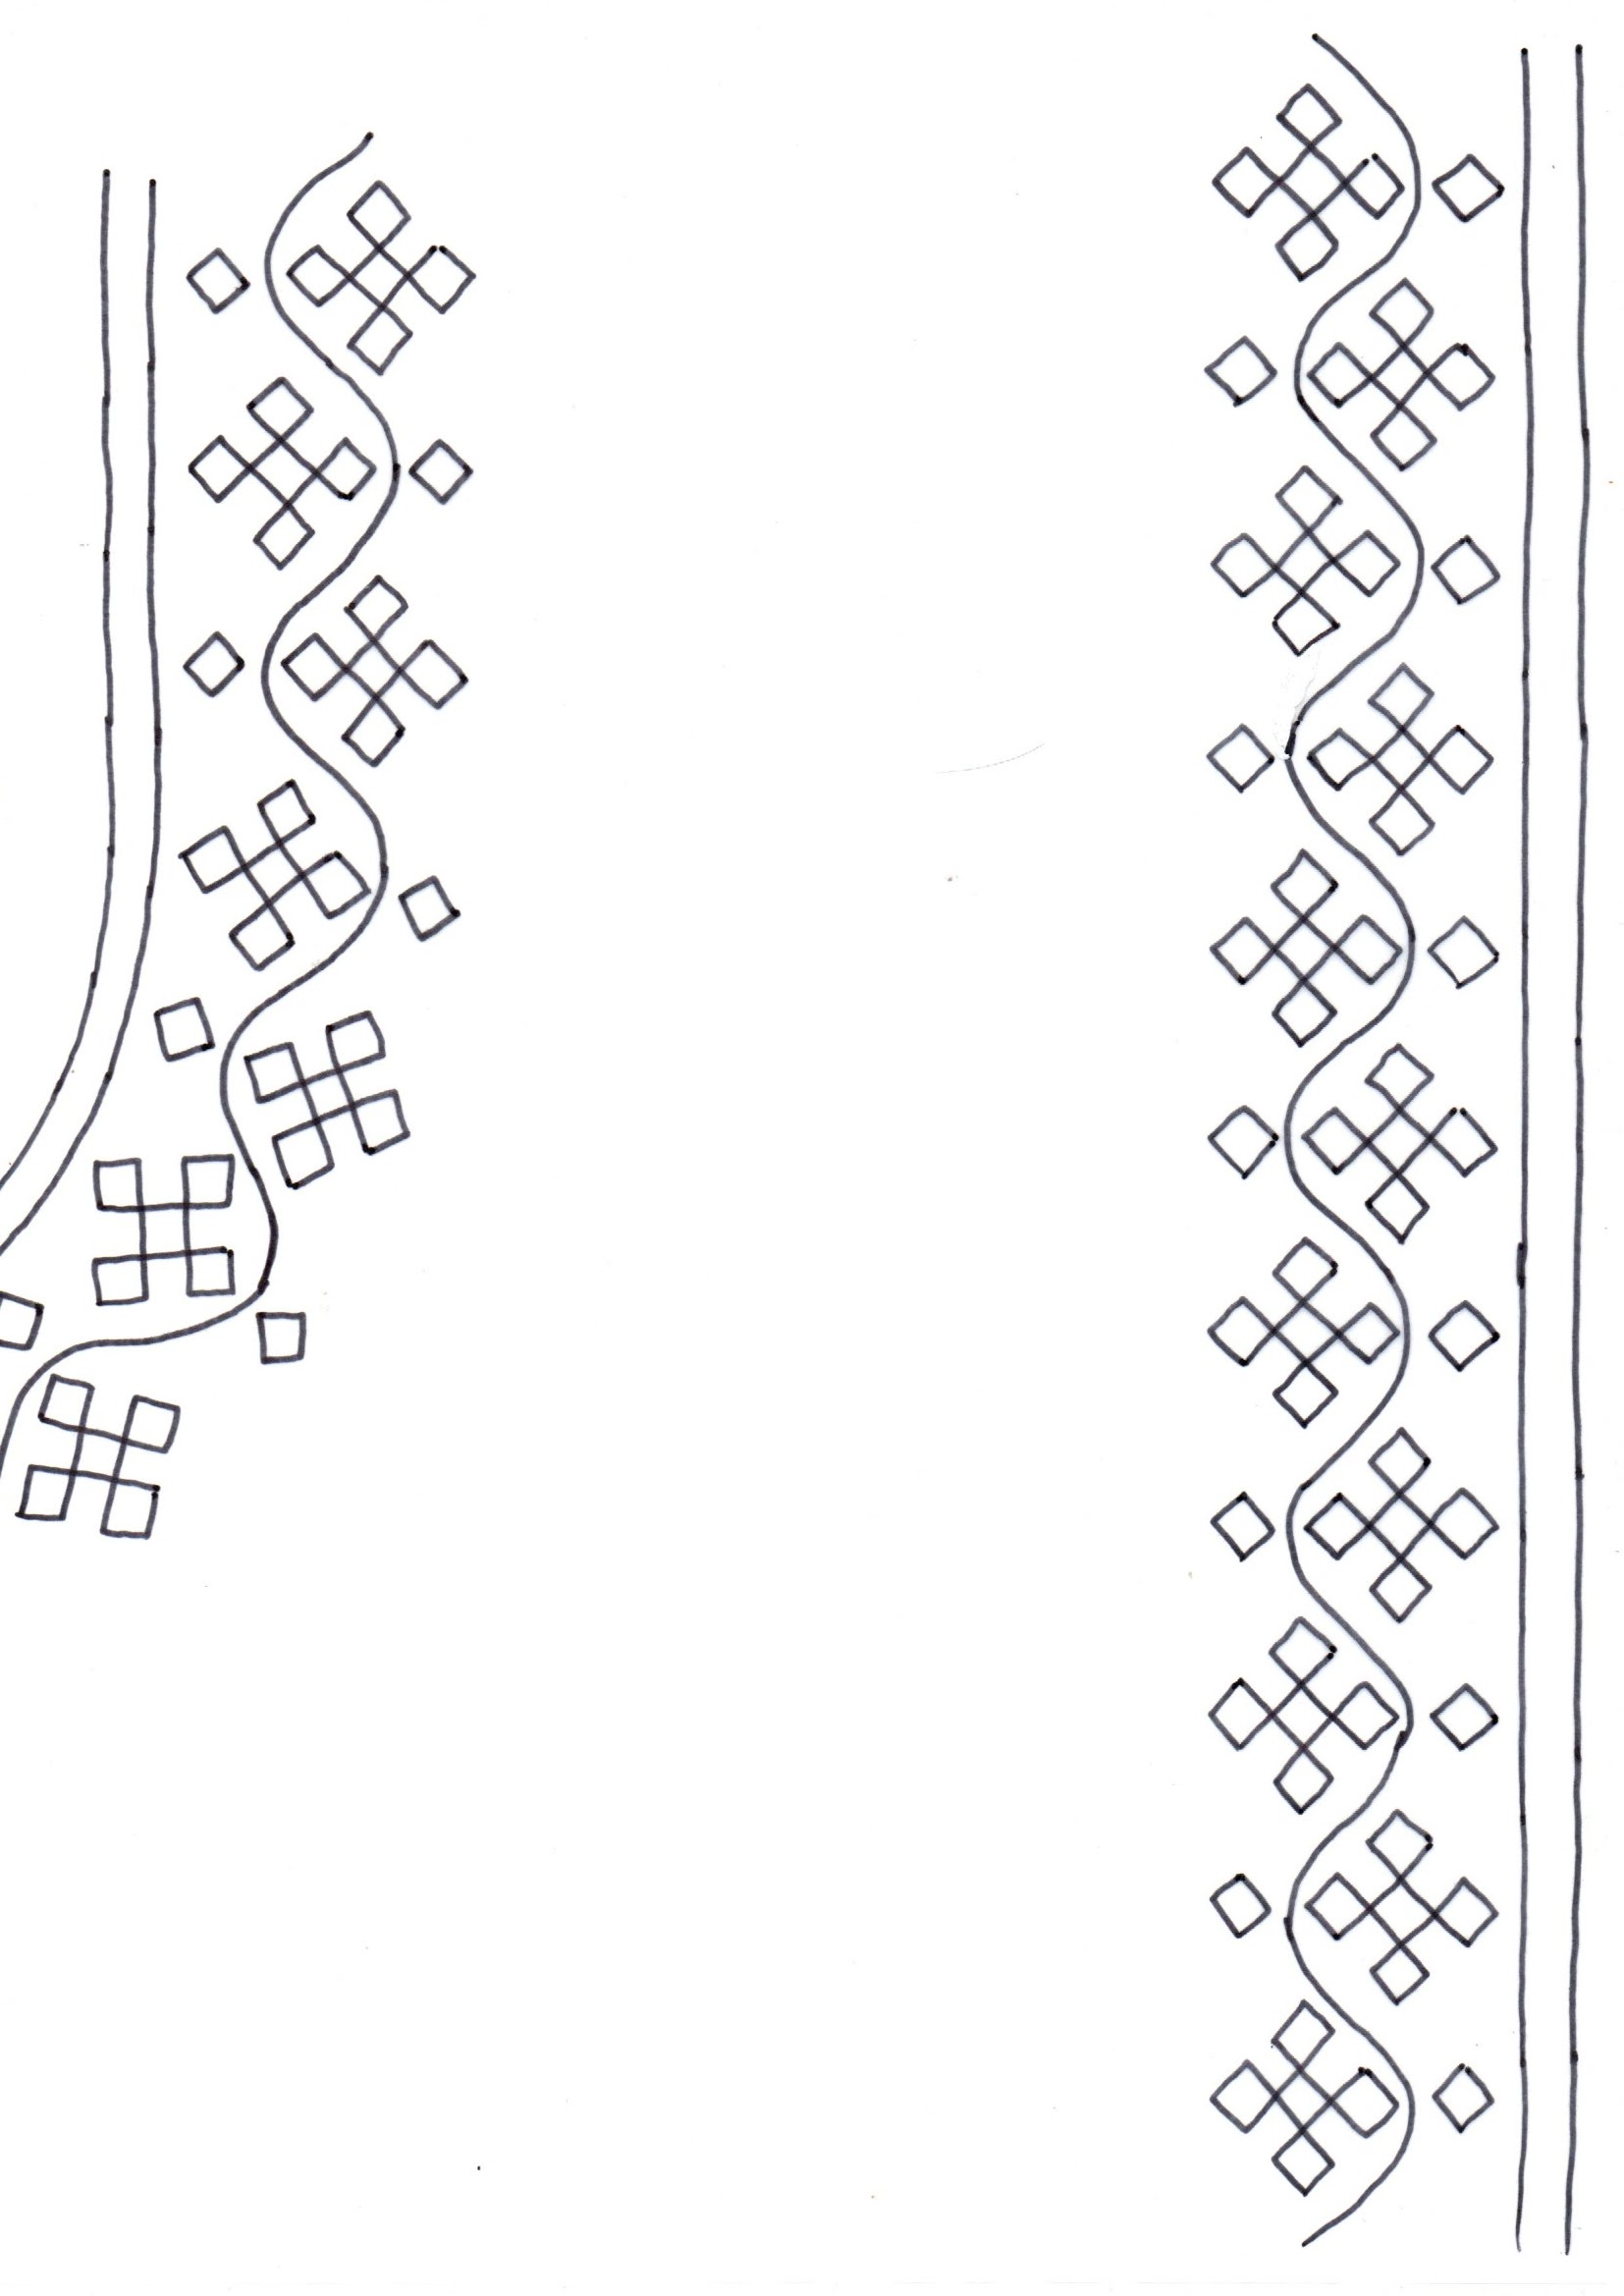
Hope all eare doing well and good. Already I have posted some basic tutorials for doing kutch embroidery. You can view it here. Today I am happy to share with you another border design that extends the basic shapes and motifs.
This design can be used as a border for kurtis and sarees. It can also be altered for doing necklines also. I am halfway in drawing this design for neckline. Once completed I will post it here.
I have not done the picture tutorial for this design. If you are new to kutch work kindly go through the part 1 tutorial. Video tutorial is also available there. Now let us move on to the design.
Video tutorial is below
Pattern for the above design
--------------------------------------------
Hope all of you like this design. Will be back with another stitch tutorial. Till then, have a nice day.
Hope all are doing well and staying safe. I have started a mirror embroidery series and completed three methods of doing mirror works. You can view them in the following links
Mirror embroidery can be done as a standalone work in dresses and it can also be embedded along with kutch work motifs that gives a rich, elegant and traditional look to the dresses. So today I have come up with one such kutch work motif along with a mirror in the centre.
This motif can be worked separately as a motif here and there and can also be worked continuosly as a border design in dresses. Let us have a look at the working of the motif. Usually kutch work is done in two steps: framing and interlacing. In both the steps if we start from one point the whole design will be covered in one go or continuously. There is no break of the design in between.
But this motif is a little different. Framing and interlacing both ends at one point and then again we have to start from another point to stitch the uncovered area. You can look at the following pictures to understand it. But the working of the motif is the same as all basic kutch works.
You can find the tutorial for the kutch works here.
For the kutch work I have used 3 strands of anchor thread and for the mirror work I used all the six strands.
In the above picture I have started the framing at black colour arrow point and finished the at the red arrow point. And you can see a portion of the traced lines are left unstitched. Usually in kutch works all these areas will be stitched. According to the design a portion is left unstitched. Now we have to start from another point and start framing. We have to be careful while going up and under the threads. For the second part I have started from the point where the needle comes up. After completing it will look like the one in the second picture.
Same will happen during interlacing also. It is done in two steps as shown below.
Instead of sequins you can also use mirror like the one in the picture below.
(This picture is an affiliate link. If you make any purchase through this link I will earn a small commission at no extra cost to you)
Now the elegant kutch work with mirror work is ready. You can use any silk cotton fabric to work kutch work which will even make the work more rich.
Hope you liked this design. I will be posting more on mirror work and kutch work. So stay tuned and kindly follow my blog using the button in the right side panel of this page.
This post has been linked to the following link parties:




.jpeg)
.jpeg)
.jpeg)
.jpeg)