Showing posts with label Hand embroidery designs. Show all posts

Wednesday, October 21, 2026

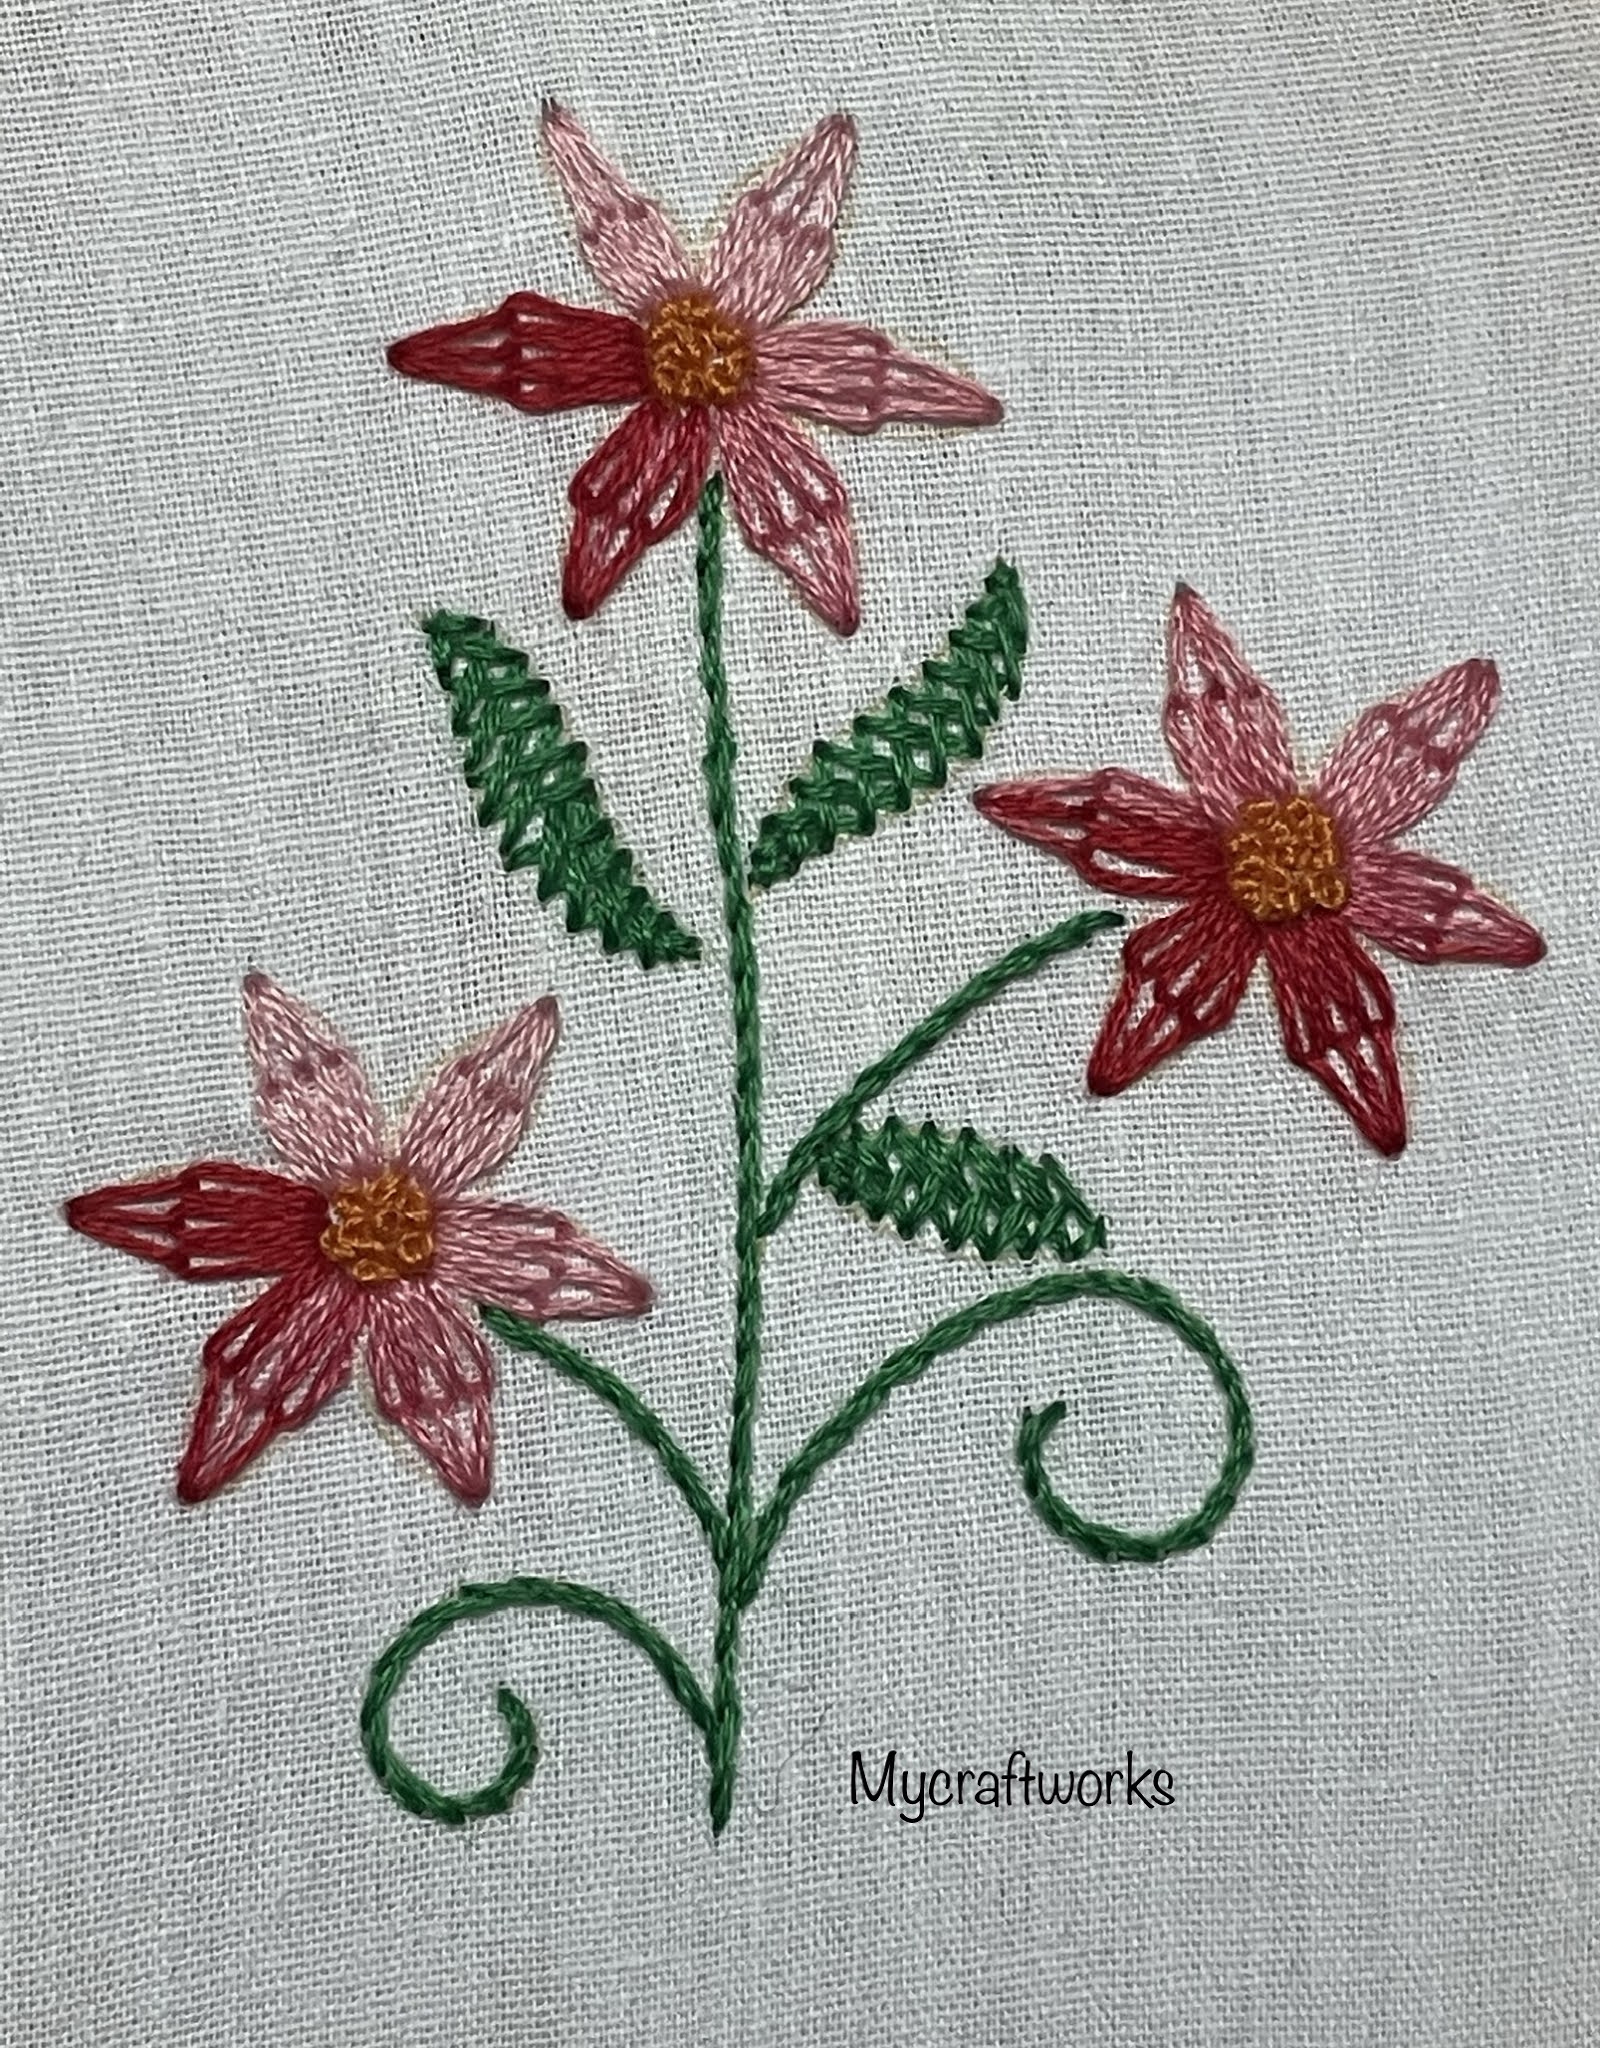
Easy Back stitch flower embroidery design for sarees. kurtis, pillow & cushion covers

 Hi friends,

A warm welcome to my blog. I hope you are all doing well.

Today, I’m sharing a simple embroidered flower design. I’ve used very easy stitches for this. It works well as a larger-scale design for sarees, or as a simple motif on the yoke of a kurti. It would also look lovely as a central design on pillow or cushion covers.


A video tutorial for creating this design is also available. You can watch the video to learn how the finer details of the design were executed. If you enjoy my videos, please don't forget to subscribe to my YouTube channel—it would really encourage me!


Pattern for the design
---------------------
Stitches used
Flowers - Back stitch - 6 strands
Inside each petal - Straight stitch - 6 strands
Centre of flower - Two rounds of back stitch - 6 strands
Within the two rounds of back stitch - French knot - 6 strands, 3 wraps
Big leaves - A variation of herringbone stitch - 6 strands
Curling tendrils - Split back stitch - 6 strands
Small leaf bunch - Fern stitch followed by back stitch - 6 strands
Small leaves in the bunch - Granitos stitch with 3 straight stitches - 6 strands
In the tip of fern stitches - Granitos stitch with 2 straight stitches - 6 strands

I hope everyone likes this design. I will see you in the next post with another new design.  Till then, have a nice time with your needle n thread.  

Monday, October 19, 2026

Easy blanket stitch flower embroidery for sarees and kurtis

 Hi all

Hope all are doing well and good.  

Whenever I think about creating a new embroidery design, it is only floral patterns that draw me in. Flowers are something that have always been attractive to me. 

 This time, I’ve come up with a simple floral design. It can be embroidered as individual, standalone motifs scattered across a saree.  If you create this design in a continuous, slanted pattern, you will get a neat and simple border design.


Video tutorial below 


Pattern for the design
-----------------------
This design fits a 11 x 7 cm box

I have used simple stitches and minimal colours for this design.  Beginners can do it easily.  

Stitches Used
Flowers - Buttonhole stitch starting from same point - 3 strands
Stems and curling tendrils - Reverse chain stitch - 3 strands
Leaves - Satin stitch - 6 strands
Added a half pearl bead in the centre of the flowers.  

I hope you all like this design. I will see you again with another Kutch work design.  Till then have a nice time with your needle and thread.

Saturday, August 23, 2025

Satin Stitch Flower Embroidery design for beginners

 Hi all 

Hope all are doing well and good.  Today I am happy to share with you an easy and simple flower embroidery design that features satin stitch.  


Video Tutorial

Stitches Used
-------------------
Big flower - Satin stitch 
Small flowers on top &middle - straight stitches
Small flower on bottom right - Granitos stitch
Leaves Big - Raised Herringbone stitch

Hope all of you like this design.  See you soon with an embroidered purse.  Till then have a happy time with your needle and thread.  

Wednesday, July 2, 2025

Kasuti Deer Border design for sarees and kurtis

 Hi all

Hope all are doing well and good.  Today I am sharing a kasuti embroidery deer design that can be used as borders for sarees and kurtis.  


Video Tutorial


Pattern for the design
------------------------------------

I have drawn this design in a 10 lines/inch graph paper and transferred it to the fabric using carbon paper.  Used 2 strands of thread throughout the design for embroidering.  

Hope all of you like this design.  See you soon with another finish.  Till then, have a nice day and have a happy time with your needle n thread.


Tuesday, August 27, 2024

Satin stitch flower embroidery design

 Hi all

Hope all are doing well and good.  Today I am happy to share with you an easy embroidery design with easy satin stitch flowers.  


Video Tutorial below

Pattern for the design
------------------------
Stitches Used
------------------------
Flowers - Satin stitch - 6 strands
Leaves - Eskimo Laced edging stitch - 3 strands
stems - stem stitch - 3 strands
Leaves - straight stitches - 3 strands
French knots - 6 strands, 1 wrap
Fern stitches with French knots for spray type leaves

Hope you all like this design.  See you soon with another design.  Till then, have a happy time with your needle and thread.  


Wednesday, September 27, 2023

Floral Kutch work design

 Hi all

Hope all are doing well and good.  Today I am happy to share with you a simple floral kutch work design. You can use this as a design all over the saree and kurti.


Video Tutorial below


Pattern for the design
----------------------
Stitches used
Flowers - Kutch work - 6 strands
Stem - Chain stitch - 3 strands
Leaves - Ray stitch - 3 strands
Dots - French Knots - 6 strands, 1 wrap

Hope you all like this design.  See you soon with another design in my next post.  Till then, have a happy time with your needle n thread.

Friday, September 1, 2023

Kutch work motif for beginners

 Today I am happy to share with you a simple kutch work motif for beginners.  


Video tutorial 

Pattern for the design 
——————————
Hope you all like this design.  Do try it and let me know the feedback in the comments section.

Thank you & have a nice day.


Simple Kutch work motif

 Today I am happy to share with you a simple kutch work motif.  It can be used as buttas all over the dress or if used continuously it makes a nice border to your dresses.  Hope you all will like it.


Video Tutorial 

Pattern for the design 
——————————-----
6 Strands of thread is used for this design.  In the centre you can add a bead or a stone for further embellishment.  

See you with another design.  Till then, have a happy time with your needle and thread.

Monday, December 20, 2021

Long Tailed Daisy Flower - Video Tutorial

 Hi all

Hope all are doing well and staying safe.  Today I am happy to share with you the video tutorial for a simple embroidery flower that has been done using long tailed daisy stitch.  Already I have posted a design to work this flower.  

Pattern for the design

Picture Tutorial

I have recorded the video for the same design and you can view it below.


This design can be used an all over embroidery design for kurtis and sarees.  Also it can be altered to form borders and necklines.  It is a simple and easy design even a beginner can also give a try.  So do give a try.  Drop in your feedbacks in the comments section.  

I will be back with another embroidery stitch tutorial in my next post.  Till then have a nice day and  have a great week. 

Sunday, August 29, 2021

Woven detached chain stitch - Embroidery Design

 Hi all

Hope all are doing well and good.  A day back I have posted the tutorial for doing woven detached chain stitch.  Today I am posting a design to practise that stitch.  This design is well suited for kurtis and sarees.


Here is the video tutorial for working this design


Pattern for the design
---------------------------------

Stitches used
----------------------
Flowers - Woven Detached Chain stitch
Stems - Stem stitch
Leaves - Detached chain stitch(Lazy daisy stitch)
Centre of flowers - French Knots
Circles - Satin stitch

Anchor embroidery threads
----------------------------------------
Variegated Red- 1203 (6 strands)
Green - 257 ( 3 strands for stems,
                       6 strands for leaves)
Yellow - 298 (6 strands)
Orange - 332 (6 strands)

I have included the pattern, the stitch details and thread numbers in the following picture.  You can print it for your reference or if you need only the pattern you can print the above design.  The original pattern is 12.5 cm in height and 7.5 cm in width.  If you scale down the picture the number of strands can also be reduced.  


Kindly Subscribe my youtube channel.  

Hope all of you like this design.  I will back soon with another finish.  Till then have a nice day.  

Tuesday, July 27, 2021

Embroidery Design - Wheatear Stitch

 Hi all

Hope all are doing well and good.  Yesterday I have shared the tutorial for doing the wheatear stitch.   Today I have posted a simple design to practice the same.  


Pattern for the design
-----------------------------

I have used two shades of green for the stalks. Start with a straight stitch for the tip.  Then proceed with the wheatear stitches till the 'v' shapes are drawn and the remaining part of the stalks are stitched with back stitch.  I have used 4 strands of threads to do the wheatear and back stitch.

After completing the wheatear stitch I have added french knots in red and yellow at the tip of the wheat ears.  I have used 6 strands of thread with 1 wrap.   This is just a simple design to practice wheatear stitch.  

Hope all of you like it.  Tomorrow I will be back with a finished crochet square.  Till then, have a nice day.  

For the other embroidery designs click here.  
                               For the picture dictionary of the designs click here.                                         

This post has been linked to

Friday, July 16, 2021

Embroidery Design - Double Cast on Stitch

 Hi all

Hope all are doing great.  Two days back I have posted the tutorial for doing Double Cast on Stitch.  Today I am happy to share with you a design to practice that stitch.  

For this design I have used pearl cotton threads.  This is the first time I am using pearl cotton thread for doing surface embroidery.  First let us see the stitched design.


Pattern for the design
------------------------------
The leaves of this design are stitched using fishbone stitch.   First I have stitched the leaves and then moved on to stitch the flowers.  

While stitching the flowers I have first made the double cast on stitch along the lines and then stitched another inbetween  the lines.  Then stitched french knots with 1 wrap inside the centre of the flowers.  For the flowers and french knots I have used two strands of pearl cotton thread, for leaves one strand of thread is used.  

For other stitch tutorials and designs click here. Tomorrow I will be back with a crochet mandala I have crocheted for my online store.   Till then have a nice day.  

Saturday, July 3, 2021

Berry stitch embroidery design for beginners

 Hi all

Hope all are staying safe and doing good.  I am here to share with you an easy pattern for practicing the berry stitch.  You can view another design using the same stitch here.  


Pattern for the above design
---------------------------------------

--------------------------------------------------------
Big flowers - 925(Orange), 29(Pink)  - 3 strands 
Small flowers - 290 (Yellow) - 3 strands
Stems and leaves - 237 (Green) - 3 strands

Stitches Used 
------------------
Big flowers - Berry Stitch
Small flowers - Lazy Daisy Stitch
Stem - Stem stitch
Leaves - Lazy Daisy Stitch

Hope all of you like this design.  Have a happy weekend.  

Thursday, July 1, 2021

Rainbow Berries

 Hi all 

Hope all are staying safe and doing good.  Whenever I start to do an embroidery project I always get confused in choosing the colours.  Sometime the colour choices will work out, but most of the times my colours choices are not that much appealing.  For example you can see this cross stitch project.  After finishing I will regret for choosing those colours.  So always I refer the pins I have save in my pinterest board .  Have a look at the boards.  You can see amazing colour combinations saved from different webpages.

I love to see the rainbow and the colours of the rainbow always amazes me.  Different projects made using rainbow colors mesmerizes me and whenever I see such projects,  I always wanted to try one using rainbow colors.  And that's why this design came into existence.  


I have named it as rainbow berries because I have used the berry stitch in rainbow colours.  I will post the tutorial for berry stitch tomorrow.  Berry stitch is nothing but layered lazy daisy stitch.  Two layers of lazy daisy stitch has been done through out.  Instead of berry stitch, granitos stitch can also be used.  

Anchor thread numbers - 4 strands 
Red - 47
orange - 316
Yellow - 298
Green - 256
Blue - 140
Indigo - 155
Violet - 100

Hope all of you like this pattern.  Tomorrow I will be back with the tutorial for berry stitch and a design to practice that stitch.  Till then, have a nice day.

Friday, June 25, 2021

Easy embroidery pattern for beginners - Long tailed Daisy

Hi all 

Today I am happy to share with you another easy embroidery design for beginners.  In my last post I have posted the step by step tutorial for doing the long tailed daisy stitch.   Today's design is to practice that stitch.  This design can be used as all over motifs for sarees, cushions, kurtis etc.  


Pattern for the design
----------------------------------
Stitches used
Centre of flowers - French Knots
Stems - Stem stitch
Leaf - Herringbone stitch

Anchor Thread numbers
Flowers - 1203(3 strands)
French knots - 308(3 strands, 1 wrap)
Leaves and stem - 230(3 strands)

Hope all of you like this tutorial.  Tomorrow I will be back with the embroidery books I own.  Till then have a nice day.

Saturday, June 5, 2021

Embroidery Design - Spider web Stitch

 Hi all

Hope all are staying safe.  In the embroidery design series, today is spider web stitch.   You can find the tutorial for spider web stitch here.   This stitch is easy with straight stitches and whipping up the straight stitches.  

The design is for a 5" embroidery hoop with the word HOPE.  


The pattern for the design
---------------------------------


Stitches Used
-----------------------
Flowers - Spider web Stitch
Leaves - Straight stitches
Stem - Fly Stitch
Letters - Back Stitch

Anchor embroidery threads
------------------------------------------
Flowers - 288, 289, 291 (6 strands)
Leaves - 245 ( 3 strands)
Stems - 257 (3 strands)
Letter - 257 ( 3 strands)

For other embroidery stitches click here. 

Hope all of you like this design.  Feel free to drop in your feedbacks in the comments section.  

Monday, April 26, 2021

Embroidery Design - Herringbone stitch

 Hi all 

Hope all are doing well and good.  In my embroidery stitch design series today I am happy to share with you a simple design that can be used to practice herringbone stitch.  Already I have posted a design for the same.  You can view it here.

This design can be used for dresses and it is suitable for a centre design or a round design.  Now let's move on to the design.


Pattern for the design
--------------------------------

For both the flowers and leaves I have used herringbone stitch and centre of flower is satin stitch. 3 strands of anchor threads are used . 

Thread numbers
Flower - 65 
Set of 5 leaves - 239
Set of 3 leaves - 237
Centre of flower - 298

Tomorrow I will post the tutorial for doing the herringbone stitch.  Till then, have a nice time with needle and thread. 

Saturday, April 10, 2021

Kutch work design 3

 Hi all

Hope all are enjoying the weekend.  Today I am happy to share with you a kutch embroidery design using a simple kutch motif.  In my last kutch work post  I have shared with you that I will be sharing the tutorial for doing the kutch motif.  It is ready and it will be available here on Monday. With that same simple motif I have come up with a flower pattern along with stem stitch stems and lazy daisy leaves.  

Kutch work design 1

Kutch work design 2

This can be used as separate motifs for dresses or expand it to form a border.  With the same kutch motif I have drawn a pattern for a kurti neck and I am working on it.   Now on to the design.


For the kutch motif I have used 3 strands of anchor thread number 56 and for stems and leaves I have used 3 strands of anchor thread number 255.

Video tutorial for working this kutch motif


Pattern for the design
---------------------------------
For those who are new to kutch embroidery start learning from the following links.  For basic kutch work tutorials refer the links given below.


To see more kutch works click here.

Hope all of you like this design.  Will be back with the tutorial for this on Monday.  Till then have a nice weekend.

Updated:
---------
I am linking this post to craftastic Monday.

Wednesday, April 7, 2021

Embroidery flower design using ring knots

 Hi all

Hope all are doing well. Yesterday and day before yesterday I have posted the tutorial for doing ring knot and a design to practice it with only one round.  Today I am happy to share with you another design that uses two round of Ring knots.  Yesterday in the tutorial itself I have shown the steps.    These two round ring knots works well for a flower where petals overlap one another.  You can work this flowers in bunches to make it more attractive.  Come let's see the design.  


This design works well as sprays for sarees and also in kurtis.  I have used 6 strands of anchor threads for the flowers.  Attached a golden colour bead in the center.  For stems I have used backstitch.  You can use stem stitch also.  Leaves are worked in straight stitches.  Then stitched the beads here and there.  I have stitches a similar design in a kurti neck using this ring knots.  You can view it here.


Pattern for the design.
-----------------------------------

The dotted pattern is zoomed below.

  • The black dot in the center is the place to attach the bead at last.  
  • Start from the outer black dots.  
  • Instead of working the ring knots in a circle first stitch in those places where these black dots are.  
  • Then stitch between the space between the two ring knots.  
  • The first round will be completed.  Now stitch on the purple dots in the middle.  
  • Take care the ring knot in this round comes between two stitches in the previous round and overlaps them halfway.  
Once again I will show the pictures that I have shown yesterday.


You can stitch more rounds to make a big flower.  You can mark dots like above and can work accordingly that can give neater look instead of working in a drawn circle.  

Hope all of you like this design and hope you understand the working of the flower also.  I will be happy if you drop down a comment in the comments section.  Do follow my blog or subscribe me through email so that you can get my blog posts in your reading list. 

Tomorrow I will be back with a zentangle frame design.  So do watch my space. 
*/