Thursday, September 30, 2021

Video Tutorial for Chemanthi Stitch

 Hi all

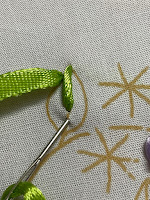
Hope all are doing good.  In my last post I have posted the picture tutorial for doing chemanthi stitch.  Here I am posting the video tutorial for doing the same.  Do have a look at the video.  In future I will come up with the variations of the chemanthi stitch.  


If you are interested in seeing embroidery and art related videos kindly subscribe to my channel and share it with your friends.  

See you soon with another interesting post.  Have a nice day. 

Chemanthi Stitch Flower - Embroidery stitch tutorial and Design

 Hi all

Hope all are doing well and good.  In my embroidery stitch tutorial series today I am happy to show you the steps to do chemanthi stitch flower.  


We will be working this flower in a round shape.  I am using three strands of variegated thread for doing the flower. 

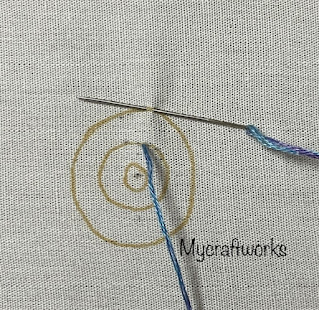
Start with a circle and draw circle inside as shown.  We will be working the points based on the three circle for every stitch.  
Come out at a point in the 2nd circle.


Now take a small stitch from right to left on the outer circle.  Pull through the thread.

The first stitch is formed

 
Now insert the needle in the centre circle and come out at a point next to the point in second circle. The thread should be under the needle. 

Pull through the thread.  
One complete chemanthi stitch is formed. 

Repeat the above steps by taking a small stitch to the right of the first stitch in the outer cirlce. 
Pull through the thread.
Insert the needle in the same point in centre of the inner circle or the point next to the previous in the inner circle and come out at the middle cirlce. 
Continue doing the same in the clockwise direction.

After completing 3/4th of the circle.

For the very last stitch take the stitch starting from the very first stitch and the last stitch done.


The last anchoring stitch should be done in the middle circle next to the working thread. 

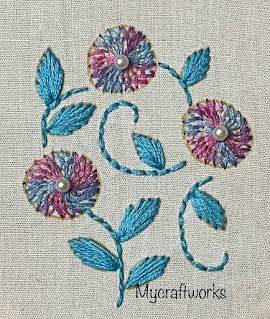
A Chemanthi stitch flower is formed. 

Pattern for the above design
------------------------------------------

Used chemathi stich for flowers, Back stitch for stems and simple straight stitches for the leaves.   I will upload the video tutorial in my next post.  Till then, have a nice day.
Tuesday, September 28, 2021

Mandalas after a long time | drawing a mandala and colouring

 Hi all 

Hope all are doing good.  Drawing and doodling is one of the ways to relax my mind.  This year I haven't drawn any mandalas.  So decided to make one.  First I have drawn one and coloured it.  Then then the next day I thought of making a video of drawing a mandala and have done the same design with some modifications.  I am so happy with the result.  

You can see my previous mandala here.  Two mandalas I have coloured from adult colouring books can be seen from here and here.

Tomorrow I will update this post with the video of drawing the second mandala. 

Updated: video tutorial 

Let's see the mandala one.


Before Colouring

Mandala Two
--------------------

I used Maped Duo colour peps for colouring,
(Amazon Affiliate links)

Hope all of you like this mandalas.  Will be back soon with another interesting post.  Till then, have a nice day.

Linking this post to 

Craftastic Monday 

Thursday, September 23, 2021

How to Embroider a Flower Bouquet ?

 Hi all

Hope all are doing well and good.  Today I am happy to share with you a simple flower boquet using the lazy daisy stitch.  Lazy daisy stitch always suits well for flowers.  Already I have posted a lazy daisy flower design

This design can used to embroider a kids dress and this is a beginner friendly design. Here is the another variation of lazy daisy flowers. 

Let's move on to the design. 


Here is the video tutorial

Pattern for the design
-----------------------------


Stitches Used
---------------------
Flowers - Lazy daisy with straight stitches inside each petal
Stem - Back stitch
Bow - Back stitch

Anchor threads used
---------------------------------
Lazy daisy stitch - 6857(6 strands)
Straight stitch - 50 (3 strands)
French knot - 6857 (6 strands, 1 wrap)
Stem - 256 (4 strands)
Bow - 6857 (6 strands)

Hope all of you like this design.  Will be back with another post soon.  Till then, have a nice day.

Linking this post to

Sunday, September 19, 2021

Diwali Embroidery Design - A reader's request

 Hi all

Hope all are doing good.  somedays back one of my reader and friend Raji asked me an embroidery design related to the festival Diwali.So I have tried this simple design for her. Used simple stitches in this design


Pattern for the design
---------------------------

Stitches used
----------------------
Flowers- Lazy daisy stitches with straight stitches inside.
Centre of flower - French Knot
Base of light - Back stitch
 Flame(tear drops) - Satin stitch
Letters - Back stitch

Anchor thread numbers 
----------------------------------
Lazy Daisy - 63 (6 strands)
Straight stitch - off white(6 strands)
French Knots - 63 ( 6 strands - 1 or 2 wraps)
Back stitch - 851 (3 strands)
Satin stitch - 291, 333 ( 3 strands)

Hope all of you like this design.  I am planning to finish this into a small wall hanging. If it works out I will be back with the tutorial for finishing this embroidered piece.  You can also finish this as a hoop art. 

Have a nice day.

Linking this post to 

Friday, September 17, 2021

Peach and White Frock | Crochet Frock for a 2 year old

 Hi all

Hope all are doing well and great.  I have crocheted a frock last month.  You can view it here.  After seeing the outcome I wanted to crochet more frocks and I have taken a bold decision to make a frock  using the measurements from a 2 year old's frock. I have decided to use the simple dc's and chain stitch.  To my surprise, the outcome is really good.  Over to the frock now.


After seeing so many charts and dresses, got an idea to crochet the yoke.  I have done it using only dc's. 

4 ply yarn

3.5mm crochet hook.

Pattern:

Ch 81.

Slip st in 1st chain to form a round.  Be careful not to twist the chain.  

Round 1:

Ch 2, dc in the first chain,
dc in each chain around.
Sl st to first dc leaving the ch-2.
- 80 dc's

Round 2:

Ch 2, dc in the first dc.
dc in the next 11 dc's
(dc, ch-2, dc) in the next dc
dc in the next 14 dc's
(dc, ch-2, dc) in the next dc
dc in next 24 dc's
(dc, ch-2, dc) in the next dc
dc in the next 14 dc's
(dc, ch-2, dc) in the next dc
dc in the next 12 dc's
Sl st into the first dc leaving ch-2.

Rnd 3 - 10:

Ch 2, dc in the first dc
dc in each dc till you reach the ch-2 space
(dc, ch-2, dc) in the ch-2 space
Fasten off.

Round 11:

(Ch 2,dc) or standing dc in the 18th dc from the beginning.
dc in the next 3 dc's
*(dc, ch-2, dc) in the next ch-2 space
dc in the next 32 dc's or till ch-2 space
(dc, ch-2, dc) in the next ch-2 space
dc in the next 4 dc's *
Skip 34 dc's
dc in the next 4 dc's
Rep from * to * once
Join with a slip stitch in the standing dc or first dc leaving ch-2. 

Round 12-13:

(Ch 2, dc)  in the first dc of previous round
dc in each st till ch-2 space
(dc, ch-2, dc) in the ch-2 space around
Join with a slip stitch in the first dc leaving the ch-2.

Round 14:

(ch 2, dc) in the first dc of previous round 
dc in each dc and ch-2 space around
Slip stitch to first dc leaving ch-2.
-107 dc's

Round 15 - 18:

(Ch 2, dc) in first st of previous round
dc around.
Join with Sl st in first dc leaving ch-2. 
-107 dc's in each round.

Round 16:

(Ch 2, dc, ch-1, 2 dc)  in first stitch
*skip 1 stitch
(2dc, ch-1, 2dc) in next stitch*
Repeat from * to *
Join with slip stitch to first dc.
Fasten off Peach colour.

Round 17 - 42:

Join White colour in ch-2 space
(2dc, ch-2, 2dc) in each ch-2 space around
Join with slip stitch to first dc. 
Fasten off White colour.

Round 43: 

Join Peach colour and Rep the previous round once.
Fasten off.

 Pattern for the flower

6 hdc's in magic ring. 
Join with sl st.
(sc, ch-4, sc) in each hdc around
Join with sl st to first sc. Fasten off.

Linking this post to 

Linky Ladies Party

Wonderful Wednesday

Wednesday Link Party

Thursday, September 16, 2021

Daisy flowers embroidery Design

 Hi all

Hope all are doing well and good.  In my last post I have shown how to embroider a lazy daisy flower in two colours.  Here I am sharing a design that can be used for dresses, cushion covers etc.  I have expanded the same design to form a medium size design.  

Let's see the design.


Video tutorial to work this design

Pattern for the design
------------------------------

Stitches used
---------------------
Flowers - two colour Lazy daisy
Centre of flowers - French knots
Leaves - Straight stitches 
Small buds - Granitos stitch

Anchor thread numbers
------------------------------
Flowers - 6857 (3 strands) for tip & 50 for petals ( 3 strands)
French knots - 6857( 6 strands, 2 wraps)
Small buds - 6857 (6 strands, 2 stitches)
Stems and leaves - 256(4 strands)

Hope all of you like this design.  Feel free to use this design for your personal use.  Will be back with a crochet finish.  Till then, have a nice day. 

This post has been linked to 

Daisy flower in two colours - Tutorial

 Hi all

 Hope all are doing well.  In the embroidery stitch tutorial series, today I am happy to share with you the simple lazy daisy flower stitch in two colours.  

I have worked a small sample design.  


Here is the video tutorial

Let's begin the tutorial.  

Trace the following pattern

First make straight stitch in the tip of each petals using a dark colour.

Pick the second colour and bring the needle up in the centre circle.  Insert it under the corresponding straight stitch without picking the fabric. 

Insert the needle again in the same place where it came out.

A single petal is completed.

Working through halfway.

Completed flower

You can attach a bead or embroidery french knots in the centre.

In my next post I will share with you a design that can be used in dresses and cushions.  Till then have a nice day.

Wednesday, September 15, 2021

Corner design - An update on my saree project

 Hi all

Hope all are doing well and good.  I have started to embroider a saree on July and I have blogged about it here.   I am using  the simple stitches like buttonhole, back stitch and lazy daisy stitches.  On that post I have shown a small motif that is going to be embroidered along the borders.  

I have extended the same design and form a corner design .  That is what I am showing it now.  I am using 3 strands of threads for all the stitches. 


I have extended the following pattern to form the corner design.

Hopefully I will be finishing this saree within next month.  Now I am in the phase of designing a simple neck  pattern using the above pattern for the blouse.  

Hope all of you like this design.  I will be back with  a crochet finish in my next post. 

Linking this post to 

Saturday, September 11, 2021

Ribbon Rose Embroidery

 Hi all 

Hope all are doing well and good.  Last year I have embroidered a kurti using satin ribbon.  I have used woven wheel stitch for embroidering the flowers and lazy daisy for the leaves. Here I have worked a small sample of the flowers and leaves.  

Today I am happy to share with you the tutorial for working the ribbon rose.  


Here is the video tutorial for this design. 

The number of spokes making the flower should be in odd number.  Use a big eyed needle while doing ribbon embroidery.  Work the spokes of the flower using the same embroidery thread with 3 strands colour as of the ribbon colour.  For the flowers I have used 1/2" satin ribbon and for the leaves and stem I have used 1/4" satin ribbon. 
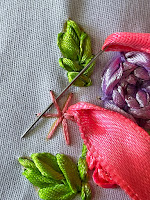
Bring the needle near the centre between any two spokes.  

Now weave in the ribbon up and down the spokes alternatively.  I hope the picture is clear.


Continue till the spokes are completely covered with the ribbon and anchor the ribbon as we do for embroidery threads. 

Working of the leaves using fishbone stitch.


After completing the flowers and the leaves.  Stem is done using back stitch.

Pattern for the design 
------------------------------

Added a pearl bead in the centre of the flowers.  

Linking to 
—————
*/